Underwater Spa LED Color-Changing Light - Installation and User's Guide IMPORTANT SAFETY INSTRUCTIONS READ AND FOLLOW ALL INSTRUCTIONS SAVE THESE ...
←
→
Transcripción del contenido de la página
Si su navegador no muestra la página correctamente, lea el contenido de la página a continuación
®

                       Underwater Spa
               LED Color-Changing Light

          Installation and User’s Guide

 IMPORTANT SAFETY INSTRUCTIONS
READ AND FOLLOW ALL INSTRUCTIONS
    SAVE THESE INSTRUCTIONS
Customer Service
    If you have questions about ordering Pentair replacement parts, and pool products,
    please use the following contact information.

    Customer Service and Technical Support (8 A.M. to 4:30 P.M. Eastern Time/Pacific Time)

         Phone: (800) 831-7133

         Fax: (800) 284-4151

Web site
         visit www.pentairpool.com or www.staritepool.com to find information about Pentair products

© 2009 Pentair Water Pool and Spa, Inc. All rights reserved.

This document is subject to change without notice.

1620 Hawkins Ave., Sanford, NC 27330 • (800) 831-7133) • (919) 566-8000
10951 West Los Angeles Ave., Moorpark, CA 93021 • (800) 831-7133 • (805) 553-5000
Trademarks and Disclaimers: IntelliBrite®, IntelliTouch®, EasyTouch®, SAm®, and Pentair Water Pool and Spa® are trademarks and/or registered
trademarks of Pentair Water Pool and Spa, Inc. and/or its affiliated companies in the United States and/or other counties. Unless noted, names and
brands of others that may be used in this document are not used to indicate an affiliation or endorsement between the proprietors of these names and
brands and Pentair Water Pool and Spa, Inc. Those names and brands may be the trademarks or registered trademarks of those parties or others.

P/N 650111 - Rev C - 08/21/09
i

                                                   Contents
IMPORTANT SAFETY PRECAUTIONS ........................................................................ii
IntelliBrite® Underwater Spa LED Color-Changing Light ................................................ 1
    IntelliBrite® Spa LED Light models ............................................................................ 1
    Using an External Isolating SafetyTransformer for IntelliBrite® 12 VAC Lights ........... 1
Operating the IntelliBrite® LED light using a wall switch ................................................. 1
    Selecting a light show mode or fixed color ................................................................ 1
    Saving a color mode or fixed color ............................................................................ 2
    Hold and Recall feature ............................................................................................ 2
    Powering on the light ................................................................................................. 2
    Troubleshooting......................................................................................................... 2
    Using an IntelliBrite® Controller (sold separately) instead of using a wall switch ............. 2
    Maximum wattage when using multiple lights with the IntelliBrite® Controller ........... 2
IntelliBrite® Spa light fixture Installation .......................................................................... 3
Installing the IntelliBrite® Spa light fixture (New Pool Construction) ................................ 3
Installing the IntelliBrite® Spa light after electrical requirements are met ........................ 3
Replacing the IntelliBrite® Spa light assembly in an existing spa ................................... 4
Before replacing the IntelliBrite® Spa light fixture ............................................................ 4
Replacing the IntelliBrite® Spa light fixture after electrical requirements are met ............ 5
Replacing the IntelliBrite® Spa light Assembly using a Replacement Kit........................ 6
Using an External Isolating Safety Transformer for Multiple IntelliBrite® 12 VAC Lights .. 9
IntelliBrite® Spa Light Replacement Kit Part Numbers .................................................. 10
ii

                             IMPORTANT SAFETY PRECAUTIONS

                Important Notice: Attention Installer: This manual contains important information about the
                installation, operation and safe use of this product. This information should be given to the owner and/
                or operator of this equipment.

          WARNING - Before installing the IntelliBrite® underwater spa LED light, read and follow all warning notices and
     instructions which are included. Failure to follow safety warnings and instructions can result in severe injury, death,
     or property damage. Call (800) 831-7133 for additional free copies of these instructions.

                                  DANGER! Risk of Electrical Shock or Electrocution!
             This underwater light must be installed by a licensed or certified electrician or a qualified pool serviceman
             in accordance with the National Electrical Code and all applicable local codes and ordinances. Improper
             installation will create an electrical hazard which could result in death or serious injury to pool users,
             installers or others due to electrical shock, and may also cause damage to property. Always disconnect
             the power to the pool light at the circuit breaker before servicing the light. Failure to do so could result
             in death or serious injury to serviceman, pool users or others due to electrical shock. READ AND
             FOLLOW ALL INSTRUCTIONS IN THIS MANUAL.

           WARNING Important Safety Information for Pentair Niche and Light Installation
                • All Niche and Light installations must conform with all codes. If local codes mandate a
                  cord seal, use Pentair Water Pool and Spa® plastic niches (P/N 79206600 and P/N 79206700).
                • Under no circumstances replace lights by splicing wire under water or behind niche.

           WARNING RISK OF ELECTRIC SHOCK AND INJURY.
           USE ONLY THE INSTALLATION METHOD SPECIFIED BELOW.

          Location of       Pentair Water Pool® and Spa Fountain Fixture*     Required Installation Method
          Luminaire Use     (P/N 560001 and P/N 560000)
          Swimming Pool     Wet-Niche Swimming Pool                           Fixture Housing (Forming Shell) ONLY.
          and Spa           (or Spa) Luminaire (Light)                        DO NOT USE Fountain Fixture Stand.
          Fountain          Wet-Niche Submersible Luminaire (Light) swimming Fixture Housing (Forming Shell) or
                            Pool (or Spa) Luminair (Light)                   Fountain Fixture Stand.

     (*) Note: Wet-niche luminaires complying with requirements for both uses may bare both the Listed Wet-Niche
     Submersible Luminaires UL Mark. A luminaire not bearing the corresponding UL Listing Mark is not considered by
     UL to have been produces under UL’s Listing and Follow-Up Service for the associated usage location.
         CAUTION - The Pentair Water Pool and Spa® IntelliBrite® LED light fixture must only be used with Pentair Water
     Pool and Spa® fixture housings (niches). If the IntelliBrite® LED light fixture is installed into other niches, the
     installation will not carry U.L. approval and will void all warranties.
         WARNING - Salt is an inherently corrosive material. While the levels of salt required for proper operation of an
     electronic chlorine generator are relatively low when compared to sea water and other salt solutions, placing any
     amount of salt in your pool increases the likelihood of corrosion or other deterioration of pool equipment and any
     surfaces used in and around your pool. Metal parts and certain natural and man-made surfaces are particularly
     susceptible to corrosion and deterioration when used in and around salt water pools. Pentair Water Pool and
     Spa, Inc. does not represent or otherwise guarantee that the proper use of an electronic chlorine generator will
     prevent corrosion or other deterioration of pool equipment and any surfaces used in and around your pool. Consult
     your experienced pool professional, who should be able to advise you on the proper material selection, installation
     techniques for those materials, and the proper use, care and maintenance of those materials for your specific pool
     type and location in order to minimize the corrosion and deterioration that is inherent in and around salt water pools.
1
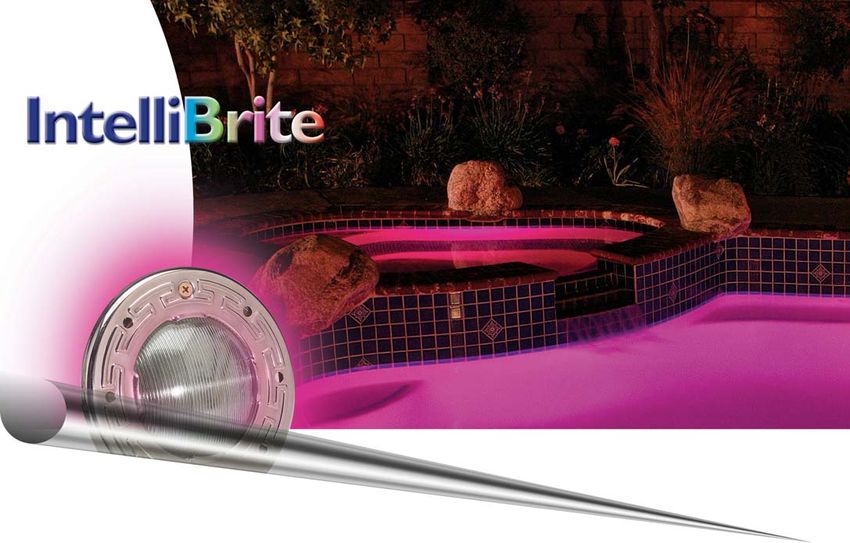
IntelliBrite® Underwater Spa LED Color-Changing Light
The IntelliBrite® underwater spa LED (light-emitting diode) light system gives you brilliant vivid multi-colors with spectacular
effects for your pool. The energy efficient colored LED array can cycle through colors at varying speeds and in different
sequences of color. The unique IntelliBrite® lens geometry provides a wider beam for greater underwater light reflection
providing increased light intensity. Choose one of the seven pre-programmed color light shows or select one of the five
fixed colors to create virtually endless range of dramatic underwater lighting effects.
IntelliBrite® LED lights are fully compatible with Pentair IntelliTouch® and EasyTouch® automation system. For more
information about using IntelliBrite® lights with IntelliTouch® and EasyTouch® automation systems, refer to the IntelliTouch®
User’s Guide (P/N 520102) and the EasyTouch® User’s Guide (P/N 520584).
IntelliBrite® Spa LED Light models
The two models of IntelliBrite® Spa LED light are:
IntelliBrite® Spa LED Light, 120 VAC, with integrated 12 VAC transformer, 50 ft. cord length* (P/N 640051)
IntelliBrite® Spa LED Light, 12 VAC, (requires a 12 VAC 60 Hz [50 Hz where applicable] isolating safety transformer),
50 ft. cord length* (P/N 640054) — (*) cord lengths vary from 30 ft. to 100 ft.
Using an External Isolating SafetyTransformer for IntelliBrite® 12 VAC Lights
For information about using multiple 12 VAC IntelliBrite® lights on an external isolating safety transformer, see page 9.
Operating the IntelliBrite® LED lights using a wall switch
IntelliBrite® LED lights can be controlled using a standard wall-mount light switch. Multiple IntelliBrite® LED lights can
be connected via a junction box to a single switch so that all lights can be switched on and off together. IntelliBrite® LED
lights are controlled by cycling AC power from a standard wall switch. By turning the switch on and off a specific number
of times, the light activates one of the seven light show modes, fixed colors, and enables the “Hold” and “Recall” feature.
Selecting a light show mode or fixed color
Switch power on to the light. A white light will momentarily illuminate, followed by the previously selected color. To select
a color show mode (1-7) or fixed color (8-12), turn the wall switch off/on a specific number of times. Each number (1-12)
shown below corresponds to the number of times to power-cycle the switch to activate a color light show or fixed color.
For details about saving color effects while in “show” modes, see “Hold” and “Recall” feature on page 2.
1. SAm® Mode: Cycles through white, magenta, blue and green colors (emulates the Pentair SAm® light).
2. Party Mode: Rapid color changing building energy and excitement.
3. Romance Mode: Slow color transitions creating a mesmerizing and calming effect.
4. Caribbean Mode: Transitions between a variety of blues and greens.
5. American Mode: Patriotic red, white and blue transition.
6. California Sunset Mode: Dramatic transitions of orange, red and magenta tones.
7. Royal Mode: Richer, deeper color tones.
8. Blue: Fixed color.
9. Green: Fixed color.
10. Red: Fixed color.
11. White: Fixed color.
12. Magenta: Fixed color.
13. Hold: Save the current color effect during a color light show.
14. Recall: Activate the last saved color effect.
Example: To select California Sunset Mode; turn the switch off and on six successive times.
▼ Turn Followed by the
During the off/on switching process, no
switch selected
▼
▼
illumination will occur, then a white
▼ Off/On “California
light will momentarily illuminate.
six times Sunset Mode”
WARNING During the off/on switching process, before the selected color is displayed, no illumination will
occur. This operating mode is normal during the switching process. During this period the pool and spa will be dark
and precautions should be taken to avoid unforeseen accidents. Failure to observe this warning may result in
serious injury or death to pool and spa users.
2

    Operating IntelliBrite® LED Lights using a wall switch                                                     (Continued)

Saving a color mode or fixed color
     When power is switched off to the IntelliBrite® lights, the last color show mode or fixed color will be saved. The next time
     the light is powered on, the previously saved color show mode or fixed color will be displayed. For example, while in “Party
     Mode” switch the light off. Wait more than 10 seconds, switch the light back on to resume “Party Mode.”
Hold and Recall feature
     Hold: Use the Hold feature (power-cycle 13 times) to capture and save a color effect while displaying one of the light
     show modes. It’s easier to capture custom color effects from one of the slower light show modes, such as “Romance
     Mode” (#3).
                                                                               On

                                                                              ▼

                                                                                                      ▼
                                                         ▼
                                                                               ▼
                                                                               Off

             Capture a unique color effect                   Turn switch off/on 13 times to                      Saved color effect
             while “Romance Mode” is active.                 save color effect.                                  is displayed.
     Recall: Use the Recall feature to activate the last saved color effect (using the Hold feature) while in color show mode or
     fixed colors.To recall the color effect, power-cycle 14 times, and after five seconds the last saved color effect will be displayed.

                                                                              On
                                                                             ▼
                                                         ▼

                                                                                                   ▼
                                                                               ▼
                                                                               Off

               While the light is on in color                Turn switch off/on 14 times to                      Saved color effect
               show or fixed mode.                           activate last save color effect.                    is displayed.

Powering on the light
     When the IntelliBrite LED light is powered on, a momentarily white light will illuminate, followed by the previously selected color.
     Note: If power to the light is off for more than five seconds, the last color show mode or fixed color that was saved will
     be displayed.
Troubleshooting
      Use the following tips to help to resolve problems that might occur while operating the LED light.

                        Problem                              Cause/Action

                        The light will not illuminate.       Check the ground fault wiring and reset if necessary.

                        Light does not function properly.    Check the light wiring connection to the junction box at the pool side
                                                             and to the AC power switch.

                                                             Be sure that there is proper AC power applied to the light.

Instead of using a wall switch, the IntelliBrite® LED spa light can be used with an IntelliBrite® Controller (sold separately)
     The IntelliBrite® Controller [P/N 600054] provides complete control of Pentair Water Pool and Spa® IntelliBrite® underwater LED
     (light-emitting diode) lights, and IntelliBrite LED landscape lights. It’s easy to select a lighting feature, just dial in any one of the
     pre-programmed color light shows or fixed colors. Using the Hold and Recall buttons you can also create endless unique lighting
     effects.
     The IntelliBrite® Controller can control individual or multiple IntelliBrite® LED lights. Multiple IntelliBrite® LED lights can be
     connected via a junction box to an IntelliBrite® Controller so that all lights can be switched on and off together.
Maximum wattage when using multiple lights with IntelliBrite® Controller
     When using multiple IntelliBrite® LED lights, the total allowable light wattage is 300 Watts maximum. The
     following example combination of IntelliBrite® LED lights can be connected to the IntelliBrite® Controller:
     • Two (2) IntelliBrite® LED pool lights (each light 70 Watt maximum)
     • One (1) IntelliBrite® LED spa light (each light 40 Watt maximum)
                                                                                                                              ▼

                                                                                                   IntelliBrite® Controller
     • Eight (8) IntelliBrite LED landscape lights (each light 15 Watt maximum)                         [P/N 600054]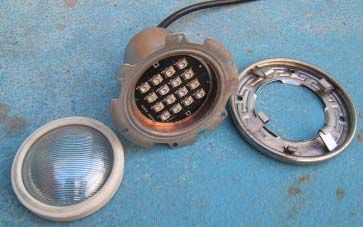
3

INTELLIBRITE® LED SPA LIGHT INSTALLATION
 The following describes how to install the IntelliBrite® spa light fixture. Read through pages 3 through 8 before starting
 the installation procedure.

Installing the IntelliBrite® LED Spa light fixture                            (new pool construction)

 BEFORE STARTING: The following steps (1-6) describe the tasks that must be completed by the electrician before the
 IntelliBrite® light fixture is installed. See Figure 1 diagram.
 Be sure that the pool meets the requirements of the current National Electrical Code (N.E.C.) Article 680-22 and all local
 codes and ordinances. A licensed or certified electrician must install the electrical system to meet or exceed those
 requirements before the underwater light is installed. Some of the requirements of the National Electrical Code which the
 pool’s electrical system must meet are as follows:
   • The lighting circuit has a Ground Fault Circuit Interrupter (GFCI) for line voltage models, and has an appropriately
     rated circuit breaker.
   • The Junction Box (or, for 12 volt models, the low voltage transformer) is located at least 8 inches above the
     maximum water level of the pool and at least 48 inches from the edge of the pool; see Figure 1.
   • The light fixture and all metal items within 5 feet of the pool are properly electrically bonded.
   • The wet niche is properly installed so that the top edge of the underwater light’s lens is at least 18 inches below
     the surface of the water in the pool/spa; see Figure 1. (Not more than 20" depth in Canada.)
   • The wet niche is properly electrically bonded and grounded via the No. 8 AWG ground connector located at the
     rear of the niche; see Figure 1.
   Note: The pool or spa electrical system can be verified with a Pool and Spa Electrical Qualification Test Kit. The
    test kit is available from Pentair Water Pool and Spa, Inc. The electrical system inspection using this kit must
    be performed by trained and certified personnel.

   • To be certain that the pool’s electrical system meets all applicable requirements, the electrician should also
     consult the local building department.
   • Use only Pentair Pool Products® wet niches to insure proper bonding and grounding connections.

Installing the IntelliBrite® Spa light Fixture after electrical requirements are met
 1. Feed cord through conduit to Junction Box, leaving at least four (4) feet of cord at the light fixture to coil around the
    light; see Figure 1. The four (4) feet of cord around the light allows the light to be serviced after the spa is filled with
    water.

                                                         48"
                                                         min.
        To GFCI, Circuit
        Breaker and                   4" min.                                           8" min. Junction Box or
        Power Source.                                                                   low Voltage Transformer.

                       Rigid
                       Conduit                                                          18" min. to top of Lens.

                         #8 AWG Ground                                                           Concrete must be cut
                         Connector bonded                                                        back around Niche to
                         to rebar.                                                     6.0"
                                                                                                 allow for a compacted
                                                                                                 plaster seal.

        Figure 1.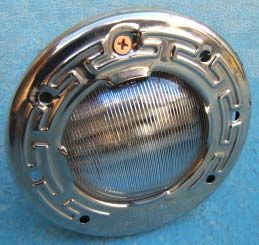
4
     2. Cut the cord at the Junction Box, leaving at least six (6) inches of cord to make connections.
     3. Strip 6 inches of the outer cord jacket to expose the three insulated wires (be careful not to damage the insulation
        on the three inner wires).
     4. Connect all three (3) wires to the corresponding circuit wires in the Junction Box and secure the Junction Box cover
        in place.

                  WARNING - Never operate this underwater light for more than ten (10) seconds unless it is totally submerged
             in water. Without total submersion, the light assembly will get extremely hot, which may result in serious burns
             or in breakage of the lens. This may result in serious injury to pool users, installers, or bystanders, or in damage
             to property.

     5. Install the IntelliBrite® light assembly into the niche. Tighten the special bronze pilot screw to secure in place.

                 WARNING - Use only the special pilot screw provided with this underwater light. This screw mounts and
             electrically grounds the housing securely to the mounting ring and wet niche. Failure to use the screw provided
             could create an electrical hazard which could result in death or serious injury to pool users, installers or others
             due to electrical shock.

     6. Fill the spa until the light is completely submerged in the water. Before powering on the light, be sure the light is
        completely submerged in the water. The light should never be powered on out of the water for more than 10 seconds.
        Final check for proper light operation: Switch on the main switch or circuit breaker, as well as the switch which
        operates the light itself. The light should illuminate what power is applied. If not recheck the installation steps starting
        with Step 1 (page 3).

    Replacing the IntelliBrite® Spa Light fixture in an existing spa

                                        DANGER! Risk of Electrical Shock or Electrocution!
                              ®
              The IntelliBrite underwater LED spa light must be installed by a licensed or certified electrician or a qualified
              pool serviceman in accordance with the National Electrical Code and all applicable local codes and ordinances.
              Improper installation will create an electrical hazard which could result in death or serious injury to pool users,
              installers or others due to electrical shock, and may also cause damage to property.
              Always disconnect the power to the spa light at the circuit breaker before servicing the light. Failure to do so could
              result in death or serious injury to serviceman, pool users or others due to electrical shock.

    Before replacing the IntelliBrite® Spa Light fixture
     Verify that the pool and spa meets the requirements of the current National Electrical Code and all local codes and
     ordinances. A licensed or certified electrician must install the electrical system to meet or exceed those requirements
     before the underwater light is installed. Some of the requirements of the National Electrical Code which the pool and spa’s
     electrical system must meet are as follows:
           • The lighting circuit has a Ground Fault Circuit Interrupter (GFCI) for line voltage models, and has an appropriately
               rated circuit breaker.
           • The Junction Box (or, for 12 volt models, the low voltage transformer) is located at least 8 inches above
               ground level and at least 48 inches from the edge of the spa; see Figure 1.
           • The light fixture and all metal items within 5 feet of the spa are properly electrically bonded.
           • The wet niche is properly installed so that the top edge of the underwater light’s lens is at least 18 inches below
               the surface of the water in the spa; see Figure 1.
           • The wet niche is properly electrically bonded and grounded via the No. 8 AWG ground connector located at the
               rear of the niche; see Figure 1.
     Note: The pool or spa electrical system can be verified with a Pool and Spa Electrical Qualification Test Kit. The test
     kit is available from Pentair Water Pool and Spa, Inc. The electrical system inspection using this kit must be performed
     by trained and certified personnel.
           • To be certain that the spa’s electrical system meets all applicable requirements, the electrician should also
               consult the local building department.
         •    Use only Pentair Water Pool and Spa® wet niches to insure proper bonding and grounding connections.
5

Replacing the IntelliBrite® Spa Light fixture after electrical requirements are met

      Note: The IntelliBrite® Spa Light
      fixture is a sealed light assembly
      which is replaceable. The lens,                                           IntelliBrite spa light fixture with lens,
      gasket and facering can be removed                                        gasket and facering attached
      from the sealed light assembly for
      replacement. See page 9 for
      replacement kit part numbers.

             WARNING - Failure to bring the pool and spa’s electrical system up to code requirements before
        installing the underwater light will create an electrical hazard which could result in death or serious injury to
        pool users, installers, or others due to electrical shock, and may also cause damage to property.

 1. Switch off main electrical switch or circuit breaker, as well as the switch which operates the IntelliBrite® underwater
    light itself.
 2. To remove the spa light fixture from the spa. Remove the special bronze pilot screw at top of face ring. Remove
    the IntelliBrite® spa light fixture from the niche and place it on the deck (see page 6 for removal instructions).

            WARNING - Be sure to keep the special pilot screw from this underwater light. This screw mounts and
        electrically grounds the housing securely to the mounting ring and wet niche. Failure to use the screw provided
        could create an electrical hazard which could result in death or serious injury to pool users, installers or others
        due to electrical shock.

 3. Remove Junction Box cover, disconnect the light fixture wires, and pull the cord through the conduit.
 4. Feed the new light fixture cord through the conduit from the niche to the Junction Box. Note: Depending on the length
    of the conduit, special tools may be required to pull the cord through the conduit.
 5. Leave at least four (4) feet of cord to coil around the light fixture; see Figure 1 on page 2. This four (4) feet of cord
    coiled around the light allows the light to be serviced after the spa is filled with water.
 6. Cut the cord at the Junction Box, leaving at least size (6) inches of cord to make connections.
 7. Strip six (6) inches of the outer cord jacket from the cord to expose the three (3) insulated wires – be careful not to
    damage the insulation on the three inner wires.
 8. Connect all three (3) wires to the corresponding circuit wires in the Junction Box (black wire to power, white wire to
    common, and green wire to ground) and secure the Junction Box cover in place.

             WARNING - Never operate this underwater light for more than ten (10) seconds unless it is totally
        submerged in water. Without total submersion, the light assembly will get extremely hot, which may result
        in serious burns or in breakage of the lens. This may result in serious injury to pool and spa users, installers,
        or bystanders, or in damage to property.

 9. Replace the IntelliBrite® spa light fixture into the niche and tighten the special pilot screw.

            WARNING - Use only the special pilot screw provided with this underwater light. This screw mounts and
        electrically grounds the housing securely to the mounting ring and wet niche. Failure to use the screw
        provided could create an electrical hazard which could result in death or serious injury to pool users,
        installers or others due to electrical shock.

10.   Fill the pool and/or spa until the IntelliBrite® spa light fixture is completely submerged in water before operating the
      light for more than ten (10) seconds. Switch on main switch or circuit breaker, as well as the switch which operates
      the IntelliBrite® spa light itself to verify that the light is operating correctly.
6

    Replacing the IntelliBrite® Spa LED Light Assembly using a Replacement Kit
    (see page 10 for Replacement Kit part numbers)

                                                        DANGER!
                              RISK OF ELECTRICAL SHOCK OR ELECTROCUTION
                       Always disconnect power to the spa light at the circuit breaker before
                      servicing the light. Failure to do so could result in death or serious injury
                        to installer, serviceman, spa users, or others due to electrical shock.

     1. Switch off main electrical switch or circuit breaker, as well as the switch which operates the IntelliBrite® underwater
        light itself.
     2. Before starting be sure that you have a new lens gasket (P/N 79108500) and an IntelliBrite® LED spa light assembly
        ready to install.

              WARNING - Replace the LED light assembly with the same type and wattage. Failure to replace the LED light
           assembly with the same type will damage the LED light fixture and may cause an electrical hazard resulting in
           death or serious injury to pool and spa users, installers, or others due to electrical shock, and may also cause
           damage to property.

                WARNING - Always install a new lens gasket (part number 79108500) whenever disassembling the IntelliBrite®
           ED light fixture. Failure to do so may permit water to leak into the assembly which could cause:
           (a) an electrical hazard resulting in death or serious injury to pool users, installers, or others due to electrical shock,
                or
           (b) breakage of the lens, which likewise could result in serious injury to pool and spa users, installers, or bystanders,
           or in damage to property.

     3. REMOVING THE INTELLIBRITE® LED LIGHT: Remove the pilot screw at top of face ring, remove the light
        assembly from the niche. Place the assembly on the deck. Note: It is not necessary to drain down the spa.

             FPilot screw

                WARNING - Be sure to keep the pilot screw from the IntelliBrite® LED underwater light. This screw mounts
           and electrically grounds the housing securely to the mounting ring and wet niche.Failure to use the screw provided
           could create an electrical hazard which could result in death or serious injury to pool and spa users, installers
           or others due to electrical shock.
7
4. Using a number three (3) Phillips head screwdriver loosen the screw and remove uni-tension wire clamp from the
face ring.
5. Remove the face ring and wire clamp from the light housing and set aside for installation later.
Note: A 12 VAC 60 Hz (50 Hz where
applicable) external isolating safety
transformer is required for the 12 VAC
model IntelliBrite® LED Spa light. See
page 9 for more information.
Loosen the Phillips screw to
remove wire clamp
6. With the light assembly resting on its base, carefully pry off the gasket to release the lens. Discard the gasket.
A NEW LENS GASKET (P/N 79108500) MUST BE USED EACH TIME THE SPA LED LIGHT IS REASSEMBLED.
7. Disconnect the IntelliBrite® Spa LED light assembly cable from the junction box and discard the light assembly.
IntelliBrite® Spa LED Light assembly
Face Ring and uni-tension wire clamp
Gasket and Lens8
8. INSTALLING THE INTELLIBRITE® LED LIGHT WITH NEW GASKET: Install a new gasket (P/N 79108500) during
reassembly of the IntelliBrite® LED light. A NEW LENS GASKET MUST BE USED EACH TIME THE LIGHT IS
REASSEMBLED.
9. Install the new gasket onto the lens:
a) With the light housing resting on its base, place the lens then the gasket on top of the light housing.
b) Place the face ring on top of the gasket. Make sure that the lens and gasket are centered correctly on the light
housing.
c) Aligning the face ring and lens: Align the face ring and lens so that the letter “O” in the word “TOP” and the
small arrow above it) on the surface of the lens points to the pilot screw hole on the face ring.
d) Aligning the lens position with the LEDs: While looking through the front of the lens, slightly rotate the lens
until the vertical lines on the lens are in focus with the four (4) rows of LEDs below.
Pilot screw
Align letter “O” in
the word “TOP”
on lens with pilot
screw hole on ▲
face ring TOP
Align vertical line
on lens with rows
of LEDs under
lens
10. With the hook ends of the circular uni-tension wire clamp pointing down, spread the clamp and place it in the “U”
recesses of the locking levers. Be sure the hook ends of the wire clamp are located between the pair of locking levers
as shown below and that the clamp is properly engaged with all of the lock levers.
11. Place a cloth on the ground to protect the lens. Turn the light over so the lens is resting on the cloth. Tighten the
bolt and nut until the distance between the ends of the clamp equals ¼-in. or less.
IntelliBrite
Spa light
assembly
Orientation of bolt
and wire clamp.
Gasket
Lens
1/4" or Less 90 Degrees
Uni-tension
Pilot Screw
Hook ends wire clamp
Screw and
bolt Tighten nut and bolt about 90˚ from
Lock lever Pilot Screw
the Pilot Screw between the lock levers.
(x4)
Face ring
Pilot screw9
12. Install the IntelliBrite® light assembly into the niche: Feed cord through conduit to Junction Box, leaving at least
four (4) feet of cord at the light fixture to coil around the light; see Figure 1 (page 3). The four (4) feet of cord around
the light allows the light to be serviced after the spa is filled with water.
13. Cut the cord at the Junction Box, leaving at least six (6) inches of cord to make connections.
14. Strip six (6) inches of the outer cord jacket to expose the three (3) insulated wires (be careful not to damage the
insulation on the three inner wires).
15. Connect all three (3) wires to the corresponding circuit wires in the Junction Box and secure the Junction Box cover
in place.
WARNING - Never operate the underwater light for more than 10 seconds unless it is totally submerged
in water. Without total submersion, the light assembly will get extremely hot and may result in serious
burns or in breakage of the lens. This may result in serious injury to pool users, installers, or bystanders, or
in damage to property.
16. Install the IntelliBrite® light assembly into the niche. Tighten the special bronze pilot screw to secure in place.
WARNING - Use only the special pilot screw provided with this underwater light. This screw mounts and
electrically grounds the housing securely to the mounting ring and wet niche. Failure to use the screw provided
could create an electrical hazard which could result in death or serious injury to pool users, installers or others
due to electrical shock.
17. Fill the spa until the light is completely submerged in the water. Before powering on the light, be sure the light is
completely submerged in the water. The light should never be powered on out of the water for more than 10 seconds.
18. Final check for proper light operation: Switch on the main switch or circuit breaker, as well as the switch which
operates the light. The light should illuminate when power is applied. If not recheck the installation steps starting
with Step 12.
Using an External Isolating Safety Transformer for Multiple IntelliBrite® 12 VAC Lights
When using multiple IntelliBrite® 12 VAC LED lights on a 300 Watt transformer, it is recommended that no more than two
(2) IntelliBrite® pool lights and one (1) IntelliBrite® Spa light be used. It is also recommended not to exceed 100 feet of
total cable run between the transformer and light (see diagram below).
300 Watt
Transformer J Box
12 Gauge
(minimum)
100 ft.
If a longer cable run is necessary, it is recommended that separate 100 Watt transformers be used for each light with
no more than 200 feet of total cable run between the transformer and light (see diagram below).
100 Watt
Transformer J Box
12 Gauge
(minimum)
200 ft.10
IntelliBrite® Spa Light Replacement Kit Part Numbers
Pilot screw
Face Ring
Captive gum
washer
Uni-tension
wire clamp
Lens
Gasket
Kit Part No. Description
640045 Face ring assembly, stainless steel
- Uni-tension wire clamp assembly
- Gasket, 4 in diameter, off white
640046 Gasket, 4 in diameter, off white
- Lens, IntelliBrite®, Spa, 4 in diameter, tempered
79104800 Pilot screw, with captive gum washer
79108500 - Gasket, 4 in diameter, off white
Note: A 12 VAC 60 Hz (50 Hz where applicable) external isolating safety
transformer is required for the 12 VAC model IntelliBrite® LED Spa light.
See page 1 for more information.NOTES
*650111*
P/N 650111 - Rev C 08/21/09
Lámpara Submarina de LED
para Baños Termales que Cambia de Color

           Guía de Instalación y del Usuario

   INSTRUCCIONES IMPORTANTE DE SEGURIDAD
    LEA Y OBSERVE TODAS LAS INSTRUCCIONES
          GUARDE ESTAS INSTRUCCIONE
Servicio al Cliente
Si tiene preguntas acerca de cómo ordenar piezas de repuesto Pentair y productos de piscinas, por
favor use la siguiente información de contacto.
Servicio al Cliente /Soporte Técnico (8 a.m. a 4:30 p.m. Hora del Pacífico)
Teléfono: (800) 831-7133
Fax: (800) 284-4151
Sanford, Carolina del Norte (8 a.m. a 4:30 p.m. Hora del Este)
Teléfono: (919) 566-8000
Fax: (919) 566-8920
Moorpark, California (8 a.m. a 4:30 p.m. Hora del Pacífico)
Teléfono: (805) 553-5000 (Ext. 5591)
Fax: (805) 553-5515
Sitio Web
Visite www.pentairpool.com o www.staritepool.com para encontrar información acerca de los productos Pentair
© 2009 Pentair Water Pool and Spa, Inc. Todos los derechos reservados.
Este documento está sujeto a cambios sin previo aviso.
1620 Hawkins Ave., Sanford, NC 27330 • (800) 831-7133) • (919) 566-8000
10951 West Los Angeles Ave., Moorpark, CA 93021 • (800) 831-7133 • (805) 553-5000
Marcas registradas y exenciones de responsabilidad: IntelliBrite™, IntelliTouch™, EasyTouch™, SAm™, y Pentair Water Pool and Spa™ son
marcas registradas de Pentair Water Pool and Spa, Inc. y/o sus compañías afiliadas en los Estados Unidos y/u otros países. A menos que sea
indicado, los nombres y marcas de otros que puedan ser utilizados en este documento no son utilizados para indicar una afiliación o endoso entre
los propietarios de estos nombres y marcas y Pentair Water Pool and Spa, Inc. Esos nombres y marcas podrían ser las marcas registradas de esas
partes u otros.
P/N 650111 - Rev C - 08/21/09i
Contenido
PRECAUCIONES IMPORTANTE DE SEGURIDAD ............................................................ ii
Lámpara submarina de LED IntelliBrite™ para baños termales que cambia de color .............. 1
Modelos de las lámparas de LED IntelliBrite™ para baños termales ................................. 1
Uso de un transformador aislado de seguridad externo para las lámparas
IntelliBrite™ de 12 VCA....................................................................................................... 1
Funcionamiento de la lámpara de LED IntelliBrite™ con un interruptor de pared ..................... 1
Selección de un modo de espectáculo lumínico o color fijo .............................................. 1
Guardar un modo de color o un modo de color fijo ............................................................ 2
Botón para capturar y traer a la memoria .......................................................................... 2
Encendido de la lámpara ................................................................................................... 2
Localización y solución de problemas ............................................................................... 2
Uso de un Regulador IntelliBrite™ (vendido por separado) en lugar de
usar un interruptor de pared .............................................................................................. 2
Vataje (wattage) máximo al usar múltiples lámparas con el Regulador IntelliBrite™ .......... 2
Instalación de la lámpara de LED IntelliBrite™ para baños termales ....................................... 3
Instalación de la lámpara de LED IntelliBrite™ (construcción de baños termales nuevas) ...... 3
Instalación de la lámpara de LED IntelliBrite™ para baños termales luego de cumplir
los requisitos eléctricos ........................................................................................................... 3
Reemplazo del ensamblaje de la lámpara de LED IntelliBrite™ en un existente ...................... 4
Antes de reemplazar la lámpara de LED IntelliBrite™ .............................................................. 4
Reemplazo de la lámpara de LED IntelliBrite™ luego de cumplir con
los requisitos eléctricos ........................................................................................................... 5
Reemplazo del ensamblaje de la lámpara IntelliBrite™ para baños termales
utilizando un kit de reemplazo ................................................................................................. 6
Uso de un transformador aislado de seguridad externo para múltiples
lámparas IntelliBrite™ de 12 VCA ............................................................................................. 9
Números de los kits de piezas de repuesto para las lámparas IntelliBrite™
para baños termales .............................................................................................................. 10ii
PRECAUCIONES IMPORTANTE DE SEGURIDA
Aviso importante – Atención instalador: Este manual contiene información importante acerca
de la instalación, funcionamiento y uso sin peligros de este producto. Esta información debe ser proporcionada
al propietario y/o operador de este equipo.
ADVERTENCIA — Antes de instalar esta lámpara submarina de LED IntelliBrite™, lea y observe todas las
advertencias, avisos e instrucciones que acompañan esta lámpara. El no observar las advertencias de seguridad
y las instrucciones puede tener consecuencias de lesiones graves, muerte o daños a la propiedad. Llame al
(800) 831-7133 para obtener gratuitamente, copias adicionales de estas instrucciones.
¡PELIGRO! ¡Riesgo de descarga eléctrica o electrocución!
Esta lámpara submarina debe ser instalada por un técnico electricista o un electricista certificado o un
técnico de piscinas calificado conforme al Código Eléctrico Nacional y todos los códigos y ordenanzas
locales pertinentes. Una instalación incorrecta creará un peligro eléctrico que puede resultar en la muerte
o lesión seria para los usuarios de la piscina, los instaladores, o a otras personas debido a descarga
eléctrica y también podría causar daños a la propiedad. Siempre desconecte la alimentación eléctrica de
la lámpara de la baños termales en el cortacircuito antes de efectuar el mantenimiento de la lámpara.
Dejar de hacer esto puede resultar en la muerte o lesión grave del técnico, los usuarios de la piscina u otras
personas debido a descarga eléctrica. LEA Y OBSERVE TODAS LAS INSTRUCCIONES EN ESTE MANUAL.
ADVERTENCIA – Información de seguridad importante para la instalación del nicho
y la lámpara Pentair
• Todas las instalaciones del nicho y de la lámpara deben cumplir con todos los códigos. Si los códigos
locales exigen un cable sellado, utilice los nichos plásticos de Pentair Water Pool and Spa™ (P/N 79206600
y P/N 79206700).
• Bajo ninguna circunstancia sustituya lámparas mediante el empalme de cables bajo el agua o detrás del nicho.
ADVERTENCIA – RIESGO DE DESCARA ELÉCTRICA Y LESIÓN.
UTILICE SOLAMENTE EL MÉTODO DE INSTALACIÓN ESPECIFICADO A CONTINUACIÓN.
Ubicación de uso Lámpara para piscinas y fuentes de baños Método requerido para la instalación
de la lámpara termales de Pentair* (P/N 560001 y P/N 560000)
Piscinas y baños Lámpara con nicho en húmedo para piscinas SOLAMENTE la carcasa de la lámpara (recubrimiento
termales (o baños termales) moldeado).
NO UTILICE el pedestal de las lámparas para fuentes.
Fuente Lámpara con nicho en húmedo sumergible para Carcasa de la lámpara (recubrimiento moldeado) o el
piscinas (o baños termales) pedestal de las lámparas para fuentes.
(*) Nota: Los nichos en húmedo para luminarias en cumplimiento con los requisitos para ambos usos podrían tener
las dos marcas de Listado UL para lámparas con nicho en húmedo sumergibles. Una luminaria que no tenga la marca
de Listado UL correspondiente no es considerada por UL que haya sido producida bajo el Listado y el servicio de
seguimiento de UL para la ubicación del uso asociado.
PRECAUCIÓN – La lámpara de LED IntelliBrite para Pentair Water Pool and Spa™ debe ser usada sólo con
carcasas (nichos) para lámparas de Pentair Water Pool and Spa™. Si la lámpara de LED IntelliBrite™ está instalada en
otros nichos, la instalación no tendrá la aprobación U.L. y se anularán todas las garantías.
ADVERTENCIA – La sal es esencialmente un material corrosivo. A pesar de que los niveles de sal requerido
para el funcionamiento apropiado de un generador electrónico de cloro es relativamente bajo cuando es comparado
a agua de mar y a otras soluciones con sal, la colocación de cualquier cantidad de sal en su piscina incrementa la
posibilidad de corrosión u otro deterioro del equipo de la piscina y de cualquier superficie utilizada en o alrededor de
su piscina. Las partes de metal y ciertas superficies naturales y creadas por el hombre son particularmente susceptibles
a la corrosión y al deterioro cuando son utilizadas en o alrededor de piscinas de agua salada. Pentair Water Pool and
Spa, Inc. no representa o de algún otro modo garantiza que el uso apropiado de un generador electrónico de cloro
impedirá la corrosión u otro deterioro del equipo de la piscina y de cualquier otra superficie utilizada en o alrededor
de su piscina. Consulte con un profesional de piscinas con experiencia, para obtener asesoría acerca de la selección
apropiada de materiales, técnicas de instalación para esos materiales, y el uso apropiado, cuidado y mantenimiento
de esos materiales para el tipo y ubicación específica de su piscina a fin de minimizar la corrosión y el deterioro que
es inherente en y alrededor de piscinas con agua salada.1
Lámpara Submarina de LED IntelliBrite™ para Baños Termales que Cambia de Color
El sistema de iluminación de la lámpara submarina de LED (diodo emisor de luz) IntelliBrite™ le ofrece multicolores brillantes
y lúcidos con efectos espectaculares para su piscina. El arreglo de LED de diferentes colores y de eficiencia energética puede
pasar por varios colores a diversas velocidades y en diferentes secuencias de colores. La geometría exclusiva de los lentes de
IntelliBrite™ ofrece un rayo de luz más amplio con lo que se logra una mayor reflexión de luz submarina brindando así una mayor
intensidad de iluminación. Elija uno de los siete espectáculos lumínicos de colores preprogramados o seleccione uno de los
cinco colores fijos para crear prácticamente una gama interminable de efectos de iluminación submarina.
Las lámparas de LED IntelliBrite™ son totalmente compatibles con los sistemas de automatización IntelliTouch™ y EasyTouch™.
Para obtener información adicional sobre el uso de las lámparas IntelliBrite™ con los sistemas IntelliTouch™, consulte la Guía
del usuario de IntelliTouch™ (P/N 520102) y la Guía del usuario de EasyTouch™ (P/N 520584).
Modelos de las lámparas de LED IntelliBrite™ para baños termales
Los dos modelos de las lámparas de LED IntelliBrite™ para baños termales son:
Lámpara de LED IntelliBrite™ para baños termales, 120 VCA, con transformador integrado de 12 VCA, 50 pies de extensión del
cable* (P/N 640051). Lámpara de LED IntelliBrite™ para piscinas, 12 VCA, (requiere un transformador aislado de seguridad
externo de 12 VCA (~) 60 Hz [50 Hz cuando sea aplicable]), 50 pies de extensión del cable* (P/N 640054). (*) la extensión del
cable puede variar de 30 pies a 100 pies.
Uso de un transformador aislado de seguridad externo para las lámparas IntelliBrite™ de 12 VCA
Consulte la página 9 para obtener más información sobre el uso de varias lámparas IntelliBrite™ de 12 VCA con un transformador
aislado de seguridad externo.
Funcionamiento de la lámpara de LED IntelliBrite™ con un interruptor de pared
Las lámparas de LED IntelliBrite™ pueden ser controladas utilizando un interruptor de iluminación de pared. Se pueden conectar
múltiples lámparas de LED IntelliBrite™ a través de una caja de empalmes a un interruptor individual para que todas las lámparas
puedan ser encendidas y apagadas en forma simultánea. Las lámparas de LED IntelliBrite™ son controladas por corriente alterna
proveniente de un interruptor de pared regular. Mediante el encendido y apagado del interruptor, una cantidad específica de
veces, la lámpara activa uno de los siete modos de espectáculo lumínico, de colores fijos y habilita la función de "Capturar" y
"Traer a la memoria".
Selección de un modo de espectáculo lumínico o color fijo
Encienda la lámpara. Una luz blanca se encenderá momentáneamente, seguido por el color seleccionado previamente. Para
seleccionar un modo de espectáculo lumínico de colores (1-7) o un color fijo (8-12), encienda y apague el interruptor de pared
una cantidad específica de veces. Cada número (1-12) mostrado a continuación, corresponde a la cantidad de veces que se
debe apagar y encender el interruptor para activar un espectáculo lumínico de colores o un color fijo. Para los detalles sobre
cómo guardar los efectos de colores mientras se está en los modos de "espectáculo lumínico", consulte la función de "Capturar"
y "Traer a la memoria" en la página 2.
1. Modo SAm™: Pasa por los colores blanco, magenta, azul y verde (emula la lámpara Pentair SAm™).
2. Modo Fiesta: Cambio de colores rápido que crean un efecto de energía y excitación.
3. Modo Romántico: Lenta transición de colores que crean un efecto cautivador y de serenidad.
4. Modo Caribeño: Transiciones entre una variedad de azules y verdes.
5. Modo Americano: Transición de rojo patriótico, blanco y azul.
6. Modo Puesta del sol de California: Dramática transición de tonos en anaranjado, rojo y magenta.
7. Modo Soberano: Tonos de colores más profundos y ricos.
8. Azul: Color fijo.
9. Verde: Color fijo.
10. Rojo: Color fijo.
11. Blanco: Color fijo.
12. Magenta: Color fijo.
13. Capturar: Guardar el efecto del color actual durante un espectáculo lumínico de colores.
14. Traer a la Memoria: Activar el último efecto de colores guardado.
Ejemplo: Para seleccionar el Modo Puesta del sol de California; encienda y apague el interruptor seis veces sucesivamente.
▼ Encienda y eguido por el modo
Durante el proceso de encendido y apagado
apague seleccionado
▼
▼
del interruptor, no ocurrirá ninguna
▼ el interruptor "Puesta del sol de
iluminación, luego una luz blanca se
seis veces California"
iluminará momentáneamente.
ADVERTENCIA: Durante el proceso de encendido y apagado del interruptor, antes de que el color seleccionado es mostrado, no
ocurrirá ninguna iluminación. Este modo de funcionamiento es normal durante el proceso de alternación. Durante este proceso la piscina y
el baño termal estarán a oscuras y se deben tomar medidas de precaución para evitar accidentes imprevistos. El incumplimiento de esta
advertencia puede resultar en muerte o lesión grave para los usuarios de la piscina o del baño termal.2
Funcionamiento de la Lámpara de LED IntelliBrite™ con un Interruptor de Pared (continuación)
Guardar un modo de color o un modo de color fijo
Cuando la energía es apagada en las lámparas IntelliBrite™, el último modo de espectáculo lumínico o color fijo es guardado.
La próxima vez que la lámpara es encendida, el modo de espectáculo lumínico o de color fijo guardado será mostrado. Por
ejemplo, mientras esté en "Modo fiesta" apague la lámpara. Espere más de 10 segundos y encienda la lámpara de nuevo para
resumir de nuevo el "Modo fiesta".
Función para capturar y traer a la memoria
Capturar: Utilice la función Capturar (encienda y apague 13 veces) para capturar y guardar un efecto de color mientras uno
de los modos de espectáculo lumínico es mostrado. Es más fácil capturar efectos de colores personalizados de los modos de
espectáculo lumínico más lentos, como el "Modo romántico" (Nº. 3).
Encendido
▼
▼
▼
▼
Apagado
Captura un efecto de color único mientras Encienda y apague el interruptor 13 El efecto de color
el "Modo romántico" está activo. veces para guardar el efecto de color. guardado es mostrado.
Traer a la memoria: Utilice la función de Traer a la memoria para activar el último efecto de color guardado (utilizando la función
de Capturar) mientras se está en modo de espectáculo lumínico o de colores fijos. Para traer a la memoria el efecto de color,
encienda y apague el interruptor 14 veces, y después de cinco segundos el último efecto de color guardado será mostrado.
Encendido
▼
▼
▼
▼
Apagado
Mientras la lámpara esté encendida en el Encienda y apague el interruptor 14 veces El efecto de color
modo de espectáculo lumínico o de color fijo. para activar el último efecto de color guardado. guardado es mostrado.
Encendido de la lámpara
Cuando la lámpara de LED IntelliBrite™ es encendida, una luz blanca se encenderá momentáneamente, seguido por el color
seleccionado previamente.
Aviso: Si la lámpara está apagada durante más de cinco segundos, se mostrará el último modo de espectáculo lumínico o de
color fijo guardado.
Localización y solución de problemas
Utilice los siguientes consejos para resolver problemas que podrían ocurrir mientras esté en funcionamiento la lámpara de LED.
Problema Causa / Medida a Tomar
La lámpara no se ilumina. Verifique el cable de falla de conexión a tierra y restablezca de ser necesario.
La lámpara no funciona Verifique la conexión de cables de la lámpara que se encuentra en la caja de
adecuadamente. empalmes al lado de la piscina y en el interruptor de encendido y apagado.
Asegúrese que la energía eléctrica de corriente alterna apropiada sea
suministrada a la lámpara.
En lugar de usar un interruptor de pared, la lámpara LED IntelliBrite™ de baños termales se puede utilizar con un
Regulador IntelliBrite™ (vendido por separado)
El Regulador IntelliBrite™ [N/P 600054] proporciona control completo de las lámparas LED (diodo emisor de luz) IntelliBrite™ subacuáticas de
Pentair Water Pool and Spa™ y de las lámparas LED IntelliBrite™ de paisaje. Es fácil de seleccionar una función de iluminación, simplemente maque
uno de los colores fijos preprogramados o una de las muestras de colores preprogramadas. También, se puede crear un sinfín de efectos
luminosos únicos utilizando los botones HOLD y RECALL.
El Regulador IntelliBrite™ puede controlar una o varias lámparas LED IntelliBrite™. Múltiples lámparas LED IntelliBrite™ pueden conectarse a través
de una caja para conexiones eléctricas con un regulador de IntelliBrite™ para que todas las lámparas puedan ser encendidas
y apagadas juntas.
Vataje (wattage) máximo al usar múltiples lámparas con el Regulador IntelliBrite™
Al usar varias lámparas LED IntelliBrite™, los vatios máximos permitidos son 300 vatios. La combinación siguiente es un
ejemplo de lámparas LED IIntelliBrite™ que se pueden conectar con el regulador IntelliBrite™:
• Dos (2) lámparas LED IntelliBrite™ de piscina (cada lámpara de 70 vatios máximo) Regulador
▼
IntelliBrite™
• Una (1) lámpara LED IIntelliBrite™ de baños termales (cada lámpara de 40 vatios máximo) [N/P 600054]
• Ocho (8) lámparas LED IntelliBrite™ de paisaje (cada lámpara de 15 vatios máximo)3
INSTALACIÓN DE LA LÁMPARA DE LED INTELLIBRITE™ PARA BAÑOS TERMALES
A continuación se describe cómo instalar la lámpara de LED IntelliBrite™. Lea detenidamente desde la página 3 a la 8 antes de
comenzar el procedimiento de instalación.
Instalación de la lámpara de LED IntelliBrite™ para baños termales (construcción de piscinas nuevas)
BANTES DE COMENZAR: Los siguientes pasos (1-6) describen las tareas que deben ser completadas por el electricista antes
de que la lámpara IntelliBrite™ sea instalada. Consulte la Figura 1 del diagrama.
Asegúrese que la piscina cumple con los requisitos actuales del Artículo 680-22 del Código Eléctrico Nacional (National Electrical
Code, N.E.C.) y con todos los códigos y ordenanzas locales. Un electricista con licencia o certificado debe instalar el sistema
eléctrico de manera que el mismo cumpla o supere dichos requisitos antes de instalar la lámpara submarina. Algunos de los
requisitos del Código Eléctrico Nacional con los que el sistema eléctrico de la piscina debe cumplir son los siguientes:
• El circuito de iluminación debe tener un interruptor del circuito de fallos en toma a tierra (Ground Fault Circuit Interrupter,
GFCI) para modelos de tensión de línea y debe tener un cortacircuito de clasificación apropiada.
• La caja de empalme (o el transformador de bajo voltaje en el caso de los modelos de 12 voltios) debe estar ubicada
a un mínimo de 20.32 cm (8 pulg.) por encima del nivel del agua y al menos a 1.22 m (48 pulg.) del borde de la piscina;
consulte la Figura 1.
• La lámpara y todos sus elementos de metal ubicados a 1.50 m (5 pies) de distancia de la piscina deben tener una
conexión eléctrica apropiada.
• El nicho en húmedo debe estar correctamente instalado de manera que el borde superior del lente de la lámpara
submarina se encuentre a un mínimo de 45.72 cm (18 pulg.) por debajo de la superficie del agua de la piscina; consulte
la Figura 1. (No más de 50.80 cm (20 pulg.) de profundidad en Canadá.)
• El nicho en húmedo debe tener una conexión eléctrica apropiada y con conexión a tierra a través del conector a tierra
Nº. 8 AWG ubicado en la parte posterior del nicho; consulte la Figura 1.
Nota: El sistema eléctrico de la piscina o del baño termal puede ser verificado con un equipo de prueba de idoneidad.
El equipo de prueba puede ser adquirido en Pentair Water Pool and Spa, Inc. La inspección del sistema eléctrico
mediante este equipo debe ser realizada por personal capacitado y certificado.
• Para asegurar que el sistema eléctrico de la piscina cumpla con los requisitos vigentes, el electricista también debe
consultar con el departamento de edificación local.
• Utilice solamente nichos en húmedo de Pentair Water Pool and Spa™ para asegurar conexiones y tomas a tierra
apropiadas.
Instalación de la lámpara de LED IntelliBrite™ para baños termales luego de cumplir con los requisitos eléctricos
1. Alimente el cable a través del conducto hasta la caja de empalme, dejando por lo menos un tramo de 1.22 m (4 pies) en
la lámpara para enrollarlo a su alrededor; consulte la Figura 1. Esto permite efectuar el mantenimiento de la lámpara después
de que la piscina esté llena de agua.
1.22 m
(48 pulg.)
Al interruptor por mínimo
corriente de pérdida
a tierra (GFCI), 10.16 cm (4 pulg.) mínimo 20.32 cm (8 pulg.) mínimo a la caja de
disyuntor y fuente empalmes o transformador de
de alimentación baja tensión (voltaje).
Conducto
rígido 45.72 cm (18 pulg.) mínimo hasta
la parte de arriba de la lente.
El tornillo piloto en la posición
de las 12 del reloj.
El conector a tierra
#8 AWG (3.3 mm) El hormigón armado (concreto)
está unido a la barra 15.24 cm debe estar recortado un poco
(6 pulg.) más alrededor del nicho para
permitir un sello compacto de yeso.
Figura 1.
Enrolle 1.22 metros (4 pies) de cable
de luz alrededor del accesorio.También puede leer