CALEFACTOR CERÁMICO MURAL WALL MONTED DOWNFLOW CERAMIC HEATER
←
→
Transcripción del contenido de la página
Si su navegador no muestra la página correctamente, lea el contenido de la página a continuación
MANUAL DE INSTRUCCIONES
INSTRUCTIONS MANUAL

CALEFACTOR CERÁMICO MURAL
WALL MONTED DOWNFLOW CERAMIC HEATER

 MODELO / MODEL

 CCB-2000

             Por favor, lea estas instrucciones atentamente antes de instalar o utilizar el aparato por primera vez.
               Please read these instructions carefully before installing or using this appliance for the first time.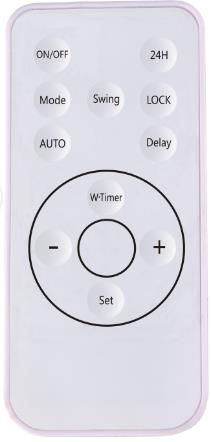
1.- IMPORTANTE Lean estas instrucciones antes de conectar este aparato por primera vez.

•    La garantía del calentador no cubrirá cualquier daño causado por la no observancia de alguna de estas instrucciones. Las
     instrucciones deben conservarse para futuras referencias. Este manual debe ser conservado y dado a cualquier nuevo usuario.
•    Este aparato pueden usarlo niños con edad de 8 años y superior y personas con capacidades físicas, sensoriales o mentales
     reducidas o falta de experiencia y conocimiento, si se les ha dado la supervisión o formación apropiadas respecto al uso del aparato
     de una manera segura y comprenden los peligros que implica. Los niños no deben jugar con el aparato. La limpieza y
     mantenimiento a realizar por el usuario no deben realizarlos los niños sin supervisión.
•    Los niños desde 3 años y menores de 8 años deben sólo encender/apagar el aparato, siempre que este haya sido colocado o
     instalado en su posición de funcionamiento normal prevista y que sean supervisados o hayan recibido instrucciones relativas al uso
     del aparato de una forma segura y entiendan los riesgos que el aparato tiene. Los niños desde 3 años y menos de 8 años, no deben
     enchufar, regular y limpiar el aparato o realizar operaciones de mantenimiento.
•    Los niños menores de 3 años deben mantenerse fuera del alcance del aparato a menos que sean continuamente supervisados.
•    Compruebe que el voltaje de la placa de características del calentador coincide con el voltaje de la red donde se va a conectar.
•    El uso de calentadores está prohibido en presencia de gases, explosivos u objetos inflamables.
•    No utilizar este aparato para secar ropa. No cubrir el aparato, ni colocar objetos en contacto con el mismo.
•    Ni el cable de conexión ni otros objetos deben entrar en contacto con el aparato.
•    Las salidas y entradas de aire del equipo aseguran el correcto funcionamiento y protegen al calentador de sobrecalentamientos. No
     se deben tapar nunca. No deje ningún objeto encima del aparato, cubriendo la rejilla u obstruyendo el flujo de aire.
•    Este calentador debe ser desconectado de la red eléctrica antes de efectuar cualquier reparación en su interior. Si quiere dejar fuera
     de servicio el aparato desconéctelo de la instalación.
•    El calentador no debe ser usado justo debajo de una toma de corriente. El calentador debe ser usado de tal forma que los
     interruptores u otros controles no puedan ser tocados por alguien que esté usando el baño o la ducha. No toque nunca el aparato
     estando descalzo o con las manos mojadas o húmedas.
•    El calentador está equipado con una manguera de conexión de 3 x 1,00 mm² que debe ser usada para conectar el aparato a la red
     eléctrica de la vivienda a través de una caja de conexión adyacente. Si la manguera de conexión de esta unidad se encuentra dañada
     deberá ser sustituida con el fin de evitar un peligro, por un servicio autorizado por el fabricante ya que se necesitan herramientas
     especiales.
•    Todos los modelos incorporan un interruptor de seguridad. Este desconectará el equipo si, por alguna razón, se sobrecalienta. Si
     actuara el interruptor de seguridad, desconecte el calentador, elimine la causa del sobrecalentamiento y el calentador se rearmará
     automáticamente.
•    La presencia en el ambiente de humo, partículas en suspensión, polución atmosférica, etc., puede, oscurecer las superficies de
     paredes cercanas al aparato. No utilice el equipo en exteriores.
•    ATENCIÓN – Algunas partes de este aparato pueden estar muy calientes y causar quemaduras. Particular atención debe
     prestarse en presencia de niños y personas vulnerables.
•    El calentador debe colgarse en la pared y hacer que la salida de aire se oriente hacia el suelo, o colocarse en una superficie plana. El
     calentador debe instalarse al menos 2 metros sobre el suelo.
•    No posicione el equipo sobre alfombras. Asegúrese de que el calefactor está posicionado en una superficie firme y que no se
     posiciona junto a cortinas o muebles, pues podría suponer un riesgo de incendio. La distancia entre la rejilla frontal y cualquier
     objeto debe ser al menos de 65cm. La parte trasera del equipo debe estar libre para la salida de aire.
•    Si desea apagar el calentador, presione el interruptor ON/OFF para apagar, entonces el calentador mantendrá el ventilador
     funcionando 30 segundos hasta que el calentador se refrigere. Entonces el calentador dejará de funcionar, y usted puede
     desenchufar el equipo.
•    Por favor, retire la pestaña de plástico antes de usar el mando a distancia. Si no usa el mando, por favor, vuelva a poner la pestaña
     de plástico en el mando para asegurar que la pila no se consume

                                                                        1
2.- INSTALACIÓN
El calentador debe ser instalado y utilizado de acuerdo con la legislación eléctrica vigente.
Para evitar peligro, siga las instrucciones de seguridad.
¡Importante! Asegúrese de que no haya cables eléctricos u otras instalaciones (por ejemplo, tuberías de
agua) cerca de los orificios de perforación. Asegúrese de que el aparato esté colocado de forma segura y
vertical en la pared. Haga dos taladros en la pared a 2 m del suelo y a mínimo 25 mm de la pared más
cercana. Fije dos tornillos en los taladros dejando que sobresalgan de la pared 10 mm y cuelgue la máquina
después de asegurarse que los tornillos estén bien fijados.
Coloque el calentador en una superficie firme y nivelada, colocando el botón principal hacia abajo. Enchufe
el equipo a una toma de corriente AC220-240V. Emitirá un sonido "BEE", la luz "Power" se encenderá y el
calentador mostrará el valor predeterminado de temperatura. Parpadeará 3 segundos.
3.- FUNCIONAMIENTO
3.1. Panel de Control 3.2. Mando a distancia
El mando utiliza una pila de litio CR2025 3V.
ON/OFF Botón de encendido/apagado
24H Temporizador 1-24 horas
MODE Seleccionar modo
Swing Oscilación rejilla salida de aire
LOCK Bloqueo para niños del calefactor
AUTO Función Ventana abierta
Delay Ajustar temperatura (modo semana)
W.Timer Programar semana
+/- Incrementar / Disminuir
Set Configurar hora
23.3. Configurar día/hora
Presione el botón ON/OFF para encender el equipo. El display mostrará 00:00 y lucirá (lunes).
- SEMANA. Presione el botón “Set” del mando, parpadeará . Presione los botones “+” o “-”
para cargar el día correcto (Mo=lunes...Su=domingo etc.).
- HORA. Presione el botón “Set” de nuevo hasta llegar a la hora. En el display parpadearán las
horas. Presione “+” o “-” para establecer la hora correcta.
- MINUTOS. Presione el botón “Set” de nuevo. En el display parpadearán los minutos. Presione
“+” o “-” para establecer los minutos correctos.
Presione el botón “Set” finalmente, y los valores de día y hora quedarán establecidos en el equipo.
3.4. Modos de funcionamiento generales.
En los modos de funcionamiento forzado, el equipo funcionará en el modo correspondiente (aire frío,
modo calefacción) independientemente de la temperatura ambiente.
3.4.1. Modo aire frío. Encienda el calentador presionando el botón ON/OFF del control remoto. La
unidad comienza a funcionar en modo aire frío, la temperatura de ambiente se muestra y el icono RT (Real
Temperatura) se muestra en el display.
3.4.2. Modo Calefacción. Potencia 1 (1000W). Presione nuevamente el botón “Mode” del mando, la
primera potencia se conecta soplando el equipo aire caliente. El símbolo se enciende en el display.
3.4.3. Modo Calefacción. Potencia 2 (2000W). Presione nuevamente el botón “Mode” del mando, la
segunda potencia se conecta. El símbolo se enciende en el display.
Al presionar el botón “Mode” de nuevo, la unidad volverá al modo aire frio.
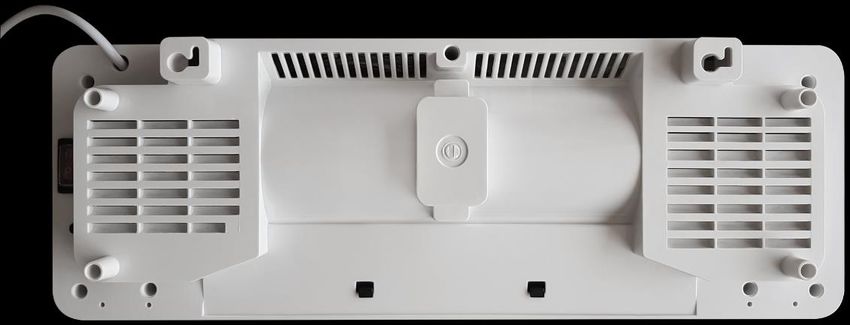
Nota. Para un funcionamiento manual, en caso de que no disponga del control remoto, debe presionar el
botón de inicio que se encuentra al lado del interruptor en la parte posterior del equipo. El calentador se
conectará en modo calefacción y nivel de potencia 2. El símbolo se encenderá.
Interruptor
Botón de inicio
33.5. Modo de funcionamiento termostato.
En el modo de funcionamiento termostato, el termo ventilador calentará en función de la temperatura de
consigna seleccionada y la temperatura ambiente actual.
Para utilizar el modo termostato, simplemente pulse las teclas “+” o “-” del mando hasta seleccionar la
temperatura ambiente deseada. La temperatura de consigna comienza a parpadear y el símbolo ST se
enciende.
Las diferentes potencias se conectarán en función de la diferencia entre la temperatura de consigna y la
temperatura ambiente para alcanzar el confort deseado.
3.5.1. Programación Semanal
Es posible programar semanalmente el funcionamiento del calentador, estableciendo el tramo horario de
cada día de la semana que queremos que el calefactor funcione, así como su temperatura de consigna. Para
ello, deberá establecer en primer lugar los tramos horarios de funcionamiento y posteriormente la
temperatura de consigna de cada día de la semana.
A. Tramos horarios semanales
En primer lugar, programaremos los tramos horarios de cada día de la semana en los que queremos que el
calentador funcione.
- Dia de la Semana. Presione el botón “W-timer” una vez y la luz comenzará a parpadear
(lunes). Presionando “+” o “-” elegirá el día de la semana en el cual quiere realizar la programación
(Mo=lunes...Su=domingo etc.)
- Inicio de calentamiento. Presione el botón “W-timer” de nuevo. Se encenderá el símbolo
(inicio de programación).
o Parpadeará en primer lugar en el display las horas. Presione “+” o “-” para elegir la hora.
o Presione el botón “W-timer” de nuevo. Parpadearán en el display los minutos. Presione
“+” o “-” para elegir los minutos de la hora de inicio.
- Fin del calentamiento. Presione el botón “W-timer” de nuevo. Se encenderá el símbolo
(fin de programación).
o Parpadeará en primer lugar en el display las horas. Presione “+” o “-” para elegir la hora.
o Presione el botón “W-timer” de nuevo. Parpadearán en el display los minutos. Presione
“+” o “-” para elegir los minutos de la hora de fin.
Repita la operación con los diferentes días de la semana para establecer la programación horaria de
calentamiento.
B. Programación de Temperaturas
Procederemos ahora a seleccionar las temperaturas de consigna deseadas para cada día de la semana.
- Presiona la tecla “Delay”. Se encenderá (Mo=Lunes) y parpadeará en el display la temperatura.
- Utilice los botones “+” o “-” para seleccionar la temperatura deseada.
- Presione nuevamente la tecla “Delay” para confirmar el valor de temperatura y pasar al siguiente
día de la semana (Tu: Martes). Utilice los botones “+” o “-” para seleccionar la temperatura
deseada.
- Repita el proceso anterior con el resto de días de la semana.
44.- FUNCIONES ADICIONALES
4.1. Temporizador 24h
Es posible programar el apagado automático del equipo, para ello, pulse el botón “24h” repetidamente
hasta seleccionar el número de horas tras el que desea que el equipo se apague automáticamente
(00=apagado, 01=1 hora, 02=2 horas…24=24 horas). Se encenderá el símbolo .
4.2. Ventanas abiertas
Con la función ventanas abiertas activada, se desconectarán los elementos calefactores en caso de detectar
el equipo una bajada brusca de temperatura ambiente. Para activar la función, presione el botón “Auto” y
se encenderá el símbolo .
Para desactivar la función, presione de nuevo el botón “Auto” y desaparecerá el símbolo , indicando
que la función de ventanas abiertas está desactivada.
4.3. Función Swing
Presione el botón “Swing” en cualquier modo de funcionamiento y la pestaña de la salida de aire oscilará,
para repartir el flujo de aire por toda la estancia.
4.4. Bloqueo de control remoto
Presione el botón “Lock” en cualquier modo de funcionamiento. La pantalla se apagará manteniendo solo
el símbolo encendido. El calentador seguirá trabajando en el modo en el que se encontraba y se
bloquearán los botones del mando, excepto el botón ON/OFF.
5.- LIMPIEZA Y MANTENIMIENTO
Este calefactor no precisa de ningún tipo de mantenimiento especial, proporcionando confort térmico
durante largas temporadas. Limpie el polvo con un trapo suave y seco, sólo cuando la unidad esté
desconectada y fría.
No utilice disolventes ni productos abrasivos.
Este equipo ha sido fabricado dentro de un sistema de calidad asegurada y conforme a procesos respetuosos
con el medio ambiente. Una vez finalizada la vida útil del aparato, llévelo a un punto limpio para que sus
materiales puedan ser reciclados de forma adecuada.
56.- ESPECIFICACIONES TÉCNICAS
Modelo CCB-2000
Potencia 2000 W
Niveles de Potencia 2 niveles (2000 / 1000 W)
Ancho 54 cm
Profundidad 12,5 cm
Altura 18,5 cm
Peso 3 kg
Tensión de alimentación 220 - 240 V
7.- FICHA DE PRODUCTO
ErP
MODELO: ELNUR GABARRON CCB200
Información Símbolo Valor Unidad
Potencia calorífica
Potencia calorífica nominal Pnom 2,0 kW
Potencia calorífica mínima Pmin 1,0 kW
Potencia calorífica máxima continuada Pmax,c 2,0 kW
Consumo auxiliar de electricidad
A potencia calorífica nominal elmax 0,000 kW
A potencia calorífica mínima elmin 0,000 kW
En modo espera elSB1.- WARNING Please read these instructions before installing or using this appliance for the first time.
• The warranty of the heater will not cover any damage caused by non-observance of any of these instructions. The instructions
should be retained for future reference. This guide must be kept and given to any new owner.
• This appliance can be used by children aged from 8 years and above and persons with reduced physical, sensory or mental
capabilities or lack of experience and knowledge if they have been given supervision or instruction concerning the use of the
appliance in a safe way and understand the hazards involved. Children must not play with the appliance. Cleaning and user
maintenance must not be made by children without supervision.
• Children aged from 3 years and less than 8 years shall only switch on/off the appliance provided that it has been placed or
installed in its intended normal operating position and they have been given supervision or instruction concerning use of the
appliance in a safe way and understand the hazards involved. Children aged from 3 years and less than 8 years shall not plug in,
regulate and clean the appliance or perform user maintenance.
• Children of less than 3 years should be kept away unless continuously supervised.
• Please check that the voltage in the rating label fits the power supply.
• The use of heaters is forbidden in any area where there is a presence of gases, explosives or inflammable objects.
• Do not use this heater to dry clothes. Do not cover this heater or put objects in contact with it.
• Neither the connecting cable nor any other object must come into contact with the hot unit.
• Do not cover this heater at any time.
• The air outlet of the thermal radiator and the air inlet are provided to ensure the most efficient operation of the appliance. They
also protect the heater from overheating; therefore, it is essential that at no time are they covered.
• This heater should be switched off at the isolating switch before any repair work is carried out.
• The heater should not be used just below an electrical socket.
• The appliance must be used in such a way that it is impossible for anyone using a bath or shower, to touch the controls.
• The heater is fitted with a flexible cable size 3 x 1.00 mm² for electrical connection. It may be used to connect the heater to the
fixed wiring of the premised through a suitable connection box positioned adjacent to the heater.
• If the flexible power cable for this unit is damaged, it may only be replaced by a repair workshop recognised by the manufacturer,
as special tools are necessary.
• All models are supplied with an electrical interrupt cut-out. This will switch off the heater if, for any reason, it overheats. Should
the cut-out operate, turn the heater off and remove the cause for the overheating. The cut-out will be reset automatically.
• The presence of air particles of smoke, dust and other pollutants could, in time, discolour the walls and surfaces around the
heater.
• CAUTION — Some parts of this product can become very hot and cause burns. Particular attention must be given when
children and vulnerable people are present.
• Do not place the heater on carpets. Always ensure that the heater is placed on a firm level surface. Ensure that the heater is
not positioned close to curtains or furniture as this could represent a fire hazard. The distance towards the front between the
front air grille and objects must be at least 65 cm. Towards the backside, the device must be clear for air supply.
• Please remove the baffle before using the remote control. If don’t use remote control, please put the insulation paper back into
the remote control to ensure that the battery power is enough.
• If want to shut off the heater, press the on/off switch to off, then the heater will keep the fan working 30 seconds until it blowing
out cool wind, then the heater will stop working, and you may pull off the plug.
• Make sure that the appliance is securely and vertically fitted to the wall. The heater must be installed at least 2 m above the floor.
72.- INSTALLATION
The heater must be installed and used in accordance with current electrical legislation.
To prevent danger, heed the safety instructions.
Important! Ensure that there are no electrical cables or other installations (for example, water pipes) close
to the drill holes. Make sure that the device has been positioned securely and vertically against the wall.
Make the drill holes on the wall 2 m from the floor and at least 25 mm from the closest wall. Insert the bolts
in the holes, making sure they protrude 10 mm from the wall. Hang the device after making sure that the
bolts have been fixed securely.
Position the heater on a firm and flat surface. The main button should face down. Connect the device to an
AC 220-240V electrical socket. It will emit a "BEEP" sound, the "Power" light will come on and the heater
will show the pre-set temperature. It will flash for 3 seconds.
3.- OPERATION
3.1. Control Panel 3.2. Remote control
The control uses a CR2025 3V lithium battery.
ON/OFF On/Off button
24H 1-24 hours timer
MODE Select mode
Swing Air outlet swing
LOCK Heater child lock
AUTO Open window function
Delay Adjust temperature (week mode)
W.Timer Weekly timer
+/- Up / Down
Set Set time
83.3. Set the day / time
Click the ON/OFF button to switch on the device. The display will show 00:00 and display (Monday).
- WEEK. Click the “Set” button on the remote control and it will flash . Click the buttons “+”
or “-” to set the correct day (Mo= Monday...Su= Sunday, etc.).
- TIME. Click the “Set” button again until it reaches the time. The hours will flash on the display.
Click “+” or “-” to set the correct time.
- MINUTES. Click the “Set” button again. The minutes will flash on the display. Click “+” or “-” to
set the correct minutes.
Finally, click the “Set” button and the day and time values will be set in the device.
3.4. General operating modes.
In the general operating modes, the device will operate in the relevant mode (cold air, heating mode),
regardless of the room temperature.
3.4.1. Cold air mode. Switch on the heater by clicking the ON/OFF button on the remote control. The
unit will start to operate in cold air mode. The room temperature will be shown and the RT (Real
Temperature) icon will appear on the display.
3.4.2. Heating Mode. Power 1 (1000W). Click the “Mode” button again on the control. The first
power level connects and blows hot air from the device. The symbol lights up on the display.
3.4.3. Heating Mode. Power 2 (2000W). Click the “Mode” button of control again. The second
power level connects. The symbol lights up on the display.
If you click the “Mode” button again, the unit will return to cold air mode.
Note. For manual operation, in case you do not have a remote control, you should click the start button
found next to the switch, at the rear of the device. The heater will connect in heating mode and at power
level 2. The symbol will light up.
Main Switch
Start Button
93.5. Thermostat operating mode.
In the thermostat operating mode, the heater will heat, depending on the temperature setting and the
current room temperature.
To use the thermostat mode, simply press on the “+” or “-” keys of the remote control until you have
selected the desired room temperature. The set-point temperature will start to flash and the ST symbol
will light up.
The different power levels will be connected according to the difference between the set-point
temperature and the room temperature, in order to reach the desired comfort.
3.5.1. Weekly programming
It is possible to program a weekly heater’s operation, setting the time periods on each day of the week
when the heater will operate, as well as the set-point temperature for each period. With that in mind, first
of all you should set the operating periods and, later, the set-point temperature on each day of the week.
A. Weekly periods programming
First of all, we shall program the time periods of each day of the week when the heater will operate.
- Day of the Week. Click the “W-timer” button once and the light will start to flash
(Monday). By clicking “+” or “-”, you can choose the day of the week that you want to program
(Mo= Monday...Su= Sunday, etc.)
- Start heating time. Click the “W-timer” button again. The symbol will light up (start of
programming).
o First of all, the hours will flash on the display. Click “+” or “-” to choose the time.
o Click the “W-timer” button again. The minutes will flash on the display. Click “+” or “-” to
choose the minutes of the start time.
- End heating time. Click the “W-timer” button again. The symbol will light up (end of
programming).
o First of all, the hours will flash on the display. Click “+” or “-” to choose the time.
o Click the “W-timer” button again. The minutes will flash on the display. Click “+” or “-” to
choose the minutes of the end time.
Repeat the task with the different days of the week to set the time heating program.
B. Temperature programming
Now we shall proceed to select the set-point temperatures required for each day of the week.
- Click the “Delay” key. The (Mo= Monday) will light up and the temperature will flash on the
display.
- Use the “+” or “-” buttons to select the desired temperature.
- Click the “Delay” key again to confirm the temperature setting and move on to the next day of
the week (Tu: Tuesday). Use the “+” or “-” buttons to select the desired temperature.
- Repeat the previous process for the rest of the days of the week.
104.- EXTRA FUNCTIONS
4.1. 24 hours timer
It is possible to set the device to switch off automatically. To do so, click the “24h” repeatedly until you
have selected the number of hours after which you want the device to switch off automatically (00= off,
01=1 hour, 02=2 hours…24=24 hours). The symbol will light up.
4.2. Open window detection
With the open window function activated, the heating elements will be disconnected in case the device
detects a sudden drop in room temperature. To activate the function, click the “Auto” button and the
symbol will light up.
To deactivate the function, click the “Auto” button again and the symbol will disappear. This
confirms that the open windows function has been deactivated.
4.3. Auto air swing function
Click the “Swing” button in any operating mode and the air outlet louver will swing to distribute the
airflow through the whole room.
4.4. Remote control lock
Click the “Lock” button in any operating mode. The screen will switch off and only the symbol will
stay lit up. The heater will continue to work in its current mode and the control buttons will be locked,
except for the ON/OFF button.
5.- CLEANING AND MAINTENANCE
The heaters do not precise any special maintenance providing thermal comfort during large periods. Clean
dust with a dry, soft cloth only when the unit is disconnected and cold.
Do not use solvents or abrasive products for cleaning.
This heater has been manufactured under an assured quality system using environment friendly processes.
Please take the heaters to a clean point once their useful life is finished, in order to recycle their materials in
the right way.
116.- TECHNICAL SPECIFICATIONS
Model CCB-2000
Power 2000 W
Power Levels 2 levels (2000 / 1000 W)
Width 54 cm
Depth 12,5 cm
Height 18,5 cm
Weight 3 kg
Voltage 220 - 240 V
7.- PRODUCT FICHE
ErP
MODEL: ELNUR GABARRON CCB200
Item Symbol Value Unit
Heat Output
Nominal heat output Pnom 2,0 kW
Minimum heat output Pmin 1,0 kW
Maximum continuous heat output Pmax,c 2,0 kW
Auxiliary electricity consumption
At nominal heat output elmax 0,000 kW
At minimum heat output elmin 0,000 kW
In standby mode elSBNOTAS / NOTES
13ES
El símbolo en el producto o en su embalaje indica que este producto no se puede tratar como desperdicios
normales del hogar. Este producto se debe entregar al punto de recolección de equipos eléctricos y
electrónicos para reciclaje. Al asegurarse de que este producto se deseche correctamente usted ayudará a
evitar posibles consecuencias negativas para el ambiente y la salud pública, lo cual podría ocurrir si este
producto no se manipula de forma adecuada. Para obtener información más detallada sobre el reciclaje de
este producto, póngase en contacto con la administración de su ciudad, con su servicio de desechos del
hogar o con la tienda donde compró el producto. Estas disposiciones solamente son válidas en los países
miembros de la UE.
ES ADVERTENCIA: Para evitar sobrecalentamientos, no cubrir el aparato de calefacción
EN
The symbol on the product or in its packaging indicates that this product may not be treated as household
waste. Instead it shall be handed over to the applicable collection point for the recycling of electrical and
electronic equipment. By ensuring this product is disposed of correctly, you will help prevent potential negative
consequences for the environment and human health, which could otherwise be caused by inappropriate waste
handling of this product. For more detailed information about recycling of this product, please contact your
local city office, your household waste disposal service or the shop where you purchased the product. These
instructions are only valid in the EU member states.
WARNING: In order to avoid overheating do not cover the heater.
14ELNUR S.A. Travesía de Villa Esther, 11 28110 Algete - Madrid Tfno. Atención al Cliente: +34 91 628 1440 www.elnurgabarron.es www.elnurgabarron.com www.elnur.co.uk Como parte de la política de mejora continua, Elnur, s.a. se reserva el derecho a realizar modificaciones técnicas sin previo aviso. As a part of the policy of continuous product improvement Elnur s.a.. reserves the right to alter specifications without notice. 90295135 R1
También puede leer