HE IS RISEN DIY EMPTY TOMB - RELIGIOUS EDUCATION PROGRAM - Holy Family Novi
←
→
Transcripción del contenido de la página
Si su navegador no muestra la página correctamente, lea el contenido de la página a continuación

RELIGIOUS EDUCATION PROGRAM

           DIY
HE IS RISEN
   EMPTY TOMB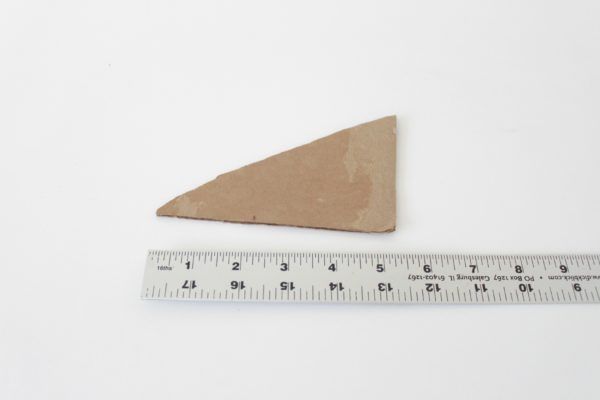
Easter celebrates the beginning and foundation of
Christianity. Jesus was raised from the dead, and it goes to
show that He conquered sin and death.
He is the only Son of God, who through this amazing
resurrection, brings us closer to God and our faith.

      25 to 35
      minutes

      beginner
                WHAT YOU'LL NEED
• One 18” x 9” Piece of Cardboard
( could be from a packing box)
• 2 Paper Plates
• 5 Paper Straws
• Scissors
• Quick-drying Craft Glue
• Markers

STEP 1 Cut the paper
plate in half. Cut a half-
oval shape in the center
of the plate about 2” x
2”. Set the half-oval you
cut out aside for later.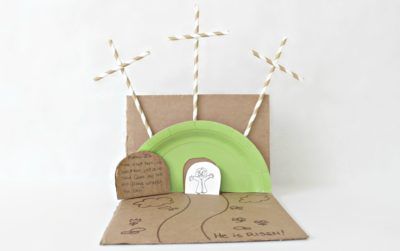
STEP 2 Cut an end off
                          the cardboard that is 3
                          ½” wide. You will use the
                          small piece for cutting
                          out shapes in a minute.
                          The larger piece will
                          remain intact.
STEP 3 Fold the larger, remaining piece of
cardboard so that the fold is 6” from one end and 8”
from the other.
                          STEP 4 From the smaller
                          piece of cardboard, cut
                          a triangle that is 3 ½
                          inches at the base and 5
                          ½ inches tall.

STEP 5 Also cut a half-oval that is 3 ½” at the
base and 3” tall from the same piece of cardboard.

STEP 6   Cut 2 of the paper straws in half.
STEP 7 Glue the paper
                      plate half onto the short
                      side of the large piece of
                      cardboard

STEP 8 Glue the triangle to the back of the
large piece of folded cardboard as a sort of
“kickstand” to help your Empty Tomb Craft
stand up
                      STEP 9 Glue the shorter
                      pieces of straws to the
                      regular straws to make
                      crosses

STEP 10 Glue the crosses to the back of
the cardboard with the bottoms tucked below
the ridge of the paper plate
STEP 11 Have the child write the Bible verse
Matthew 28:6 on the back of the half oval
piece of cardboard from step five.
This will be the stone that was rolled away.
Glue it next to the tomb opening so you don’t
lose it. You may also choose to leave it
unattached for dramatic play.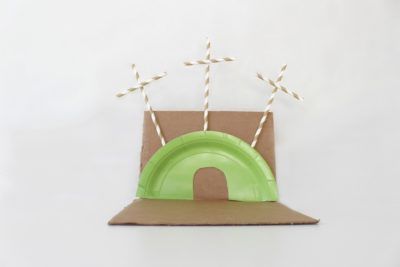
“He is not here; he has risen, just as he said.
Come and see the place where he lay.”
–Matthew 28:6

                      STEP 12 Have the child
                      draw a picture of Jesus
                      on the back of the paper
                      plate cut-out from step
                      one. Glue the picture of
                      Jesus inside the opening
                      of the tomb, or leave it
                      unattached for dramatic
                      play.
STEP 13 Let your child decorate their Empty
Tomb Craft as they wish!
Now that the kids have completed this Jesus
is alive craft, you can read of Jesus’s
Resurrection straight from the Bible. This
craft not only will it help you share the REAL
meaning of Easter in a way your kids can
understand, but it is also a reminder that
“Jesus is Alive ” for you, too!
PROGRAMA DE EDUCACIÓN RELIGIOSA

 HAZLO TU MISMO
EL RESUCITO
 LA TUMBA VACIA
La Pascua es la celebración del inicio y fundación de la
Cristiandad. Jesús resucitó de entre los muertos y nos enseña
que Él ha derrotado la muerte y el pecado.
Él es el Hijo Único de Dios, quien por su resurrección nos ha
acercado al Padre y da sentido a nuestra fe.

      25 to 35
      minutos

      principiante
                    Materiales
• Una pieza de cartón 18” x 9”
( puede ser de un empaque)
• 2 Platos de Papel
• 5 Popotes de Papel
• Tijeras
• Pegamento de rápido secado
• Marcadores

PASO 1 Cortar el plato
de papel a la mitad.
Corta un medio óvalo al
centro de 2” x 2”. Guarda
este medio ovalo para
usarlo más tarde.
PASO 2 Corta la orilla
del cartón de 3 ½” de
ancho. Vamos a usar
este para cortar piezas
pequeñas más adelante.
La pieza grande
permanecerá así .
PASO 3 Dobla la pieza grande de cartón deberá
doblarse de manera que quede una pieza de 6” de
un lado y de 8” por el otro.
PASO 4 De la pieza
pequeña de cartón
corta un triángulo, este
debe ser de 3 ½ pulgadas
de base y 5 ½ pulgadas
de alto.
PASO 5 También corta un medio óvalo de 3 ½” y
de base 3” pulgadas de alto de esta misma pieza de
cartón pequeña.
PASO 6 Corta 2 popotes de papel a la mitad.PASO 7 Pega el medio
plato de papel a lo largo
del dobles de la pieza
grande de cartón.
PASO 8 Pega el triángulo en la parte de
atrás del cartón doblado para hacer una
especie de “kickstand” que sostenga nuestra
manualidad.
PASO 9 Pega las piezas
pequeñas de los popotes
para hacer con ellas unas
cruces
PASO 10 Pega las cruces en la parte de atrás
del cartón doblado de tal forma de que queden
en el papel de plato al frente
PASO 11 Deja que tu hijo escriba el verso
bíblico de Mateo 28:6 en la pieza de atrás del
óvalo del PASO 5.
Esta es la roca que será rodada. Pega junto a la
tumba abierta para que no se te pierda. Si tu
quieres puedes dejarla suelta si quieres hacer
una representación.“No esta aquí; ha resucitado, como lo había
dicho. Vengan a ver el sitio donde estaba
puesto.” –Mateo 28:6
PASO 12 Deja que el niño
dibuje a Jesús en la parte
de atrás del medio óvalo
del PASO 1. Pegalo en la
apertura de la tumba o si
prefieres déjalo sin pegar
para una representación.
PASO 13 ¡Deja libremente a los niños decorar la
Tumba Vacía a su gusto!
Ahora los niños han completado la manualidad
de Jesús está vivo, ahora puedes leer la
historia de la Resurrección directo de la Biblia.
Esta manualidad no solo te ayudara a
compartir el real sentido de la Pascua de tal
forma que los mas pequeños pueden entender,
pero tambien es un recordatorio de que ¡El esta
Vivo! para ti también.También puede leer