The lights and sounds of Christmas Las luces y los sonidos de Navidad - INSTRUCTION MANUAL MANUAL DE INSTRUCCIONES
←
→
Transcripción del contenido de la página
Si su navegador no muestra la página correctamente, lea el contenido de la página a continuación
the lights and sounds
of Christmas     ®

Las luces y los sonidos
             ®
de Navidad

        INSTRUCTION MANUAL
      MANUAL DE INSTRUCCIONES

                           Patented
                           Patentado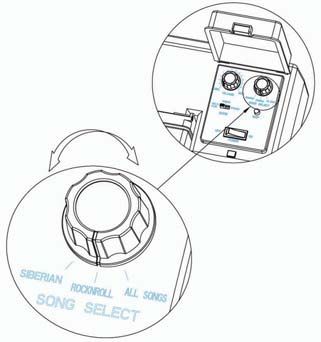
Safety related graphical symbols                      90 DIAS DE GARANTIA LIMITADA
                                                      Mr Christmas Inc. garantiza al cliente/comprador original de este juego
                                                      de LUCES Y SONIDOS DE NAVIDAD® que éste no tendrá defectos de fabricación o
                                                      materiales por un período de 90 días a partir de la fecha de compra. Bajo esta garantía,
                                                      cualquier responsabilidad de Mr Christmas Inc. estará limitada a la reparación o
                                                      el reemplazo de las piezas defectuosas sin costo alguno si el artículo es devuelto con
                                                      el envío pre-pagado con una prueba de la fecha de compra, nombre y dirección del
                                                      cliente/comprador original y una descripción del defecto. Llame, por favor, al servicio
                                                      de garantía al 1-800-4MR-Xmas.

                                                      Mr Christmas Inc. no será responsable por ningún otro daño o pérdida. Algunos
                                                      estados no permiten la exclusión o limitación de los daños incidentales o consecuentes.
                                                      Por tanto, la limitación o exclusión puede no aplicarse a ciertos clientes/compradores.

                                                      Esta garantía no cubre los defectos ocasionados por el daño durante la transportación,
                                                      abuso, accidente, negligencia o reparaciones hechas por otros. Esta garantía le
                                                      concede al cliente/comprador derechos legales              El cliente/comprador
                                                      pudiera tener además otros derechos que varían de un estado a otro.

                                                                                                               ©2010 Mr Christmas Inc.
                                                                                                                  5841E. Shelby Drive
                                                                                                                  Memphis, TN 38141
                                                                                                                                 USA
                                                                                                                    1-800-4MR-Xmas
                                                                                                                www.mrchristmas.com

                            Bottom view of the unit

                WARNINGˈ SEE INSTRUCTION MANUAL

                ELECTRIC SHOCK HAZARD

                AC ONLY

                PROTECTIVE EARTHING

                                                                                                10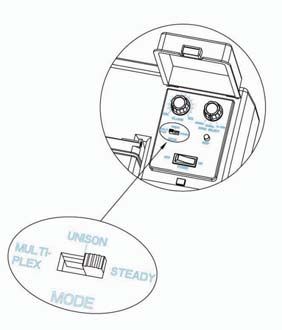
V. Detección de problemas                                                                               IMPORTANT SAFETY INSTRUCTIONS
Su juego de LUCES Y SONIDOS DE NAVIDAD® ha sido diseñado para brindarle
un funcionamiento sin problemas durante muchas temporadas. Si tuviera                                   1. Read these instructions.
algún problema, por favor        a la siguiente tabla para conocer las
soluciones que se sugieren.
                                                                                                        2. Keep these instructions.
Problema            Causa posible                Solución                                               3. Heed all Warnings.
No hay efecto       No enciende                  Asegúrese de que el cable de la fuente esté
de luz
                                                                                                        4. Follow all instructions.
                                                 conectado a un tomacorriente que funcione.
Nohaymúsica                                                                                             5. Clean only with dry cloth.
                    Sobrecarga ocasionada        Reemplace el fusible (siga el procedimiento que
                    por la conexión de juegos    se indica en la sección para el reemplazo del          6. Do not block any ventilation openings. Install in accordance with the
                    de luces o aparatos de       fusible de este manual).                                  manufacturer’s instructions.
                    luces decorativas que ex-
                    ceden el máximo de 1440                                                             7. Do not install near any hear sources such as radiators, heat registers,
                    vatios, fusible quemado.
No hay efecto de    Problema en la línea de      1. Asegúrese de que el juego de luces esté
luz pero se escu-   luces.                          enchufado en el tomacorriente de la unidad.         8. Do not defeat the safety purpose of the polarized or grounding–type
cha música                                       2. Retire el juego de luces de la unidad y                plug. A polarized plug has two blades with one wider than the other.
                                                    enchúfelo directamente a un tomacorriente              A grounding type plug has two blades and a third grounding prong.
                                                    para           si enciende. Si no encendiera,          The wide blade or the third prong is provided for your safety. If the
                                                    revise para detectar bombillos rotos o faltantes.
                                                 3. Revise para detectar un fusible quemado en                replacement of the obsolete outlet.
                                                    el enchufe del juego de luces y reemplácelo si
                                                                                                        9. Protect the power cord from being walked on or pinched particularly at
                                                    estuviera dañado.
                                                 4. Revise para detectar si el fusible de la unidad
                                                                                                           plugs, convenience receptacles, and the point where they exit from
                                                    está dañado. De estarlo, reemplácelo con el            the apparatus.
                                                    fusible de repuesto (se incluye).           a la    10.
                                                    sección III de este manual del usuario.
                                                                                                        11. Unplug this apparatus during lightning storms or when unused for
El efecto de luz 1. Si está en el modo           1. Re-ajuste la(s) línea(s) de luces. Vea la sección
                    MULTIPLE, la línea de           II, parte 7.
                                                                                                            long period of time.
no es el deseado
                       luces no está enchufada   2. Ajuste el interruptor de modo. Vea la sección       12.
                       en la toma correcta.         II, parte 6.
                    2. El interruptor de modo                                                                 when the apparatus has been damaged in any way, such as power-
                       está en la posición                                                                    supply cord or plug is damaged, liquid has been spilled or objects
                       incorrecta.                                                                            have fallen into the apparatus, the apparatus has been exposed to
                                                                                                              rain or moisture, does not operate normally, or has been dropped.

                                                 9                                                                                           1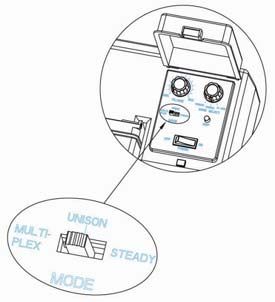
INDEX                                                                                                                             2. Ajuste panorámico: Usando el siguiente arreglo, la intermitencia de las
                                                                                                                                     luces estará distribuida de una manera más panorámica por todo el frente
Mounting the unit on the wall....................................................................page 3                              de la casa:
Installing the ground stake .........................................................................page 3
Turning on the unit .........................................................................................page 4
Selecting songs ................................................................................................page 4
                                                      ...............................................................page 4 - 5
Replacing the fuse ..........................................................................................page 6
Troubleshooting ...............................................................................................page 9
                                                                                                                              ®
                WhenusingthisoutdoorLIGHTSANDSOUNDSOFCHRISTMAS ,
basic safety precautions should always be followed to reduce the risk of

a) Use only three-wire outdoor extension cords that have three-prong
   grounding plugs and grounding receptacles that accept the apparatus’
   plug.
b) Ground Fault Circuit Interrupter (GFCI) protection should be provided
                                                                                                                                     Luces como zonas:
   on the circuit(s) or outlet(s) to be used for the wet location portable
                                                                                                                                     Zona 1 – Todos los aleros                     Zona 4 – Arbol
   lamp. Receptacles are available with built-in GFCI protection.                                                                    Zona 2 – Todos los arbustos                   Zona 5 – Ciervo izquierdo
c) Use only with an extension cord for outdoor use, such as type SW,                                                                 Zona 3 – Marco de la puerta                   Zona 6 – Ciervo derecho
   SW-A, SOW, SOW-A, STW, STW-A, STOW, STOW-A, SJW, SJW-A, SJOW,
   SJOW-A, SJTW, SJTW-A, or SJTOW, SJTOW-A.                                                                                       Luz en la zona       Enchufe en la toma   Tendrá el efectot
d) This power unit is intended to be correctly oriented in a vertical or                                                                               de la unidad
                                                                                                                                  ³Todos los aleros   $³Superior izqui-    Intermitencia máxima, interactúa con la toma B
USE FOR LIGHTING DEVICE ONLY.                                                                                                                          erdo
DO NOT USE FOR ANY OTHER ELECTRICAL DEVICE OR ADAPTOR.                                                                            ³Todos los ar-      %³Superior central   Intermitencia máxima, interactúa con la toma A
THIS IS NOT A POWER DISTRIBUTOR.                                                                                                  bustos
READ ALL INSTRUCTIONS AND SAVE FOR FUTURE REFERENCE.
                                                                                                                                  ³0Drco de la        &³Superior derecho Intermitencia media, interactúa con la toma D
THIS INSTRUMENT IS NOT A TOY!                                                                                                     puerta
Please read this entire instruction booklet.
                                                                                                                                  ³$UERO              '³,QIHULRU izquierdo Intermitencia media, interactúa con la toma C
I. Description
Thank you for purchasing the LIGHTS AND SOUNDS OF CHRISTMAS® from                                                                 ³&LHrvo izquierdo   (³,QIHULRU central   Intermitencia mínima, “resalta” la música con la toma F
Mr Christmas Inc. This product plays 20 Christmas songs and has six                                                               ³&LHrvo derecho     )³,QIHULRU derecho   Intermitencia mínima, “resalta” la música con la toma E

This product plays 20 Christmas songs and has six outlets in

1440 watts total or 240 watts per outlet.

                                                            2                                                                                                                  8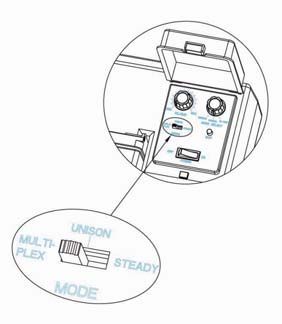
IV. Ajuste sugerido en modo “Múltiple”
Como cada persona decora su hogar de una manera particular, hay muchas                                  work with the LIGHTS AND SOUNDS OF CHRISTMAS®, follow these steps:
formas de ajustar sus luces decorativas según la música usando el juego de                                 1.
luces y sonidos navideños para exteriores. Una manera sencilla a considerar                                   the set wattage.
en cuanto al uso del producto en el modo múltiple es pensar en su decoración                               2.
de luces por “zonas”. A continuación aparecen fotos y tablas que muestran                                  3. The resulting number of sets can be safely plugged into each LIGHTS AND
dos posibles arreglos de las seis “zonas” usando el juego de luces y sonidos                                  SOUNDS OF CHRISTMAS® outlet.
navideños para exteriores:                                                                              EXAMPLE:
1. Ajuste simétrico: Usando el siguiente arreglo, la intermitencia de las luces                            1. You have a mini light set of 40 watts.
    tendrá lugar a lo largo de líneas simétricas en la decoración exterior:                                2. Dividing 240 by 40 watts, the result is 6.
                                                                                                           3. You can safely plug 6 of these mini light sets into 1 of the outlets on the
                                                                                                              LIGHTS AND SOUNDS OF CHRISTMAS®.

                                                                                                        II. Operation
                                                                                                           1. Installation:
                                                                                                              FOR WALL MOUNTING
                                                                                                              Attach the three screws (provided) to a wall and then mount the unit on
                                                                                                              these three screws
                                                                                                              through the three
                                                                                                              “Key holes” on the
                                                                                                              back of the unit.
                                                                                                              Make sure the unit

                                                                                                              against the wall
   Luces como zonas:
                                                                                                              (Mounting Template,
   Zona 1 – Alero izquierdo y arbustos                Zona 4 – Alero central
                                                                                                              See FIG I).
   Zona 2 – Alero derecho y arbustos                  Zona 5 – Arbol
   Zona 3 – Marco de la puerta                        Zona 6 – Escultura de luces/ciervo
Luz en la zona                Enchufe en      Tendrá el efecto                                                                      FIG I: BACK OF UNIT
                              la toma de la                                                                                         WALL MOUNTING
                              unidad
³$OHro izquierdo y ar-       $³Superior      Intermitencia máxima, interactúa con la toma B
bustos                        izquierdo
³$OHro derecho y arbustos    %³Superior      Intermitencia máxima, interactúa con la toma A
                                                                                                              FOR GROUND STAKING
                              central                                                                         Slide the ground stake into the slot
³0Drco de la puerta          &³Superior      Intermitencia media, interactúa con la toma D                   on the base of the unit. Carefully press
                              derecho                                                                         the stake into the ground. (See FIG II.)
³$OHro central               '³,QIHULRU      Intermitencia media, interactúa con la toma C
                              izquierdo
³$UERO                       (³,QIHULRU      Intermitencia mínima, “resalta” la música con la toma F
                              central                                                                                                         FIG II: STAKE FOR
³(VFXOWXUD de luces/ciervo   )³,QIHULRU      Intermitencia mínima, “resalta” la música con la toma E                                         GROUND MOUNTING
                              derecho

                                                  7                                                                                            3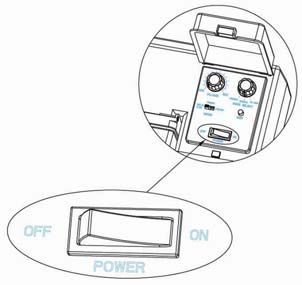
2. Plug your Christmas light strings                                     III. Advertencia
                                                                            1. No conecte líneas de luces ni juegos de iluminación que excedan el
   the six outlets (MAX 240 watts                                              vataje de la
   per outlet).                                                             2. Mantenga siempre la cubierta resistente a la intemperie cerrada después
                                                                               de los ajustes.
3. Plug the main power cord into                                            3. Incluye fusible de repuesto para el reemplazo. Para el reemplazo de
   a power outlet (recommended to                                              fusible, (vea la FIG IX)
   plug into a receptacle or                                                   El fusible protege contra sobrecarga o abuso si se excede la
   extended receptacle protected                                               máxima que se
   by GFCI).                                                                   Para reemplazar el fusible, desconecte el cable de la fuente del tomacor
                                                                               riente eléctrico. Reemplácelo con el fusible del mismo tipo y la misma
4. To turn ON, press the power              FIG III: POWER SWITCH
                                                                                             12 amperios y 125 voltios con             UL.
   switch to the “ON” position. (See
   FIG III.)                                                                                      Para reemplazar el fusible

5. The song select switch allows                                                                  125 voltios, 12 amperios.
   you to choose between a group                                               ¡Desconecte siempre el cable de la fuente del tomacorriente antes
                                                                                                        del reemplazo!
   styles. (See FIG IV.)
                                                                           Hale el fusible hacia afuera siguiendo los pasos 1-2-3 y reemplácelo con el
6. Adjust the mode switch to get                                                             fusible nuevo siguiendo los pasos 3-2-1.

   MULTIPLEX: Each of the six out-
   lets drives each of the coordi-
   nating light sets to create a
                                         FIG IV: MUSIC STYLE SELECTOR
   the music. (See FIG V.)
   UNISON: All six outlets drive all

   neously to the rhythm of the
   music. (See FIG VI.)

   STEADY: All six outlets keep light
   sets steady On (NO FLASHING).
   (See FIG VII.)

                                                                                                 FIG IX: REEMPLAZO DEL FUSIBLE

                                        FIG V: MULTIPLEX LIGHTING MODE
                                    4                                                                          6
FIG VI: MODO DE FIG VII: MODO DE FIG VI: UNISON LIGHTING MODE FIG VII: STEADY LIGHTING MODE
ILUMINACION AL UNISONO ILUMINACION CONTINUO
7. En el MODO MULTIPLE, las seis tomas funcionan de una manera diferente 7.
(para crear una coreografía de luces) y están marcadas A, B, C, D, E y F. La (to create choreography of lights) and are marked A, B, C, D, E and F.
toma A tiene la mayor acción de iluminación, descendiendo hacia la OUTLET A has the most lighting action, descending to OUTLET F with the
toma F con la menor acción. Arregle sus juegos de luces de la least amount of action. Arrange your light strings as desired.
manera deseada.
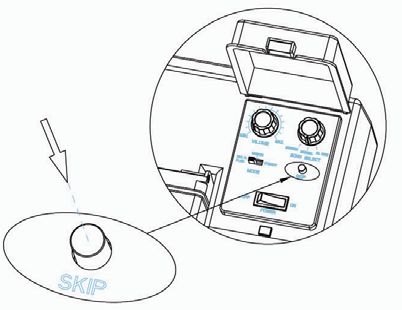
8. Presione el botón SKIP para escuchar una nueva canción. 8. Press the skip button to hear a new song. (See FIG VIII.)
(Veala FIG. VIII).
FIG VIII: BOTON SKIP PARA SALTAR CANCIONES FIG VIII: SONG SKIP BUTTON
9. Gire el control de volumen para ajustar el nivel de la música. 9. Turn the volume control to adjust music loudness.
5 5III. Warning 2. Enchufe sus luces decorativas
1. Do not connect the light strings or light sets to exceed rating. de Navidad o artefactos de
2. Always keep the weather proof cover closed after setting. luces decorativas en las seis tomas
3. Includes spare fuse for replacement. Fuse replacement (see FIG IX.) (MAXIMO de 240 vatios por toma).
exceeded. 3. Enchufe el cable de la fuente
To replace the fuse, always disconnect the main power cord from the a un tomacorriente eléctrico
power source. Replace with same type and same rating, 12A 125V UL (se recomienda enchufarlo en
listed fuse. un tomacorriente o extensión con
protección GFCI).
To Replace the Fuse 4. Para ENCENDER, presione el FIG III: INTERRUPTOR ELECTRICO
interruptor eléctrico hacia la
Caution: Only use same type of fuse with same rating: 125V 12AMP. posición de ON. (Vea la FIG. III).)
Always unplug the main power cord during replacement!
5. El interruptor de selección de
Pull out the old fuse following steps 1-2-3 and canciones le permite elegir entre
replace new fuse following steps 3-2-1. un grupo de canciones en
diferentes estilos musicales. (Vea
la FIG. IV).
6. Ajuste el interruptor de modo
para lograr un efecto de
iluminación diferente:
MULTIPLE: Cada una de las seis
FIG IV: SELECTOR
tomas acciona cada juego de DE ESTILOS MUSICALES
luz de manera coordinada para
crear un efecto de iluminación
según la música.
(Vea la FIG V).
AL UNISONO: Las seis tomas hacen
que todos los juegos de luces se
enciendan simultáneamente al
FIG IX: FUSE REPLACEMENT
ritmo de la música. (Vea la FIG VI).
CONTINUO: Los seis juegos de
luces se mantienen encendidos de
manera continua (NO FIG V: MODO DE
INTERMITENTE). (Vea la FIG VII). ILUMINACION MULTIPLE
6 4Para calcular el número de juegos de luces u otros aparatos de luces decorativas que IV. Suggested Set-up in the “Multiplex” Setting
pueden funcionar con las LUCES Y SONIDOS DE NAVIDAD, siga los siguientes pasos: Since everyone decorates their home in a unique way, there are likewise many
a la caja del juego de luces o del aparato de luces decorativas unique ways to set your lighted decorations to music using the LIGHTS AND
para determinar el vataje del juego. SOUNDS OF CHRISTMAS®. One easy way to consider using this product in the
2. Divida 240 entre el vataje del juego de luces o del aparato de luces Multiplex setting is to think of your outdoor lighting décor within “Zones.” Below
decorativas. are photos and charts outlining two possible arrangements of the six “Zones”
3. El resultado es el número de juegos que se pueden enchufar con seguridad using the LIGHTS AND SOUNDS OF CHRISTMAS®:
a cada toma de las LUCES Y SONIDOS DE NAVIDAD.
EJEMPLO: 1. Symmetrical Set Up
1. Usted tiene un juego de luces en miniatura de 40 vatios. the light will occur along symmetrical lines in the outdoor décor:
2. Divida 240 entre 40 vatios, el resultado es 6.
3. Puede enchufar con seguridad 6 de esos juegos de luces en miniatura en
1 de las tomas de las LUCES Y SONIDOS DE NAVIDAD®.
II. Funcionamiento
1. Instalación:
PARA EL MONTAJE EN LA PARED
Fije los tres tornillos (se incluyen) a la pared y monte luego la unidad en
estos tres tornillos
mediante las ranuras
ubicadas en la parte
posterior de la unidad.
Asegúrese de que la
unidad se ajuste
a la pared
(vea la plantilla de Lights as Zone:
montaje en la FIG I). Zone 1 – Left Eaves and Bushes Zone 4 – Center Eaves
Zone 2 – Right Eaves and Bushes Zone 5 – Tree
Zone 3 – Door Frame Zone 6 – Deer/Light Sculpture
FIG I: PARTE POSTERIOR DE LA UNIDAD
PARA EL MONTAJE EN LA PARED Light in Zone Plug into
Socket on Unit
PARA USAR CON ESTACAS DE SUELO
³/HIW(Dves and Bushes $³Top Left
Deslice la estaca para suelo en la ranura
³5LJKW(Dves and Bushes %³Top Center
ubicada en la base de la unidad. Presione con
cuidado la estaca para enterrarla en el suelo. ³'RRU)UDPH &³Top Right
(Vea la FIG. II). ³&HQWHU(Dves '³%RW/HIW
³7ree (³%RW&HQWHU
FIG II: ESTACA PARA EL ³'HHU/LJKW6FXOSWXre )³%RW5LJKW
MONTAJE EN EL SUELO
3 72. Panoramic Set Up INDICE
the light show will be distributed in more of a panorama across the
house front: Montaje de la unidad en la pared............................................................página 3
Instalación mediante estaca para suelo..............................................página 3
Encendido de la unidad................................................................................página 4
Selección de canciones ................................................................................página 4
Cambio de los diferentes modos........................................................página 4 - 5
Reemplazo del fusible ...................................................................................página 6
Detección de averías .....................................................................................página 9
Siempre que se use este juego de LUCES Y SONIDOS DE
NAVIDAD se deben seguir las precauciones básicas de seguridad para
evitar el riesgo de incendios, descargas eléctricas y lesiones personales.
a) Use solamente cables de extensión de tres alambres para exteriores
que tengan enchufes de conexión a tierra de tres puntas y
tomacorrientes de conexión a tierra que acepten el enchufe
del aparato.
Lights as Zone: b) Para las lámparas portátiles en lugares húmedos, se debe usar
Zone 1 – All Eaves Zone 4 – Tree protección mediante interruptor de circuito de falla conectado a tierra
Zone 2 – All Bushes Zone 5 – Left Deer (GFCI) en el circuito o las tomas que se empleen. Hay tomacorrientes
Zone 3 – Door Frame Zone 6 – Right Deer disponibles con protección GFCI incorporada.
Light in Zone Plug into Socket c) Use solamente cables de extensión para exteriores, de
on Unit tipo SW, SW-A, SOW, SOW-A, STW, STW-A, STOW, STOW-A, SJW,
³$OO(Dves $³Top Left SJW-A, SJOW, SJOW-A, SJTW, SJTW-A, o SJTOW, SJTOW-A.
³$OO%XVKHV %³Top Center d) Este aparato eléctrico está diseñado para usarse en la posición
³'RRU)UDPH &³Top Right
correcta vertical o instalado sobre el piso.
PARA USO CON DISPOSITIVO DE ILUMINACION SOLAMENTE.
³7ree '³%RW/HIW
NO LO USE PARA NINGUN OTRO APARATO ELECTRICO NI ADAPTADOR.
³/HIW'HHU (³%RW&HQWHU
ESTO NO ES UN DISTRIBUIDOR DE CORRIENTE.
³5LJKW'HHU )³%RW5LJKW LEA TODAS LAS INSTRUCCIONES Y GUARDELAS PARA REFERENCIA FUTURA.
¡ESTE APARATO NO ES UN JUGUETE!
Por favor, lea completamente este folleto de instrucciones.
I. Descripción
Gracias por comprar las LUCES Y SONIDOS DE NAVIDAD de Santa’s Best Craft.,
LTD. Este producto toca 20 villancicos de Navidad y tiene 6 tomas en las que
se pueden conectar juegos de luces o aparatos de luces decorativas. La
capacidad de la unidad es de:
1440 vatios en total ó 240 vatios por tomacorriente.
8 2INSTRUCCIONES DE SEGURIDAD IMPORTANTES V. Troubleshooting
Your LIGHTS AND SOUNDS OF CHRISTMAS® has been designed to give many
1. Lea las instrucciones. seasons of trouble-free operation. In the event that a problem does occur,
please refer to the following chart for suggested solutions.
2. Guarde las instrucciones.
3. Preste atención a todas las advertencias. Problem Likely Cause Solution
4. Siga todas las instrucciones. No power Make sure the main power cord is plugged into a
No music working outlet.
5. Limpie con un paño seco solamente.
Overloading caused by Replace the fuse (follow the procedure as outlined
6. No bloquee ninguna de las aberturas de ventilación. Instálelo de connecting light strings or in the fuse replacement section in this manual).
acuerdo con las instrucciones del fabricante.
7. No instale el aparato cerca de fuentes de calor como los radiadores, over the rating max 1440
ventilas de calefacción, estufas u otros aparatos (incluyendo los watts, fuse burnt out
que generen calor. Light string problem 1. Make sure the light string plug is plugged into
8. El enchufe polarizado o de conexión a tierra tiene un propósito de but music plays the unit receptacle.
seguridad. Un enchufe polarizado tiene dos patas con una más 2. Remove light string(s) from unit and plug
ancha que la otra. Un enchufe de conexión a tierra tiene dos patas y directly into a power source to see if they light
up. If they do not, check for missing or broken
una tercera espiga para la conexión a tierra. La pata ancha o la
bulbs.
tercera espiga de conexión a tierra son para su propia seguridad. Si el
3. Check for blown fuse in light string plug, and
enchufe proporcionado no entra en la toma, consulte con un
replace if damaged
electricista para reemplazar el tomacorriente obsoleto.
4. Check to see if fuse in unit is damaged. If it is,
9. Proteja el cable; procure no pisarlo ni doblarlo especialmente en replace with spare fuse (provided). Refer to
la parte del enchufe, los tomacorrientes convenientes y a la salida Section III in this user manual.
del aparato.
10. Use solamente los accesorios que el fabricante. 1. If in MULTIPLEX, light 1. Re-arrange string(s). See section II, part 7.
not as desired string(s) not plugged into 2. Adjust mode switch. See section II, part 6.
11. Desenchufe este aparato durante las tormentas eléctricas o cuando correct outlet
no se use por un largo período de tiempo. 2. Mode switch on wrong
cualquier mantenimiento a un personal de servicio setting
Se requiere mantenimiento cuando el aparato esté dañado de
cualquier manera, por ejemplo, si el cable eléctrico o el enchufe
están dañados, si hay un derrame de líquido o entrada de objetos
dentro del aparato, o si ha sido expuesto a la lluvia o humedad, si no
funciona normalmente o si se ha caído.
1 990-DAY LIMITED WARRANTY
Mr Christmas Inc. warrants to the original consumer/purchaser of the LIGHTS AND
SOUNDS OF CHRISTMAS® that it will be free from defects in material and workmanship
for a period of 90 days from date of purchase. Any liability of Mr Christmas Inc.
under this warranty shall be limited to the repair or replacement of defective parts
without charge if the item is returned with shipping charges prepaid together with proof
of date-of-purchase, name and mailing address of the original consumer/purchaser and
a description of the defect. Please call warranty service at 1-800-4MR-Xmas.
Mr Christmas Inc. shall not be liable for any other damages or loss. Some states do
not allow the exclusion or limitation of incidental or consequential damages. Accordingly,
the limitation or exclusion may not be applicable to certain consumers/purchasers.
This warranty does not cover defects caused by damage in transit, abuse, accident,
negligence or repairs made by others. This warranty gives the consumer/purchaser
from state to state.
©2010 Mr Christmas Inc.
5841E. Shelby Drive
Memphis, TN 38141
USA
1-800-4MR-Xmas
www.mrchristmas.com
VISTA INFERIOR DE LA UNIDAD
ADVERTENCIA: VEA EL MANUAL DE INSTRUCCIONES
RIESGO DE DESCARGA ELECTRICA
AC SOLAMENTE
CONEXION A TIERRA PROTECTORA
10También puede leer