SILLA DINAMIC - Este producto está destinado a niños de entre 6 y 36 meses y hasta 15 kg de peso. Conforme a la norma EN 1888:2012 - Asalvo
←
→
Transcripción del contenido de la página
Si su navegador no muestra la página correctamente, lea el contenido de la página a continuación
SILLA DINAMIC
            INSTRUCCIONES DE USO
           REF: 13477 - 13484 - 16423

  Este producto está destinado a niños de
 entre 6 y 36 meses y hasta 15 kg de peso.
   Conforme a la norma EN 1888:2012
Guardar instrucciones para consultas futuras

                 www.asalvo.com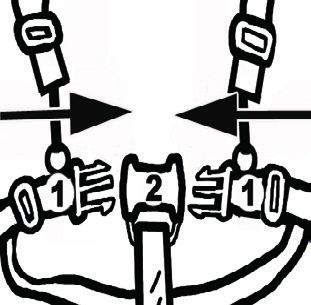
Gracias por elegir nuestro producto.

                Lea estas instrucciones cuidadosamente antes de su uso y guárdelas para referencias futuras.
                La seguridad de su hijo puede verse afectada si usted no sigue estas instrucciones.

                                                        ATENCIÓN
                   - Este cochecito está diseñado para niños a partir de una edad de 6 meses y un peso
INSTRUCCIONES

                   de hasta 15 kilos.

                   - Se puede cargar la bolsa de redecilla hasta un peso de 2 kilos.

                   - Este cochecito está construido para ser usado por un niño.

                   - Utilice solamente accesorios autorizados para su fabricante.

 ES                - Al transitar por escalones o escaleras, o cuando se que tiene que levantar su
                   cochecito para niños, se debería sacar siempre a su hijo del cochecito.

                   - El dispositivo de estacionamiento debe estar engranado antes de colocar y sacar al
                   niño del asiento.

                Por favor, lea las instrucciones antes de usar este producto, se le indicará el método correcto

                incorrecto y daños en el producto o dañar a su hijo. Guarde este manual en lugar seguro,
                para futuras referencias.

                 1      ABRIR EL COCHECITO

                        - Abra el cochecito (1b)

                        ADVERTENCIA: Antes de su uso asegúrese de que todos los enganches están bien
                        cerrados.

                             1a                        1b                      1b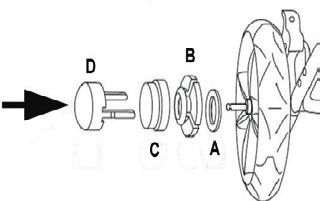
2 MONTAJE DE LAS RUEDAS
- (2a) Coloque el eje trasero sobre el armazón. 1a 1b
Atención: Las palancas del freno deben apuntar hacia atrás.
- (2b) Coloque a continuación las ruedas traseras en el eje.
Introduzca la arandela (A) en el eje.
Fije la rueda con el anillo de retención (B), presione la tapa protectora sobre el
mismo (C) e inserte la cubierta de la rueda en la llanta (D).
INSTRUCCIONES
- (2c) Para montar las ruedas delanteras se tendrán que introducir las ruedas en el
1a
1a
1a 1b
1b
1b 1b
1b
1b 2a 2b
1a 1b 1b
1a 1b
ES
2a
2a
2a 2b
2b
2b 2c
2c
2c 2c 3
2a 2b 2c
1a 1b 1b 2a 2b
3 APRETAR Y SOLTAR EL FRENO
- Para apretar el freno empuje la
palanca hacia abajo.
- Para soltar el freno empuje la
palanca hacia arriba.
2c
2c
2c 333 4a
4a
4a 4b 5
2c 3 4a
2a 2b 2c 2c 3
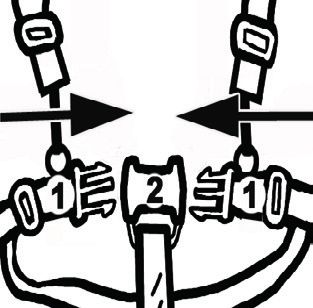
4 CERRAR EL CINTURÓN
- (4a) Para cerrar el cinturón
introduzca las hebillas (1) en el
piernas (2).
4b
4b
4b - (4b) Ajuste el dispositivo
555 de 666
ajuste del cinturón de tal forma4b 5 6
para que el niño quede sujeto en
2c
su posición prevista.
3 4a 5
4b
ADVERTENCIA: Utilice el cinturón
de entrepierna siempre junto con
el cinturón de pelvis.
2a                                2b
                                  2a                       2b2c                     2c

                         5   ABRIR CINTURÓN
                             - Para abrir el cinturón, presione         6     AJUSTAR EL RESPALDO
                                                                              - Para ajustar el respaldo, si ha
                             las hebillas unas contra otras                   alcanzado la posición deseada,
2c                           y separe
                                    3 a continuación el
                                   2c                        34a              suelte4a
                                                                                     el estribo para que el
                             cinturón.                                        respaldo engatille en esta
                                                                              posición.
     INSTRUCCIONES

4b                                 5
                                   4b                          56                    6

      ES                 7   AJUSTAR EL REPOSAPIERNAS
                             - Para ajustar los reposapiernas           8     BLOQUEAR Y SOLTAR LAS
                                                                              RUEDAS GIRATORIAS
                             se debe presionar los botones                    - Para bloquear las ruedas
                             de ambos lados hacia dentro y a                  delanteras, empuje la palanca
                             continuación ajustar la altura. A                hacia abajo. Empuje la palanca
                             continuación suelte los botones                  hacia arriba para la posición de
                             para que el reposapiernas                        giro.
                             engatille.

                                   7                       7    8                    8   9a                       9a

                         9   FIJAR EL ESTRIBO DE PROTECCIÓN
                             - (9a) Fije los dispositivos de sujeción en el armazón del cochecito.
                                                                        7                             8
                             - (9b) Para ajustar la altura del estribo de protección, se deberán mantener
                             pulsados los dos botones laterales, y a continuación empujar el estribo hacia
                             arriba o abajo.

                                   9b                        10a                    10a 10b
                                                           9b                                                     10b

                     8                        9a                         9b                          10a
7   7                  8   8                            9a 9

 10        PLEGAR EL COCHECITO
           - Coloque el apoyabrazos en la posición más alta. (10a) Presione el botón 1 y
           manténgalo presionado. A continuación presione el botón 2 y presione la empuña-
           dura hacia abajo hasta que note una resistencia.
           - (10b) A continuación empuje la palanca hacia abajo.

      8   7-   (10c) Pliegue el cochecito
                                      8 presionando el manillar 9a
                                                                completamente hacia abajo.
 8                            9a    9a                                   10a10a                         10b1
                                                    9b 9b

                                                                                               INSTRUCCIONES
           - (10d) Fije el seguro de transporte.

                                                                                                ES
                                    10a                       10b
10a 10a 9b                    10b 10b              10c10c                10d10d                                11

 11        COLOCACIÓN DE LA CAPOTA
           - Fije la capota con ambos
           soportes de plástico en el marco
           de la silla.

       10c                           10d                       11
10d 10d                        11   11

                        INDICACIONES DE CUIDADO Y DE USO
     - Los materiales utilizados para la fabricación de nuestros productos cumplen las
     normas relativas al uso de colorantes azoicos, EN71-2 y EN71-3, así como la solidez
     a la luz para revestimientos. No obstante, aconsejamos no exponer intensivamente el
     modelo al sol durante un periodo prolongado. Un desgaste por el roce, sangrado de los

     tapicería de este artículo es lavable. Las fundas se pueden lavar a mano o a máquina en
     frío (detergente suave).
     - Una protección total contra la lluvia para nuestros modelos se consigue solamente
     mediante nuestra capota de Asalvo que se puede adquirir en el comercio.
     - Todos los armazones de nuestros modelos han sido comprobados según EN1888 :
     2012 y corresponden a ella. Para mantener la seguridad de su modelo a largo plazo, se
     tendrán que engrasar o en caso de necesidad volver a remachar las piezas movibles.
     ATENCIÓN: Para engrasarlas rogamos que utilice solamente aceite o spray de silicona.
     - Para mantener la seguridad y el valor de su producto es recomendable un cuidado y
     mantenimiento regulares. Las influencias ambientales tales como el contenido de sal en
el aire, sal para esparcir o lluvia ácida así como guardarlo incorrectamente fomentan la
                    corrosión.
                    - Recomendamos un cuidado regular de todas las piezas lacadas. En casos individuales

                    ensuciado.
                    - Compruebe de vez en cuando las piezas y cierres sueltos y en caso necesario
                    apriételas.

b                                                       ADVERTENCIAS
    INSTRUCCIONES

                    - ¡ADVERTENCIA!: No deje a su hijo sin vigilancia.
                    - ¡ADVERTENCIA!: Utilice un cinturón de seguridad en
                    cuanto su hijo sepa sentarse por sí mismo.
                    - ¡ADVERTENCIA!: Esta unidad de silla no es adecuada
     ES             para niños de menos de 6 meses.
                    - ¡ADVERTENCIA!: Las cargas colgadas de las
                    empuñaduras perjudican la estabilidad del cochecito.
                    - ¡ADVERTENCIA!: Antes de usarlo se deberá comprobar
                    si el capazo portabebés o la unidad de silla ha engatillado
                    correctamente.
                    - ¡ADVERTENCIA!: Este producto no es adecuado para la
                    práctica del footing o del skating.
                    - ¡ADVERTENCIA!: Rogamos que no realice ninguna

                    - ¡ADVERTENCIA!: Mantenga este producto alejado del
                    fuego u otras fuentes de calor.
                    - ¡ADVERTENCIA!: Para evitar lesiones, asegúrese de que
                    el niño se mantiene apartado del proceso de plegado y
                    desplegado del producto.
                    - ¡ADVERTENCIA!: No permita que el niño juegue con el
                    producto.
                    - ¡ADVERTENCIA!: Siempre use el sistema de retención.
                                                    Importado por Estar Asalvo S.L.
                                                            CIF B91234286
                        PI Hacienda Dolores, C/Dos, 2 · 41500 · Alcalá de Guadaíra · Sevilla · Tfno. 902 360 516
                                              Fax: 955 631 205 · email: info@asalvo.com
                                                          www.asalvo.com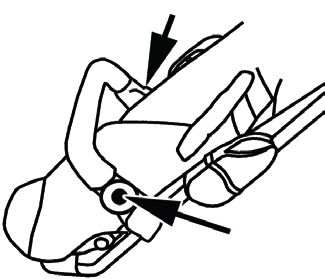
STROLLER DINAMIC
                     OWNER’S MANUAL
                REF: 13477 - 13484 - 16423

This stroller is intended for use with children age between 6
          and 36 months, up to 15kg for weighting.

         This product complies with EN 1888:2012

           Keep instructions for future reference

                       www.asalvo.com
Please read this manual carefully in order to correctly use the stroller and safely keeping it for
future reference.If you do not follow the instructions ,it may affect the safety of children. If the
transfer, please send the instructions to be delivered.
BE CAREFUL
- This pushchair is designed for children aged 6 months or above and weighing up to
INSTRUCTIONS
15 kg.
- The net bag can carry up to 2 kg.
- This pushchair is designed to transport a child.
- Do not use any accessories other than those approved by the manufacturer.
EN - You are advised to take your child out of the pushchair as a matter of principle when
negotiating steps or flights of stairs or if the pushchair needs to be lifted or carried.
- The parking device shall be engaged when placing and removing the child.
Please read the instructions before using this product, it will tell you the right operation
method and the installation program, in order to avoid incorrect operation method and
damage to the product or harm your child. This manual shall be properly kept in the place
that children is not easy to take place.
1 OPENING THE PUSHCHAIR
- Release the transportation lock. (1a)
- Unfold the pushchair. (1b)
CAUTION: Ensure that all the catches are engaged before use.
1a 1b 1b2 FITTING THE WHEELS
- (2a) Fit the rear axle onto the frame. 1a 1b
NB: The brake levers must be pointing rearwards.
- (2b) Place the rear wheels on the axis.
Put the washer (A) onto the axis.
place the wheel caps (D) in the rim.
INSTRUCTIONS
1a
1a
1a pull the wheels out.
1b
1b
1b 1b
1b
1b 2a 2b
1a 1b 1b
1a 1b
EN
2a
2a
2a 2b
2b
2b 2c
2c
2c 2c 3
2a 2b 2c
1a 1b 1b 2a 2b
3 OPERATING THE BRAKE
- Press the lever down to engage
the brake.
- Press the lever up to disengage
the brake.
2c
2c
2c 333 4a
4a
4a 4b 5
2c 3 4a
2a 2b 2c 2c 3
4 FASTENING THE HARNESS
- (4a) To close the harness, push
the clips (1) into the leg harness
catch (2).
- (4b) Adjust the strap to a
4b
4b
4b setting where the 5baby
55 is held in 666
the correct position. 4b 5 6
2c
CAUTION: Always
3
use the 4a 5
4b
shoulder harness and lap belt
together.2a 2b
2a 2c
2b 2c
5 UNFASTENING THE HARNESS
- To open the harness, press 6 ADJUSTING THE BACKREST
- To adjust the backrest, pull the
the clips inwards and pull the retainer on the rear of the backrest
harness apart upwards and then adjust the height.
When you have reached the required
2c 32c 4a
3 position,4alet go of the retainer to
allow the backrest to remain in that
position.
INSTRUCTIONS
4b 54b 6
5 6
EN
7 ADJUSTING THE LEG REST
- To adjust the leg rest, press in 8 LOCKING AND UNLOCKING THE
SWIVELING WHEELS
the buttons on both sides and - Push the lever down to lock the
then adjust the height. Let go of wheels. Push the lever up to set
the buttons again so that the leg the wheels in swivel position.
rest clicks into place.
7 7 8 8 9a 9a
9 FITTING THE GUARD RAIL
- (9a) Fit the brackets on the pushchair frame.
7 8
- (9b) To adjust the height of the guard rail, press and hold down the buttons on
each side and push the bar up or down.
9b 10a 10a 10b
9b 10b
8 9a 9b 10a7 7 8 8 9a 9
10 FOLDING THE PUSHCHAIR
- (10a) Hold the button (1) and push the handle knob (2) to unlock the folding
mechanism.
- (10b) Then push the lever down.
- (10c) Press the pushbar all the way down to fold the pushchair.
7 8 9a
8 8 - (10d) Apply the transportation
9a 9a lock. 10a10a 10b1
9b 9b
INSTRUCTIONS
EN
10a 10b
10a 10a 9b 10b 10b 10c10c 10d10d 11
11 ATTACHING THE HOOD
- Fit the hood on the seat frame
with the two plastic brackets.
10c 10d 11
10d 10d 11 11
CARE INSTRUCTIONS
- The materials used to manufacture our products comply with the AZO requirement,
EN71-2 and EN71-3, and light fastness standards for textiles. Nevertheless, we advise
you not to leave the product exposed to bright sunlight for any length of time. No claims
may be made for wear and tear or if the colours fade when exposed to strong sunlight.
The fabric covers on this product can be washed by hand or on a cold cycle in the
washing machine (mild detergent).
- An Asalvo rain canopy is available in retail stores offering complete protection against
the rain.
- All the frames on our products have been tested for conformity with EN1888 : 2012
and have met the required standards. In order to maintain the safety of the product it is
necessary to oil the moving parts or tighten the rivets as and when required.
NB: Please do not use any product for lubrication other than silicone oil or silicone spray
lubricant.
- Regular care and upkeep have a major part to play in maintaining the safety and value
of the product. Exposure to such things as salt in the air, road-gritting salt or acid rainwill encourage the onset of corrosion, as will inappropriate storage of the product.
- We recommend regular maintenance of all coated parts. In serious cases of soiling
please clean the surface coating immediately.
- Check for loose parts and fastenings from time to time and tighten if necessary.
b CAUTION
INSTRUCTIONS
- ¡CAUTION!: Do not leave your child unattended.
- ¡CAUTION!: Use a safety harness as soon as your child
can sit independently.
- ¡CAUTION!: This seat is not suitable for babies under 6
EN months old.
- ¡CAUTION!: Loads attached to the handle affect the
stability of the pushchair.
- ¡CAUTION!: Before use, check that the pushchair
attachment or seat is correctly engaged in position.
- ¡CAUTION!: This product is not suitable for jogging or
skating.
product which compromise its safety.
sources of heat.
- ¡CAUTION!: To avoid injury ensure that your child is kept
away when unfolding and
folding this product.
- ¡CAUTION!: Do not let your child play with this product.
- ¡CAUTION!: Always use the restraint system.
Importado por Estar Asalvo S.L.
CIF B91234286
PI Hacienda Dolores, C/Dos, 2 · 41500 · Alcalá de Guadaíra · Sevilla · Tfno. 902 360 516
Fax: 955 631 205 · email: info@asalvo.com
www.asalvo.comPOUSSETTE DINAMIC
INSTRUCTIONS D’USAGE
REF: 13477 - 13484 - 16423
CE PRODUIT EST DESTINE AUX ENFANTS ENTRE 6 ET 36
MOIS, ET JUSQU’A 15 KG DE POIDS.
CONFORME A LA NORME EN 1888:2012
GARDEZ LES INSTRUCTIONS POUR DES FUTURES
CONSULTIONS
www.asalvo.comVeuillez lire cette notice attentivement avant l’utilisation et conservez-la. La non-lecture de cette
consigne peut porter atteinte à la sécurité de votre enfant.
ATTENTION
- Ce landau est destiné aux enfants de plus de 6 mois et d’un poids jusqu’à 15 kg.
INSTRUCTIONS
- Ce landau a été conçu pour transporter un enfant.
- Employez uniquement les pièces d’accessoires autorisées de votre fabricant.
- Pour monter ou descendre les marches et escaliers ou lorsque votre landau doit
FR être soulevé ou porté, vous devez toujours sortir l’enfant du landau.
- Assurez-vous que le frein de stationnement est attiré, si vous mettez votre enfant
dans la poussette ou si vous enlevez votre enfant.
Veuillez lire cette notice attentivement avant l’utilisation et conservez-la. La non-lecture de cette
consigne peut porter atteinte à la sécurité de votre enfant.
1 OUVERTURE DE LA POUSSETTE
- Ouvrez la protection de transport. (1a)
- Dépliez la poussette. (1b)
MISE EN GARDE: Assurez-vous avant l’utilisation que tous les verrouillages
sont fermés.
1a 1b 1b2 MONTAGE DES ROUES
- (2a) Enfoncez l’essieu arrière sur le châssis. 1a 1b
Attention : Les leviers de frein doivent être en arrière.
- (2b) Enfoncez ensuite les roues arrière sur l’essieu.
Placez la rondelle (A) sur l’essieu.
Fixez les roues avec les agrafes (B), placez les capuchons de protection (C)
par-dessus et enfoncez les enjoliveurs (D) dans la jante.
INSTRUCTIONS
- (2c) Pour monter les roues avant, enfoncez les roues dans le logement jusqu’à
enclenchement. Pour démonter les roues avant, appuyez sur le bouton situé sur le
1a
1a
1a logement des roues
1b1bet retirez les roues. 1b
1b 1b
1b 2a 2b
1a 1b 1b
1a 1b
FR
2a
2a
2a 2b
2b
2b 2c
2c
2c 2c 3
2a 2b 2c
1a 1b 1b 2a 2b
3 FIXATION ET DESSERRAGE DES
FREINS
levier.
- Pour desserrer les freins, levez
le levier.
2c
2c
2c 333 4a
4a
4a 4b 5
2c 3 4a
2a 2b 2c 2c 3
4 FERMETURE DU HARNAIS
- (4a) Pour fermer le harnais,
enfoncez les boucles (1) dans la
boucle de la sangle d’entrejambe
(2).
4b
4b
4b - (4b) Réglez le harnais
555 de sorte 666
qu’il maintienne l’enfant dans4b
la 5 6
position prévue.
2c 3 4a 4b 5
Mise en garde : Employez la
sangle d’entrejambe toujours en
combinaison avec la ceinture
ventrale.2a 2b
2a 2b2c 2c
5 OUVERTURE DU HARNAIS
- Pour ouvrir le harnais, appuyez 6 RÉGLAGE DU DOSSIER
- Pour régler le dossier, tirez
sur les côtés de la boucle et l’anse située au dos du dossier
ouvrez le harnais. vers le haut et réglez-la en
hauteur. Lorsque vous avez
2c 3
2c 34a atteint4ala position souhaitée,
lâchez l’anse pour que le dossier
s’enclenche dans cette position.
INSTRUCTIONS
4b 5
4b 56 6
FR
7 RÉGLAGE DU REPOSE-JAMBES
- Pour régler le repose-jambes, 8 BLOCAGE ET DÉBLOCAGE DES
ROUES PIVOTANTES
enfoncez les boutons des deux
côtés vers l’intérieur, puis régler roues. Levez le levier pour la
la hauteur. Relâchez ensuite les position orientable.
boutons pour que le repose-
jambes s’enclenche.
7 7 8 8 9a 9a
9 FIXATION DE LA BARRE DE PROTECTION
7 8
- (9b) Pour régler la hauteur de l’anse de protection, maintenez les deux boutons
latéraux enfoncés et poussez l’anse vers le haut ou vers le bas.
9b 10a 10a 10b
9b 10b
8 9a 9b 10a7 7 8 8 9a 9
10 PLIAGE DE LA POUSSETTE
- (10a) Appuyez d’abord sur le bouton 1 et maintenez-le enfoncé. Appuyez ensuite
sur le bouton 2 et poussez le guidon vers le bas jusqu’à ce que vous sentiez une
résistance.
- (10b) Baissez ensuite le levier.
7 8 9a
8 8 - (10c) Pliez la poussette
9a 9a en rabattant entièrement le guidon vers
10ale bas.
10a 10b1
9b 9b
INSTRUCTIONS
- (10d) Fixez la protection de transport.
10a 10b
9b FR
10a 10a 10b 10b 10c10c 10d10d 11
11 MONTAGE DE LA CAPOTE
- Fixez la capote au châssis du
plastique.
10c 10d 11
10d 10d 11 11
CONSIGNES D’ENTRETIEN ET D’UTILISATION
- Les matériaux employés pour la fabrication de nos produits satisfont aux exigences
des normes AZO, EN71-2 et EN71-3 ainsi qu’à l’exigence de stabilité à la lumière des
revêtements. Nous conseillons malgré tout de ne pas exposer le modèle au soleil de
façon intensive durant une période prolongée. L’abrasion, la déteinte des couleurs
réclamation. La housse en tissu de cet article est lavable. Vous pouvez laver les housses
pour pluie Asalvo qui est disponible dans le commerce.
- Tous les châssis de nos modèles sont testés selon les normes EN 1888 : 2012 et
satisfont aux exigences de ces dernières. Les éléments mobiles doivent être huilés de
sécurité de votre modèle.
ATTENTION : Veuillez employer uniquement de l’huile silicone ou un spray silicone pour
huiler ces éléments.
- Une maintenance et un entretien réguliers contribuent considérablement à la sécuritéet au maintien de la valeur de votre produit. Les influences atmosphériques, telles
qu’atmosphère salée, sel de déneigement ou encore pluie acide, ainsi qu’une mauvaise
mise à l’abri, développent la corrosion.
- Nous recommandons un entretien régulier de toutes les pièces peintes. En cas
d’encrassements particulièrement importants, nettoyer la surface peinte immédiatement.
- Contrôler de temps à temps les pièces de fermeture et autres pour s’assurer qu’elles ne
sont pas desserrées et les resserrer si bien besoin est.
b
AVERTISSEMENT
INSTRUCTIONS
- ATTENTION!: Ne laissez jamais votre enfant sans
surveillance.
- ATTENTION!: Utilisez une ceinture de sécurité dès que
votre enfant s’assoit tout seul.
FR - ATTENTION!: Cette assise ne convient pas pour les
enfants de moins de 6 mois.
stabilité du landau.
- ATTENTION!: S’assurer avant l’utilisation que la nacelle
ou le siège soit bien enclenché.
- ATTENTION!: Ce produit ne convient pas pour faire du
jogging ou du roller.
susceptible de nuire à la sécurité.
- ATTENTION!: Tenez ce produit à l’écart du feu et
d’autres sources de chaleur.
- ATTENTION!: Assurez-vous que votre enfant est hors de
portée, si vous ouvrez et repliez la poussette, pour éviter
les blessures.
- ATTENTION!: Ne laissez pas jouer votre enfant avec la
poussette.
- ATTENTION!: Utilisez toujours l’ensemble de retenue.
Importado por Estar Asalvo S.L.
CIF B91234286
PI Hacienda Dolores, C/Dos, 2 · 41500 · Alcalá de Guadaíra · Sevilla · Tfno. 902 360 516
Fax: 955 631 205 · email: info@asalvo.com
www.asalvo.comSTROLLER DINAMIC
MANUAL D’INSTRUCTIONS
REF: 13477 - 13484 - 16423
This stroller is intended for use with children age between 6
and 36 months, up to 15kg for weighting.
This product complies with EN 1888:2012
Keep instructions for future reference
www.asalvo.comLesen Sie diese Anleitung vor Gebrauch sorgfältig und bewahren Sie sie für zukünftige Referenz.
Nichtbeachtung dieser Anleitung kann die Sicherheit des Kindes beeinträchtigen.
WICTIGER HINWEIS
- Dieser Kinderwagen ist für Kinder im Alter von 6 Monaten oder einem Gewicht von
INSTRUCTIONS
bis zu 15 kg ausgelegt.
- Der Netzbeutel kann bis zu 2 kg tragen.
- Dieser Kinderwagen ist entworfen, um nur ein einziges Kind zu transportieren.
- Verwenden Sie keine Zubehörteile, die nicht vom Hersteller genehmigt wurden.
DE - Wenn Sie Stufen oder Treppen klettern, tragen Sie nicht den Kinderwagen mit Ihrem
Kind im Wagen sitzen. Dies ist für die Sicherheit Ihres Kindes.
- Dieses Modell eignet sich für Kleinkinder ab 6 Monaten bis 3 Jahre und bis zu
einem maximalen Gewicht von 15 kg.
Lesen Sie diese Anleitung vor Gebrauch sorgfältig und bewahren Sie sie für zukünftige Referenz.
Nichtbeachtung dieser Anleitung kann die Sicherheit des Kindes beeinträchtigen.
1 ÖFFNUNG DEN KINDERWAGEN
- Veröffentlichung Sie die Transportsicherung. (1a)
- Entfalten Sie den Kinderwagen. (1b)
Achtung: Sicherstellen Sie, dass alle Fänge vor Gebrauch tätig sind.
1a 1b 1b2 DER RÄDER VESSAMLUNG
- (2a) die Hinterachse auf den Rahmen zu passen. 1a 1b
Hinweis: Die Bremshebel müssen nach hinten gerichtet sein.
- (2b) Legen Sie die Hinterräder auf der Achse.
Legen Sie die Unterlegscheibe (A) auf der Achse. Sichern Sie die Räder mit Halter
(B), passen Sie die Schutzkappen über sie (C) und legen Sie die Radkappen.
- (2c) Um die Vorderräder montieren, schieben Sie die Räder in den Armaturen,
INSTRUCTIONS
bis sie einrasten. Um die Vorderräder zu entfernen, drücken sie die knöpfe auf den
Rad-Armaturen und die Räder.
1a
1a
1a 1b
1b
1b 1b
1b
1b 2a 2b
1a 1b 1b
1a 1b
DE
2a
2a
2a 2b
2b
2b 2c
2c
2c 2c 3
2a 2b 2c
1a 1b 1b 2a 2b
3 BETRIEB DER BREMS
- Um die Bremsen zu
engagieren, drücken Sie den
Hebel nach oben.
- Um die Bremse zu lösen,
drücken Sie den Hebel nach
2c
2c
2c unten. 333 4a
4a
4a 4b 5
2c 3 4a
2a 2b 2c 2c 3
4 BEFESTIGUNG DER
KABELBAUM
- (4a) Um den Gurt zu schließen,
schieben Sie die Clips (1) auf das
Bein Kabelbaum Schloss (2).
4b
4b
4b - (4b) Passen Sie den
555 Gurt auf 666
eine Einstellung, wo das Baby4bin 5 6
der richtigen Position gehalten
2c
wird. 3 4a 5
4b
Warnung: immer den
Schultergurt und Beckengurt
zusammen benutzen2a 2b
2a 2b2c 2c
5 DAS GURTZEUG LÖSEN
- To open the harness, press the 6 EINSTELLEN DER RÜCKENLEHNE
- Ziehen Sie den Hebel auf der
clip inward and pull apart the Rückseite der Rückenlehne nach
belt. oben und dann passen Sie die Höhe
Und wenn Sie die gewünschte
2c 3
2c 34a Position
4a erreicht haben, lassen Sie
den Hebel sowie die Rückenlehne
in der Position bleiben können.
INSTRUCTIONS
4b 5
4b 56 6
DE
7 ANPASSUNG DER BEINSTÜTZE
- Drücken Sie die Tasten auf 8 SPERREN UND ENTSPERREN DER
SCHWENKRÄDER
beiden Seiten und dann passen - Herunterdrücken Sie den Hebel,
Sie die Höhe . loslassen die um die Räder blockieren. Drücken
Tasten wieder, so dass die sie die Hebel der Räder nach
Beinstütze einrastet. oben zum schwenkbar Position
festlegen.
7 7 8 8 9a 9a
9 MONTAGE DER FRONTBÜGEL
- (9a) Befestigen Sie die Klammern auf das Kinderwagengestell.
7 8
- (9b) Um die Höhe der Frontbügel anzupassen, halten Sie die Tasten auf jeder
Seite und schieben Sie die Leiste nach oben oder unten.
9b 10a 10a 10b
9b 10b
8 9a 9b 10a7 7 8 8 9a 9
10 FOLDING THE PUSHCHAIR
- (10a) Halten Sie die Taste (1) und schieben Sie den Griff Regler (2) nach den
Faltmechanismus entriegeln.
- (10b) Dann den Hebel herunterdrücken.
7- (10c) Presse den Kinderwagen
8 bis hin zum Falten der
9a Kinderwagen.
8 8 9a 9a 10a10a 10b1
9b9b
- (10d) Auftragen Sie die Transportsicherung.
INSTRUCTIONS
10a 10b
9b DE
10a 10a 10b 10b 10c10c 10d10d 11
11 ANBRINGEN DER SONNENDECH
MIT FENSTER
- Passen Sie die sonnendech
auf das Sitzgestell mit den 2
Kunststoff-Klammern.
10c 10d 11
10d 10d 11 11
PFLEGE- UND GEBRAUCHSHINWEISE
- Die zur Herstellung unserer Produkte verwendeten Materialien entsprechen der
AZO-Anforderung, EN71-2 und EN71-3, sowie Lichtechtheit für Bekleidung. Wir raten
Ihnen trotzdem das Modell nicht längere Zeit intensiv der Sonne auszusetzen. Abrieb,
Ausbluten der Farben und Verblassen bei starker Sonneneinstrahlung begründen keinen
Reklamationsanspruch. Der Stoffbezug dieses Artikels ist waschbar. Sie können die
Bezüge mit der Hand oder mit der Maschine auf Kaltwäsche (Feinwaschmittel) waschen.
- Ein absoluter Regenschutz für unsere Modelle wird nur durch ein im Handel erhältliches
Asalvo Regenverdeck erreicht.
- Alle Gestelle unserer Modelle sind nach EN1888 : 2012 getestet und entsprechen
dieser. Die beweglichen Teile müssen, um die Sicherheit Ihres Modells dauerhaft zu
erhalten, gelegentlich geölt oder bei Bedarf nachgenietet werden.
ACHTUNG: Zur Ölung bitte nur Silikon-Öl oder Silikon-Spray verwenden.
- Zur Sicherheit und Werterhaltung Ihres Produkts tragen regelmäßige Pflege und
Wartung in hohem Maße bei. Umwelteinflüsse, wie Salzgehalt in der Luft, Streusalz oder
saurer Regen, sowie falsche Unterbringung fördern die Korrosion.
- Wir empfehlen eine regelmäßige Pflege aller lackierten Teile. In gravierendenEinzelfällen gleich nach der Verunreinigung die Lackoberfläche reinigen.
- Überprüfen Sie von Zeit zu Zeit lockere Teile und Verschlussteile und ziehen Sie sie falls
nötig fest.
WARNUNG
b - Lassen Sie Ihr Kind nicht unbeaufsichtigt.
- Verwenden Sie einen Sicherheitsgurt, sobald Ihr Kind
INSTRUCTIONS
selbständig sitzen kann.
- Diese Sitzeinheit ist für Kinder unter 6 Monaten nicht
geeignet.
- Am Schieber befestigte Lasten beeinträchtigen die
DE Standfestigkeit des Wagens.
- Es ist vor Gebrauch zu überprüfen, dass der
Kinderwagenaufsatz oder die Sitzeinheit korrekt
eingerastet ist.
- Dieses Erzeugnis ist nicht geeignet zum Joggen oder
Skaten.
- Führen Sie keine Veränderungen durch, die die
Sicherheit in Frage stellen.
- Halten Sie dieses Produkt vor Feuer und anderen
Hitzequellen fern.
- Vergewissern Sie sich, dass Ihr Kind beim Aufklappen
und Zusammenklappen des Wagens außer Reichweite ist,
um Verletzungen zu vermeiden.
- Lassen Sie Ihr Kind nicht mit dem Wagen spielen.
- Verwenden Sie immer das Rückhaltesystem.
Importado por Estar Asalvo S.L.
CIF B91234286
PI Hacienda Dolores, C/Dos, 2 · 41500 · Alcalá de Guadaíra · Sevilla · Tfno. 902 360 516
Fax: 955 631 205 · email: info@asalvo.com
www.asalvo.comCARROZZINA DINAMIC
MANUAL D’INSTRUCTIONS
REF: 13477 - 13484 - 16423
This stroller is intended for use with children age between 6
and 36 months, up to 15kg for weighting.
This product complies with EN 1888:2012
Keep instructions for future reference
www.asalvo.comLeggete attentamente le seguenti istruzioni prima dell’uso e conservatele per future consulta-
zioni. L’inosservanza di queste istruzioni può compromettere la sicurezza del vostro bambino.
ATTENZIONE
- Questo passeggino è idoneo per bambini a partire dall’età di 6 mesi con un peso
massimo di 15 kg.
INSTRUZIONI
- La rete porta-spesa può essere caricata con un peso massimo di 2 kg.
- Utilizzate esclusivamente accessori omologati dal produttore.
IT - Nel salire o scendere gradini o scale o se occorre sollevare o portare a mano il
passeggino, è necessario togliere il bambino dal passeggino.
- Il dispositivo di stazionamento (freno) deve essere inserito durante il
posizionamento e la rimozione del bambino.
Leggete attentamente le seguenti istruzioni prima dell’uso e conservatele per future consulta-
zioni. L’inosservanza di queste istruzioni può compromettere la sicurezza del vostro bambino.
1 APERTURA DELLA CARROZZINA
- Togliere la protezione per il trasporto. (1a)
- Aprire la carrozzina. (1b)
AVVERTENZA: prima dell’utilizzo, assicurarsi che tutti gli agganci siano
correttamente bloccati.
1a 1b 1b2 MONTAGGIO DELLE RUOTE
- (2a) Inserire l’asse posteriore sul telaio. 1a 1b
Attenzione: la leva del freno deve essere orientata verso la posizione posteriore.
- (2b) Quindi posizionare le ruote posteriori sull‘asse.
Spingere la rondella (A) sull’asse. Fissare le ruote con gli anelli di arresto (B), appli-
care i tappi protettivi (C) e inserire i copriruota (D) nei cerchi.
- (2c) Per montare le ruote anteriori, è necessario inserirle e premerle nel supporto
INSTRUZIONI
estrarre la ruota.
1a
1a
1a 1b
1b
1b 1b
1b
1b 2a 2b
1a 1b 1b
1a 1b
IT
2a
2a
2a 2b
2b
2b 2c
2c
2c 2c 3
2a 2b 2c
1a 1b 1b 2a 2b
3 BLOCCO E SBLOCCO DEL
FRENO
- Per bloccare il freno, spingere
la levetta verso il basso.
- Per sbloccare il freno, spingere
la levetta verso l’alto.
2c
2c
2c 333 4a
4a
4a 4b 5
2c 3 4a
2a 2b 2c 2c 3
4 AGGANCIO DELLA CINTURA
- (4a) Per agganciare la cintura,
della cintura centrale (2).
- (4b) Regolare il dispositivo
della cintura in modo tale
4b
4b
4b che il bambino possa
555 essere 666
mantenuto nella posizione 4b 5 6
prevista.
2c 3 4a 4b 5
Avvertenza: Utilizzare sempre
la cintura centrale insieme alla
cintura subaddominale.2a 2b
2a 2b2c 2c
5 SGANCIO DELLA CINTURA
- Per aprire la cintura di 6 REGOLAZIONE DELLO SCHIENALE
- Per la regolazione dello schienale,
sicurezza, premere le forcelle tirare verso l’alto la staffa su retro
esterne dell’aggancio e dello schienale e regolare l’altezza.
2c 3
2c 34a Al raggiungimento
4a della posizione
desiderata, rilasciare la staffa per
bloccare lo schienale in posizione.
INSTRUZIONI
4b 5
4b 56 6
IT 7 REGOLAZIONE DEL POGGIAGAMBE
- Per regolare il poggiagambe, 8 BLOCCO E SBLOCCO DELLE
RUOTE PIROETTANTI
premere verso l’interno i pulsanti - Spingere verso il basso la levetta
su entrambi i lati del passeggino e per bloccare le ruote. Spingere
regolare l’altezza desiderata. verso l’alto la levetta per abilitare il
Rilasciare i pulsanti per permettere movimento piroettante.
il bloccaggio in posizione del
poggiagambe.
7 7 8 8 9a 9a
9 FISSAGGIO DELLA PROTEZIONE ANTERIORE ANTICADUTA
- (9a) Fissare i supporti al telaio del passeggino.
7 8
- (9b) Per regolare in altezza la protezione anteriore anticaduta, è necessario
verso il basso.
9b 10a 10a 10b 10b
9b
8 9a 9b 10a7 7 8 8 9a 9
10 CHIUSURA DEL PASSEGGINO
- (10a) Premere la manopola 1 e tenerla premuta. Poi azionare la manopola 2 e
- (10b) In seguito, premere la levetta verso il basso.
7-(10c) Chiudere il passeggino
8 premendo il maniglione
9a completamente verso il
8 8 basso. 9a 9a 10a10a 10b1
9b 9b
- (10d) Fissare la protezione per il trasporto.
INSTRUZIONI
10a 10b
9b IT
10a 10a 10b 10b 10c10c 10d10d 11
11 MONTAGGIO DELLA CAPOTTINA
- Fissare la capottina mediante i
due supporti in plastica posti sul
telaio del seggiolone.
10c 10d 11
10d 10d 11 11
ISTRUZIONI D’USO E MANUTENZIONE
- I materiali utilizzati per la realizzazione dei nostri prodotti sono conformi ai requisiti AZO,
EN71-2 e EN71-3 nonché ai requisiti di resistenza alla luce per i capi d’abbigliamento.
Vi consigliamo comunque di non esporre il prodotto ai raggi solari per tempi prolungati.
Scolorimenti, alterazioni di colore e sbiadimenti causati da forte irraggiamento solare non
è lavabile. Potete lavare la fodera a mano o in lavatrice con il programma di lavaggio a
freddo (detersivo per delicati).
- Una protezione sicura contro la pioggia è garantita per i nostri modelli soltanto
- Tutte le intelaiature dei nostri modelli sono testate e omologate a norma EN1888 : 2012.
Per garantire una lunga durata del vostro passeggino, è necessario oliare e all’occorrenza
ribattere di tanto in tanto gli elementi mobili.
ATTENZIONE: Per oliare, utilizzare esclusivamente olio o spray siliconico.
- Una regolare pulizia e manutenzione del vostro passeggino contribuiscono in modo
rilevante a garantirne la sicurezza e a mantenerlo in buono stato. Gli agenti atmosferici,
come il contenuto salino dell’aria, il sale sparso in inverno sulle strade, le piogge acide e
la sistemazione in un luogo non adatto, favoriscono la corrosione.
- Suggeriamo di pulire regolarmente tutte le parti verniciate. Nei casi più gravi, pulire leprovvedere a stringerle.
AVVERTENZE:
- ¡ATTENZIONE!: Non lasciate il vostro bambino
b
incustodito.
- ¡ATTENZIONE!: Utilizzate la cintura di sicurezza non
appena il vostro bambino è in grado di stare seduto da
INSTRUZIONI
solo.
- ¡ATTENZIONE!: Questo seggiolino non è adatto per
bambini al di sotto dei 6 mesi di età.
IT
compromettono la stabilità del passeggino.
che l’alzata o l’unità seggiolino sia correttamente inseriti e
agganciati.
- ¡ATTENZIONE!: Questo prodotto non è adatto per
praticare jogging o pattinaggio.
compromettere la sicurezza.
- ¡ATTENZIONE!: Tenete questo prodotto lontano da
- ¡ATTENZIONE!: Per evitare lesioni assicuratevi che il
vostro bambino sia tenuto a debita distanza quando
aprite e/o chiudete questo prodotto.
- ¡ATTENZIONE!: Non permettete al vostro bambino di
giocare con questo prodotto.
- ¡ATTENZIONE!: Usate sempre le cinture di sicurezza e/o
tutti I sistemi in dotazione per
evitare che il bambino fuoriesca dall’apparato.
Importado por Estar Asalvo S.L.
CIF B91234286
PI Hacienda Dolores, C/Dos, 2 · 41500 · Alcalá de Guadaíra · Sevilla · Tfno. 902 360 516
Fax: 955 631 205 · email: info@asalvo.com
www.asalvo.comCARRINHO DINAMIC
INSTRUÇOES DE USO
REF: 13477 - 13484 - 16423
ESTE PRODUTO É DESTINADO A CRIANÇAS ENTRE 6 E 36
MES ATÉ 15 KG DE PESO
ATENDE A NORMATIVA EN1888:2012
GUARDAR INSTRUÇOES PARA FUTURAS CONSULTAS
www.asalvo.comLeia atentamente estas instruções antes de usar e utilize-as como referência futura. A não
leitura dessas instruções pode comprometer a segurança da criança.
OBS
- Este modelo é recomendado para crianças de 6 meses até um peso máximo de 15
kg.
INSTRUÇOES
- A bolsa de objetos suporta até 2 kg.
- Este carrinho foi concebido para transportar uma criança.
- Não use acessórios que não sejam aprovadas pelo fabricante.
PT - É aconselhável retirar a criança do carrinho em escadas ou quando o carrinho tem
de ser car regado ou levantado.
criança do carrinho.
Leia atentamente estas instruções antes de usar e utilize-as como referência futura. A não
leitura dessas instruções pode comprometer a segurança da criança.
1 ABRINDO O CARRINHO
- Libere a alça de transporte. (1a)
- Desdobre o carrinho. (1b)
1a 1b 1b2 COLOCANDO AS RODAS
- (2a) Ajuste o eixo traseiro na estrutura de alumínio. 1a 1b
NB: As alavancas de freio devem estar apontando para trás.
- (2b) Coloque as rodas traseiras no eixo.
Ajuste os retentores (A) sobre o eixo. Fixe as rodas com os retentores (B) se
encaixe as tampas de proteção sobre eles (C) colocando as tampas das rodas (D)
no aro.
- (2c) Para montar as rodas da frente, empurrar as rodas para os acessórios
INSTRUÇOES
até que eles se encaixem no lugar. Para retirar as rodas dianteiras, pressione os
1a
1a
1a botões nas rodas1be1b
acessórios puxar as rodas
1b 1b1b para fora.
1b 2a 2b
1a 1b 1b
1a 1b
PT
2a
2a
2a 2b
2b
2b 2c
2c
2c 2c 3
2a 2b 2c
1a 1b 1b 2a 2b
3 OPERAÇÃO DO FREIO
- Pressione a alavanca para
baixo para ativar o freio.
- Pressione a alavanca para
cima para soltar o freio.
2c
2c
2c 333 4a
4a
4a 4b 5
2c 3 4a
2a 2b 2c 2c 3
4 AJUSTANDO O CINTO DE
SEGURANÇA
- (4a) Para apertar o cinto de
segurança, insira o plástico
do cinto peitoral no conector
4b
4b
4b 555 666
- (4b) Ajuste a altura do cinto4b 5 6
de segurança no qual o bebê é
2c
mantido na posição
3
correta. 4a 5
4b
Cuidado: Sempre use o cinto de
ombro e cinto de segurança em
conjunto.2a 2b
2a 2b2c 2c
5 ABRINDO O CINTO DE
SEGURANÇA 6 AJUSTANDO O ENCOSTO
- Para ajustar o encosto, puxe
- Para abrir o cinto, pressione os a alavanca na parte de trás do
botões laterais para dentro até encosto para cima e, em seguida,
que se soltem. ajuste a al tura. Quando tiver
alcançado a posição desejada,
2c 2c
3 34a solte a4a
alavanca para permitir que o
encosto de permaneça
nessa posição.
INSTRUÇOES
4b 5
4b 56 6
PT
7 AJUSTANDO O DENCANSO DOS
PÉS
- Para ajustar o descanso de pé,
pressione os botões em ambos os
lados e, em seguida, ajuste a altura.
7 8
8 BLOQUEIO E DESBLOQUEIO DAS
RODAS GIRATÓRIAS
- Para bloquear as rodas, empurre
a alavanca situada na próximo ao
encaixe das mesmas conforme
Empurre a alavanca para cima
7 8
9b 10a
9a
giratória.
9 MONTAGEM DA BARRA DE PROTEÇÃO
- (9a) Coloque a barra de proteção inserindo-a na lateral plástica em ambos os
lados. Para remover a barra de proteção da cadeira, levante as alças na lateral em
ambos os lados e puxe para fora.
- (9b) Para ajustar a altura da barra de proteção, levante as alavandas laterais,
remova a barra de proteção e ajuste para cima ou para baixo.
9b 10a
10c 10b
10d7 8
8 9a 9b 10a
7 7 8 8 9a 9
INSTRUÇOES
10 FECHANDO O CARRINHO
- (10a) Pressione o botão (1) e empurre a alavanca de punho (2) para destravar o
mecanismo.
- (10b) Em seguida, empurre a alavanca para baixo.
PT
10a 7- (10c) Pressione o puchador
8 do carrinho 10c
para frente9apara dobrá-lo. 10d
10b
8 8 9a 9a 10a10a 10b1
9b 9b
9b 10a 10b
10d 11
10a 10a 10b 10b 10c10c 10d10d 11
11 COLOCANDO A CAPOTA
- Fixe a capota sobre a estrutura
do assento com os dois
suportes de plástico indicados
10c 10d 11
10d 10d 11 11
INSTRUÇÕES DE MANUSEIO
- Os materiais utilizados para fabricar os nossos produtos estão em conformidade com
a exigên cia AZO, solidez da EN71-2 e EN71-3, e com proteção a luz solar de acordo
com as normas para os produtos têxteis. Contudo, aconselha-se não deixar o produto
exposto à luz solar por um longo período de tempo. Reclamações não serão aceitas caso
as cores desbotarem quando o produto for exposto à luz excessiva. O tecido pode serlavado à mão ou em máquina de lavar com água fria (utilizar detergente neutro).
- Para proteção completa contra chuva, está disponível em lojas de varejo uma capa de
chuva Asalvo.
- Todas as estruturas de alumínio dos nossos produtos foram testados em
conformidade com a norma EN1888: 2012. Para manter a segurança do produto, é
- A manutenção tem um papel fundamental na segurança e valor do produto. A
exposição à água salgada, chuvas ácidas ou o armazenamento inadequado do produto,
favorecem o pro cesso de corrosão.
- Recomendamos a manutenção regular de todas as peças revestidas. Em casos graves
INSTRUÇOES
de su jeira, limpe o revestimento da superfície afetada imediatamente.
ATENÇÃO
PT - Não deixe a criança sozinha.
b
- Use cinto de segurança quando a criança conseguir
sentar-se por si prória.
- A cadeira não é recomendada para bebês com menos
de 6 meses de idade.
- Colocar peso sobre as alças do carrinho pode afetar a
estabilidade.
assento esporte estão corretamente encaixados.
- Este produto não é adequado para correr ou andar de
skate.
sua segurança.
- Mantenha o produto longe do fogo e outras fontes de
calor.
- Para evitar problemas, mantenha sua criança longe do
produto na hora de abrí-lo ou fechá-lo.
- Não deixe que sua criança brinque com o produto.
- Use sempre os freios.
Importado por Estar Asalvo S.L.
CIF B91234286
PI Hacienda Dolores, C/Dos, 2 · 41500 · Alcalá de Guadaíra · Sevilla · Tfno. 902 360 516
Fax: 955 631 205 · email: info@asalvo.com
www.asalvo.comTambién puede leer