G6508N - UNIDAD ELECTRÓNICA ELECTRONIC MONITOR UNITÉ ÉLECTRONIQUE ELEKTRONIKEINHEIT UNIDADE ELECTRÓNICA IMPIANTO ELETTRONICO ELEKTRONISCHE MONITOR ...
←
→
Transcripción del contenido de la página
Si su navegador no muestra la página correctamente, lea el contenido de la página a continuación
G6508N

  UNIDAD ELECTRÓNICA
  ELECTRONIC MONITOR
   UNITÉ ÉLECTRONIQUE
    ELEKTRONIKEINHEIT
  UNIDADE ELECTRÓNICA
 IMPIANTO ELETTRONICO
ELEKTRONISCHE MONITOR
Fig.1
Fig.2

Fig.3
Español
INDICACIONES GENERALES.- la pantalla alfanumérica (B) Fig.2.
Este monitor electrónico está Estando la palabra ‘LANGUAGE’
diseñado para ser utilizado de forma parpadeando, pulse la tecla ENTER y
sencilla e intuitiva. Los textos que le parpadeara el idioma, seleccione su
aparecen en la pantalla inferior (B) idioma con las teclas UP▲ y
guiarán al usuario durante la DOWN▼ pulse la tecla ENTER y le
realización del ejercicio. volverá a parpadear la palabra
Sin embargo, recomendamos que el “LANGUAGE”, con la tecla DOWN▼,
preparador físico lea atentamente esta pase al punto (2 SOUNDS).
sección con el fin de conocer a fondo
el monitor electrónico y mostrar al 2) CAMBIO DE SONIDO.-
usuario su funcionamiento de forma Estando la palabra SOUNDS
efectiva. parpadeando, pulse la tecla ENTER y
le parpadeará la palabra ON o OFF,
NOTA: El monitor pasa a modo reposo con las teclas UP▲ y DOWN▼ se
si está 4 minutos sin tocar ninguna tecla cambia la opción que se muestra
.Pulsando la tecla STOP el monitor parpadeante, una vez elegida la
pasa a modo preparado (READY) opción pulse la tecla ENTER para
confirmar y le parpadeará la palabra
PERSONALIZACIÓN DEL SOUNDS, con la tecla DOWN▼, pase
al punto (3 TEXT).
MONITOR ELECTRÓNICO
Para entrar en el modo de 3) CAMBIO DE SALUDO INICIAL.-
personalización del monitor es Estando la palabra TEXT
necesario seguir los siguientes pasos: parpadeando, pulse la tecla ENTER y
Estando la máquina y el monitor le parpadeará la palabra ON o OFF,
apagado, mantenga pulsada la tecla con las teclas UP▲ y DOWN▼ se
RESET del monitor Fig. 3, y sin soltar cambia la opción que se muestra
la tecla ponga el interruptor (b) de parpadeante. Eligiendo la palabra ON
entrada de corriente en la posición 1 le permite cambiar el mensaje de
Fig.A, situado en la parte inferior saludo inicial del monitor.
delantera de la máquina. Una vez elegida la opción ON pulse la
Fig.A tecla ENTER y visualizará en la
pantalla alfanumérica (B) un cursor
parpadeante, con las teclas UP▲ y
DOWN▼, seleccione letra a letra el
mensaje de saludo inicial. Una vez
haya completado el mensaje pulse la
tecla ENTER durante unos segundos
1) CAMBIO DE IDIOMA.- y le parpadeará la palabra Text, con la
Una vez encendido el monitor le tecla DOWN▼, pase al punto (4
aparecerá la palabra “LANGUAGE” en MANUAL T).
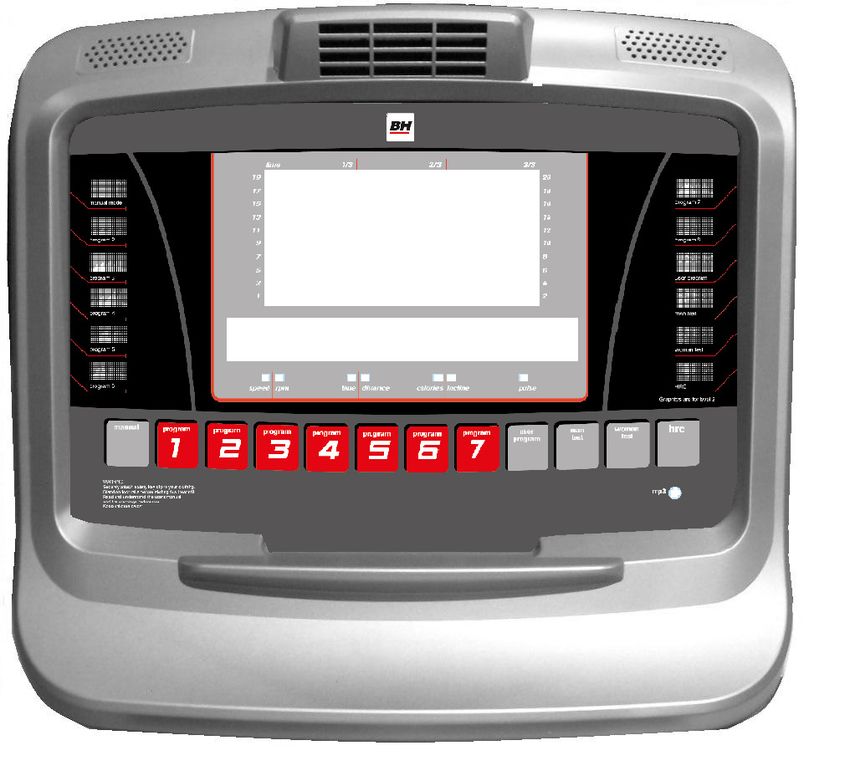
44) TIEMPO MAX. EJERCICIO.- VISUALIZACIÓN.
Estando la palabra MANUAL T. Esta zona está compuesta por dos
parpadeando, pulse la tecla ENTER y pantallas.
le parpadeara la cifra entre 0 y 60 (A).- Display Matriz de LEDs
Minutos, con las teclas UP▲ y superior, donde se monitoriza el nivel
DOWN▼ seleccione la opción que se de esfuerzo que se realiza del
muestra parpadeante, una vez elegida programa seleccionado en cada
la opción pulse la tecla ENTER para momento.
confirmar y le parpadeara la palabra (B).- Display de Pantalla
MANUAL T, con la tecla DOWN▼, alfanumérica inferior, que guía al
pase al punto (5 SPR TIME). usuario durante la selección y
realización del ejercicio.
5) TIEMPO DE RESISTENCIA
EN PROGRAMA H.R.C.- La pantalla superior (A) mostrará los
Estando la palabra SPR TIME diferentes perfiles preprogramados de
parpadeando, pulse la tecla ENTER y esfuerzo (programas) que podemos
le parpadeara la cifra entre 20 y 60 seleccionar y, durante el ejercicio, el
Segundos, con las teclas UP▲ y nivel de esfuerzo que se realiza en
DOWN▼ seleccione la opción que se cada momento.
muestra parpadeante, una vez elegida
la opción pulse la tecla ENTER para La pantalla alfanumérica inferior (B)
confirmar y le parpadeará la palabra se encarga de guiar al usuario durante
SPR TIME. la selección del ejercicio a realizar y
Para salir del modo personalización, de mostrar información sobre el
pulse la tecla STOP. ejercicio durante y después de su
realización. Los LEDs indicadores (C)
CAMBIO DE Km. a Millas. que se encuentran debajo de la
Para cambiar de Km. a Millas, pulse la pantalla alfanumérica muestran
tecla ENTER durante 10 segundos y simultáneamente la VELOCIDAD;
accederá al cambio, visualizando en TIEMPO / DISTANCIA; CALORIAS /
la pantalla (B) “KM”, seleccione la INCLINE; PULSO e indican cual es la
medida de su velocidad con las teclas información que se está mostrando en
Λ e inclineV
inclineΛ V (METRIC / Km. -- cada momento del ejercicio.
ENGLISH / Millas) pulse la tecla
ENTER. Los datos que se muestran en los
LEDs (C) durante la realización del
ELEMENTOS DEL MONITOR ejercicio son los siguientes:
ELECTRÓNICO (Fig.1)
El monitor electrónico se compone de - SPEED - VELOCIDAD: Se muestra
dos zonas bien diferenciadas; un valor estimado de la velocidad
La zona superior Fig. 2 (A – lineal a la que se desplaza la banda
B – C) se encuentra la visualización. de la maquina. El valor se muestra en
La zona inferior Fig. 3 (E – kilómetros por hora (Km/h).
F – G) se encuentra el teclado.
5-TIME – TIEMPO: Durante el ejercicio TECLADO (Fig.3).
se muestra el tiempo que ha trascurrido A continuación se enumera la función
desde que comenzamos el mismo, o, de cada tecla.
en caso de haber seleccionado un
tiempo de ejercicio predefinido, el Este monitor electrónico dispone de
tiempo que resta para acabar el un teclado de uso fácil y sencillo. Este
ejercicio. El tiempo se muestra en teclado consta de: (D) Teclas de
minutos y segundos (mm:ss). programas; Conexión para el audio;
-DISTANCE – DISTANCIA: Se (E) Ventilador; (F) Teclas de función;
muestra la distancia que hemos (G) Teclas numéricas.
recorrido desde el inicio del ejercicio.
La distancia se calcula teniendo en (D).- Teclas de programas.- Manual;
cuenta la estimación de velocidad Programa 2; Programa 3; Programa 4;
lineal (SPEED) y las unidades son los Programa 5; Programa 6; Programa 7;
kilómetros y hectómetros. Programa 8; Programa Usuario (User);
-CALORIES – CALORIAS: Se Programa Test Man (Hombre);
muestra una estimación de las Programa Test woman (Mujer);
calorías que se han quemado hasta el Programa H.R.C (Ritmo cardiaco
momento. La estimación se realiza constante).
tomando en cuenta la energía que se
está realizando en cada momento y Clavija de audio, conexión MP3.
los datos de peso y edad introducidos
por el usuario. (E) - Teclas Fan / Ventilador.-
-INCLINE – INCLINACION: Se Off/On (Marcha y parada);
muestra el nivel de inclinación que
tiene la máquina en cada momento. La (F) - Teclas de función.- cool
máquina tiene 15 niveles de inclinación down; pause; reset; down▼; enter;
(0 a 15). El grado de inclinación se up▲; incline V; incline Λ; stop;
puede cambiar actuando sobre las quick/start; speed ; speed –.
teclas incline V e incline Λ. Al finalizar Estas teclas se utilizan para
el ejercicio la máquina vuelve al nivel seleccionar el ejercicio a realizar,
de inclinación 0. introducir los datos solicitados,
-PULSE – PULSO: Se muestra la controlar el nivel de resistencia del
frecuencia cardiaca del usuario, ejercicio y finalizar el mismo.
siempre que esta información sea
accesible mediante los sensores de (G) - Teclas numéricas.- (1- 0)
mano ( Hand – Grip )o la banda se utilizan para introducir los datos
telemétrica de pecho, cuando se que el monitor solicite.
utilizan los dos juntos, se da prioridad
a la banda telemétrica de pecho. Para -cool down.- Tecla progresiva de
más información acerca de la disminución.
frecuencia cardiaca, consultar la Cuando la velocidad es superior a
sección: Medida de pulso; banda de 10Km/h, pulsando la tecla disminuirá
pecho y hand-grip. la velocidad el 40% con un tiempo en
disminución de 40 segundos.
6Cuando se haya cumplido el tiempo, selección de un perfil preprogramado
bajara la velocidad un 40%, durante para seleccionarlo, validar los datos
40 segundos en disminución. Cuando que han de introducirse y comenzar el
se haya cumplido el tiempo, bajara la ejercicio. Durante la programación del
velocidad un 50%, durante 30 perfil de usuario se utiliza además
segundos en disminución. Una vez para validar el nivel de esfuerzo
cumplido este ultimo tiempo la correspondiente a cada minuto.
maquina se parará. -pause.- Tecla de pausa. Si se pulsa
Cuando la velocidad es inferior a durante la realización del ejercicio,
10Km/h, pulsando la tecla disminuirá éste se interrumpe, deteniendo el
la velocidad el 50% con un tiempo en cronometro de duración de ejercicio.
disminución de 30 segundos. Cuando Para reanudar el cronometro de
se haya cumplido el tiempo, bajara la duración del ejercicio pulse la tecla
velocidad un 50%, durante 30 pause de nuevo. Si, estando en modo
segundos en disminución. Una vez pausa, se pulsa la tecla STOP en
cumplido este último tiempo la ejercicio se dará por finalizado. El
máquina se parará. tiempo límite de modo pausa es de
-reset.- Tecla de anulación. Se utiliza cinco minutos, una vez transcurrido
para borrar los datos que se este tiempo el ejercicio se dará por
introducen en el monitor a la hora de finalizado.
seleccionar un programa. Si, estando en modo pausa, se pulsa
-speed–.- Tecla de disminución de la tecla STOP en ejercicio se dará por
velocidad. Durante la realización del finalizado.
ejercicio esta tecla disminuye en una -stop.- Tecla de parada. Si se pulsa
décima de kilómetro por hora la durante la realización del ejercicio,
velocidad de la maquina. Si se éste se da por finalizado y la cinta se
mantiene pulsada esta tecla la para. Se muestra un resumen con los
velocidad continuara disminuyendo. datos del ejercicio y se vuelve a la
Durante la selección de los perfiles pantalla de inicio.
preprogramados se utiliza para -incline V.-. Tecla de decremento del
mostrar en pantalla el perfil anterior al nivel de inclinación. Durante la
mostrado. realización del ejercicio esta tecla
-speed .- Tecla de incremento de disminuye en un grado la inclinación
velocidad. Durante la realización del de la máquina. Si se mantiene
ejercicio está tecla aumenta en una pulsada esta tecla la inclinación
décima de kilómetro por hora la continuará disminuyendo.
velocidad de la máquina. Si se -incline Λ.- Tecla de incremento del
mantiene pulsada esta tecla la nivel de inclinación. Durante la
velocidad continuará aumentando. realización del ejercicio esta tecla
Durante la selección de los perfiles aumenta en un grado la inclinación de
preprogramados se utiliza para la máquina. Si se mantiene pulsada
mostrar en pantalla el perfil siguiente esta tecla la inclinación continuará
al mostrado. aumentando.
-enter.- Tecla de selección y
validación. Se utiliza durante la
7-quick/start.- Tecla de inicio las teclas speed – o speed , usted
inmediato. Siempre que el LED de la puede aumentar o disminuir la
tecla se encuentre parpadeando, al velocidad de la máquina. También
pulsar esta tecla y transcurriendo 3 puede aumentar o disminuir la
segundos, contados en forma velocidad con las teclas numéricas
descendente, comienza el ejercicio en (G) del teclado.
modo manual.
INSTRUCCIONES DE
PUESTA EN MARCHA.
Para la puesta en marcha del monitor: FUNCIONAMIENTO.-
Conectar el cable eléctrico que se PUESTA EN MARCHA
suministra con la máquina, al enchufe VENTILADOR.-
de red eléctrica, comprobando que Esta maquina dispone en el monitor
corresponde al voltaje que especifica en de salidas de aire que a través de un
la maquina, también compruebe que el ventilador (FAN) Fig.3, le proporciona
enchufe tiene toma de tierra Fig.B. dos velocidades de aire, una baja
Seguido ponga el interruptor (b) en (LOW) y otra alta (HIGH), para la
posición 1 Fig.A. puesta en marcha del ventilador
Fig.A estando realizando el ejercicio, pulse
la tecla ON/OFF situada en el teclado
Fig.3 y el ventilador se pondrá en
marcha, en el momento que el monitor
se ponga en PAUSE el ventilador se
desconecta.
Fig.B MODO PROGRAMAS.-
El monitor dispone de: 1 programa de
perfil MANUAL; 8 PROGRAMAS con
perfiles preprogramados; de un perfil
programable por el usuario (USER);
programas TEST masculino, y TEST
femenino; y programa de ritmo
cardiaco constante (H.R.C.).
Una vez encendido el monitor le P0 MODO MANUAL.-
mostrará en el display de matriz de Una vez encendido el monitor le
LEDs (A) Fig.2, el perfil y la letra “M” mostrara en el display de matriz de
de manual, y en display de pantalla LEDs superior (A) Fig.2 el perfil y la
alfanumérica inferior (B) le mostrará el letra “M” de manual, y en display de
saludo de bienvenida. pantalla alfanumérica inferior (B) Fig.2
Pulsando la tecla QUICK/START se le mostrará el saludo de bienvenida.
pone en marcha el programa en Pulsando la tecla QUICK / START a
manual, transcurridos 3 segundos, los 3 segundos .contados en forma
indicados en forma descendente con descendente se pone en marcha el
una velocidad de 2 Km./h. y pulsando programa, en manual.
8En el display de matriz de LEDs Estando el monitor encendido le
superior (A) Fig.2 le indicara mostrara el display de matriz de LEDs
parpadeando a la velocidad que esta superior (A) Fig.2 el perfil y la letra “M”
realizando el ejercicio. Pulsando las de manual. Para visualizar lo
teclas speed o speed –, usted diferentes perfiles preprogramados se
puede aumentar o disminuir entre los utilizan las teclas speed o speed –.
veinte niveles de velocidad del ejercicio. Una vez se haya seleccionado un
También puede aumentar o disminuir perfil en concreto pulse la tecla
la velocidad con las teclas numéricas ENTER.
(G) del teclado Fig.3. En el display de matriz de LEDs
En el display de pantalla alfanumérica superior (A) le pedirá la edad entre
inferior (B) Fig.2 le irá mostrando cada (10 y 99 años) seleccione su edad con
10 segundos alternativamente, los las teclas numéricas (G) Fig.3, pulse
valores de; La velocidad SPEED; ENTER. A continuación le pedirá el
Sistema Métrico Km/h, Sistema peso entre (30 y 199Kg.), seleccione
Británico Mª/h; El tiempo (TIME); su peso con las teclas numéricas (G)
Calorías (CALORIES) y Pulso Fig.3, pulse ENTER.
(PULSE) y en otra secuencia le A continuación le pedirá el tiempo de
mostrara; El tiempo (TIME); Distancia duración del ejercicio entre (10 y 60
(DISTANCE) e Inclinación (INCLINE). minutos), seleccione el tiempo con las
Pulsando la tecla STOP o pulsando la teclas numéricas (G) Fig.3, pulse
tecla de EMERGENCIA situada en la ENTER, le mostrara en la pantalla
parte inferior de las pantallas de alfanumérica (B) INICIO DE
monitor, se interrumpe el programa y EJERCICIO y dará comienzo a su
en el display de pantalla alfanumérica ejercicio transcurridos 3 segundos,
inferior (B) Fig.2, le informara de la indicados en forma descendente con
media de los valores TIEMPO DE una velocidad de 2Km./h.
EJERCICIO (HH:MM:SS); DISTANCIA Dentro de cada perfil preprogramado
RECORRIDA (Km./h); VELOCIDAD el usuario dispone de niveles de
MEDIA (Km./h); CALORIAS dificultad diferentes, para seleccionar
CONSUMIDAS (Kcal.); que ha cualquiera de ellos es suficiente con
realizado durante el ejercicio, utilizar las teclas speed o speed –
mostrándoselos dos veces cada cinco durante la realización del ejercicio.
segundos. Una vez haya terminado el programa
Si en el tiempo que trascurre la que ha estado realizando el ejercicio el
información de los valores medios, no monitor le habrá calculado la media de
se toca ninguna tecla, no se hace los valores en el cual ha realizado el
ejercicio y se pulsa la tecla STOP ejercicio y se los mostrará el la pantalla
pasara al programa manual. alfanumérica inferior (B) Fig.2.
Pulsando la tecla STOP se interrumpe
P2 - P8 PROGRAMAS el programa y en el display de pantalla
PREPROGRAMADOS.- alfanumérica inferior (B) Fig.2, le
Ver gráficos de los programas informara de la media de los valores
preprogramados en las páginas TIEMPO DE EJERCICIO; DISTANCIA
finales de este manual. RECORRIDA; VELOCIDAD MEDIA;
9CALORIAS CONSUMIDAS; que ha completar el gráfico del programa que
realizado durante el ejercicio, usted desee.
mostrándoselos dos veces cada cinco Si se ha equivocado al grabar algún
segundos. paso, pulse la tecla RESET y volverá
Si en el tiempo que trascurre la al paso anterior.
información de los valores medios, no A continuación pulse tecla ENTER y le
se toca ninguna tecla, y se pulsa la mostrará en la pantalla alfanumérica
tecla STOP pasará al programa (B) INICIO DE EJERCICIO y dará
manual. comienzo a su ejercicio transcurridos
3 segundos, indicados en forma
P9 PROGRAMA USUARIO descendente.
(USER). Una vez haya terminado el programa
Estando el monitor encendido le que ha estado realizando el ejercicio
mostrara el display de matriz de LEDs el monitor le habrá calculado la media
superior (A) Fig.2 el perfil y la letra “M” de los valores en el cual ha realizado
de manual, para visualizar lo diferentes el ejercicio y se los mostrara el la
perfiles preprogramados se utilizan las pantalla alfanumérica (B) Fig.2.
Pulsando la tecla STOP se interrumpe
teclas speed y speed–. Una vez se
el programa y en el display de pantalla
haya seleccionado el programa 9
alfanumérica inferior (B) Fig.2, le
(USER), pulse la tecla ENTER.
informara de la media de los valores
En el display de matriz de Leds (A)
TIEMPO DE EJERCICIO; DISTANCIA
Fig.2 le pedirá la edad entre (10 y 99
RECORRIDA; VELOCIDAD MEDIA;
años) seleccione su edad con las
CALORIAS CONSUMIDAS; que ha
teclas numéricas (G) Fig.3, (si se
realizado durante el ejercicio,
introduce el valor, fuera de los dos
mostrándoselos dos veces cada cinco
dígitos le mostrara el valor mas
segundos .
cercano). Pulse ENTER.
Si en el tiempo que trascurre la
A continuación le pedirá el peso entre
información de los valores medios no
(30 y 199Kg.), seleccione su peso con
se toca ninguna tecla, y no se hace
las teclas numéricas (G) Fig.3, pulse
ejercicio si pulsa la tecla STOP pasara
ENTER.
al programa manual.
A continuación le pedirá el tiempo de
duración del ejercicio entre (10 y 60
minutos), seleccione el tiempo con las P10 - P11 PROGRAMAS DE
teclas numéricas (G) Fig.3 y pulse TEST VARON – MUJER.
ENTER a continuación pulse la tecla El objetivo del test es valorar la forma
RESET y pulsando las teclas up▲ o física del usuario. La diferencia entre
down▼, puede comenzar a diseñar el los programas de varón y de mujer
perfil de velocidad que usted desee en esta en los Watios, los valores del
el display de matriz de LEDs (A). varón están seleccionados en 150 W.
El perfil a diseñar esta subdividido en y en el programa de mujer en 100 W.
21 pasos. Para seleccionar el primer Estando el monitor encendido, el
paso, pulse RESET, las teclas up▲ o display de matriz de LEDs superior (A)
down▼, a continuación pulse la tecla Fig.2 le mostrará el perfil y la letra “M”
ENTER, y así sucesivamente hasta de manual.
10Para visualizar los diferentes perfiles sobrepasar se le denomina ritmo
preprogramados se utilizan las teclas máximo y éste disminuye con la edad.
speed o speed –. Una sencilla fórmula para calcular es
restar a 220 la edad en años. El
Una vez se haya seleccionado el ejercicio, para que sea correcto, debe
programa TEST Varón ó TEST Mujer, mantenerse entre el 65% y el 85 %
pulse la tecla ENTER. A continuación, del ritmo cardíaco máximo y se
el display de Pantalla alfanumérica recomienda no sobrepasar el 85%.
inferior (B) Fig.2 le pedirá la edad Cuando sus pulsaciones pasen del
(entre 10 y 99 años). Seleccione su 85% del ritmo cardiaco máximo
edad con las teclas numéricas (G) aparecerá un corazón parpadeando y
Fig.3 y pulse ENTER, le mostrara en un pitido durante 2 segundos hasta
la pantalla alfanumérica (B) INICIO que sus pulsaciones no bajen del 85
DE EJERCICIO y dará comienzo a su % de su ritmo cardiaco máximo.
ejercicio transcurridos 3 segundos, Se recomienda trabajar por debajo del
indicados en forma descendente. 85% del ritmo cardíaco máximo por
En el dispay de matriz de LEDs superior razones de seguridad.
(A) Fig.2 le mostrara un corazón
parpadeante, coloque sus manos sobre P12 PROGRAMA DE RITMO
los sensores de pulso (hand -grip) CARDIACO CONSTANTE (H R C)
situados en el manillar o en el caso de Es conveniente hacer un pequeño
disponer de banda medidora de pulso calentamiento antes de realizar el
telemétrica colóquesela en el pecho. programa. Esto evitará posibles
Comience el TEST. lesiones.
Al finalizar los 12 minutos de duración
del test le mostrará una valoración Este programa permite hacer el
entre el 1 (muy deficiente) y el 5 ejercicio a un ritmo cardiaco (entre el
(excelente). También puede aparecer 65 y el 85% del ritmo cardiaco
una valoración de 0 que quiere decir máximo) y la máquina le ajustara el
que el test no ha sido realizado nivel de resistencia para lograr que en
correctamente, no se ha utilizado la todo momento el usuario mantenga el
medición de ritmo cardiaco ritmo cardiaco al nivel seleccionado.
correctamente. Es obligatorio utilizar la medición del
ritmo cardiaco, usando para ello la
NOTA: Es obligatorio para hacer el banda de pulso telemétrico de pecho
test utilizar la medición del ritmo únicamente, y no sobrepasar del 85%
cardiaco, usando para ello los del ritmo cardiaco máximo.
sensores manuales (hand-grip) o la Estando el monitor encendido le
banda de pecho. Es conveniente mostrara el display de matriz de LEDs
hacer un pequeño calentamiento superior (A) Fig.2 el perfil y la letra “M”
antes de realizar el test. Esto evitará de manual, para visualizar lo
lesiones. diferentes perfiles preprogramados se
utilizan las teclas speed o speed –
El máximo número de pulsaciones . Una vez se haya seleccionado el
que una persona nunca debe programa HRC pulse la tecla ENTER.
11En el display de la Pantalla programas de tests.
alfanumérica inferior (B) le pedirá el Al máximo número de pulsaciones
valor del ritmo cardiaco que desea que una persona nunca debe
hacer el ejercicio seleccione con las sobrepasar se le denomina ritmo
teclas numéricas (G) Fig.3 entre (25 y máximo y éste disminuye con la edad.
250 P.P.M. Pulsaciones Por Minuto) Una sencilla fórmula para calcular es
pulse ENTER, le mostrara en la restar a 220 la edad en años. El
pantalla alfanumérica (B) INICIO DE ejercicio, para que sea correcto, debe
EJERCICIO y dará comienzo a su mantenerse entre el 65 y el 85% del
ejercicio transcurridos 3 segundos, ritmo cardíaco máximo y se
indicados en forma descendente. recomienda no sobrepasar el 85%.
En los tres primeros minutos este
programa tiene un esfuerzo Cuando sus pulsaciones pasen del 85
programado para evitar cualquier tipo % del ritmo cardiaco máximo
de lesión. En el primer minuto se aparecerá un corazón parpadeando y
comienza con una velocidad de un pitido durante 2 segundos hasta
4Km./h. En el segundo minuto se que sus pulsaciones no bajen del 85
pasa a una velocidad de 4,5 Km/h. En % de su ritmo cardiaco máximo. Se
el tercer minuto se pasa a una recomienda trabajar por debajo del
velocidad de 5Km/h. A partir del 85% del ritmo cardíaco máximo por
cuarto minuto, el ordenador adecua razones de seguridad.
automáticamente el esfuerzo para
mantener el pulso entorno al valor *0*:
previamente programado. Este símbolo aparece en los tests
masculino y femenino y significa que
NOTA: Si en el paso al minuto tercero usted ha realizado el test no se ha
el monitor no ha recibido ninguna colocado la banda de pecho).
señal de pulso el programa se para.
Símbolo de Llave fija:
SIGNIFICADO DE LOS Avería mecánica. Apagar la máquina
SÍMBOLOS.- y encenderla pasados 2 minutos. La
En la pantalla pueden aparecer una máquina posee un sistema de
serie de símbolos o de palabras con el corrección de averías automático, no
siguiente significado: obstante, si el problema persiste,
póngase en contacto con el servicio
técnico.
Símbolo del corazón ♥?:
No se ha colocado la banda del pecho BH SE RESERVA EL DERECHO A
o no se la ha colocado MODIFICAR LAS
adecuadamente. ESPECIFICACIONES DE SUS
PRODUCTOS SIN PREVIO AVISO.
Símbolo del corazón ♥
parpadeando:
Este símbolo sólo aparecerá en los
12LOCALIZACIÓN DE FALLOS O AVERIAS
SÍNTOMAS COMPROBACIONES SOLUCIONES
1. No se enciende el 1)Asegúrese de que la máquina está 1)Enchufe el cable a la red.
monitor enchufada a la red, el interruptor Coloque el interruptor en
general en posición 1 y la llave de posición 1 y ponga la llave
seguridad puesta. de seguridad
2. Se enciende el 2)Comprobar que el limitador de 2)Desconectar la máquina y
monitor y no corriente esté hacia dentro. pulsar el limitador de
funciona el motor corriente. Lubricar la
banda
3. Tirones al andar 3.a)Comprobar lubricación banda 3.a)Lubricar la banda de
encima de la 3.b)Comprobar tensión banda deslizamiento.
banda deslizamiento. 3.b)Tensar la banda de
3.c)Comprobar tensión correa de deslizamiento.
transmisión 3.c)Tensar la correa de
transmisión.
4. La máquina se 4)Comprobar lubricación banda 4)Pulsar el limitador de
para (salta el corriente con el interruptor
limitador de en 0 y lubricar la banda de
corriente) deslizamiento.
5. La barandilla da 5)Comprobar que el enchufe donde está 5)Enchufar la máquina en
calambres en las conectada tiene toma de tierra enchufe con toma de
manos tierra.
6. La banda se 6.a)Comprobar nivelación del suelo 6)Nivele la máquina con las
descentra 6.b)Comprobar la cojera de la máquina patas regulables.
ERRORES DE LA MÁQUINA
Aparece en la pantalla monitor E1 - Fallo en la señal de reenvío.
Aparece en la pantalla monitor E6-E7 - Fallo en el sistema de elevación
Para cualquier consulta, no dude en ponerse en contacto con el (S.A.T).Servicio
de Asistencia Técnica, llamando al teléfono de atención al cliente (ver página
final del presente manual).
13English
GENERAL INSTRUCTIONS Press the ENTER key and the current
The electronic monitor is designed to language will start flashing. Select
be easy and intuitive to use. The your language using the UP▲ and
messages that appear on the bottom DOWN▼ keys and then press
screen (B) will guide the user ENTER, the word “LANGUAGE” will
throughout the whole exercise. start flashing again, using the
Nevertheless, we recommend that the DOWN▼ key , pass on to the ( 2
gym instructor reads through this SOUNDS) setting.
section carefully to become fully
familiar with the electronic monitor in 2) CHANGING THE SOUND.-
order to show the user how to operate With the word “SOUNDS" flashing,
it correctly. press the ENTER key and the word
ON or OFF will start flashing. Select
NOTE: The monitor will switch back to the flashing value using the UP▲ and
stand-by mode after 4 minutes if no DOWN▼ keys and then press ENTER
keys are pressed. The monitor can be to confirm, the word “SOUNDS” will
switched back to READY by pressing start flashing again, using the
the STOP key. DOWN▼ key to pass to the (3 Text)
setting.
PERSONALISING THE
3) CHANGING THE WELCOME
ELECTRONIC MONITOR.- MESSAGE.-
Follow the procedure below to access With the word “TEXT” flashing, press
the monitor’s personalisation mode: the ENTER key and the word ON or
With the machine and the monitor OFF will start flashing. Select the
switched off, press and hold the option that is flashing by using the
RESET key in the console, Fig. 3, and UP▲ and DOWN▼ keys choosing the
turn the main switch (b) to position 1 ON option allows you to change the
Fig. (A), located at the bottom front of monitor’s welcome message.
the machine.
Once the ON option has been
Fig.A. selected, press the ENTER key and a
flashing cursor will appear on the
alphanumeric screen (B). Use the
UP▲ and DOWN▼ keys to enter a
welcome message letter by letter.
Once you have finished entering the
message, press the ENTER key for a
few seconds and the word “TEXT” will
1) CHANGING LANGUAGE.- start flashing. Use the DOWN▼ key to
With the monitor on, the word pass on to the (4 Manual T) setting. If
“LANGUAGE" will appear flashing on you wish to exit the personalisation
the alphanumeric screen (B), Fig.2. mode press the STOP key.
144) MAX. EXERCISE TIME.- (A) The top LED array, which
With the word “MANUAL T" flashing, displays real-time exertion levels
press the ENTER key and a figure being produced during the selected
between 0 and 60 minutes will start program.
flashing. Select the flashing value (B) Bottom alphanumeric screen,
using the UP▲ and DOWN▼ keys which guides the user selection
and then press ENTER to confirm, the options and exercise.
word “MANUAL T” will start flashing
again, using the DOWN▼ key, pass The top screen (A) displays the
on to the (5 SPR TIME) setting. various pre-programmed exercise
profiles (programs) that we can select
5) STEADY PULSE RATE and, during exercise, current exertion
TIME.- levels.
With the word “SPR TIME" flashing, The bottom alphanumeric screen (B) is
press the ENTER key and a figure used to guide the user when selecting
between 20 and 60 seconds will start the exercise to do, as well as
flashing. Select the flashing value displaying information about the
using the UP▲ and DOWN▼ keys exercise both during and after the
and then press ENTER to confirm, the session. The LED indicators (C)
word “SPR Time” will start flashing located below the alphanumeric screen
again. give a simultaneous readout of
If you wish to exit the personalisation SPEED; TIME/DISTANCE; CALORIES
mode press the STOP key. /INCLINE; PULSE RATE and indicate
which information is being displayed
CHANGING FROM km to Miles.- throughout the exercise.
To change from km to miles press the The data that are displayed on the
ENTER key for 10 seconds, this will LEDs (C) during exercise are as
take you to the change option, follows:
displaying “KM” on screen (B). Use -SPEED: This displays the linear
the incline Λ and incline V keys to velocity at which the belt is travelling.
select the speed measure scale The value is displayed in kilometres
(METRIC / km. -- IMPERIAL / Miles) per hour (km/h).
and press the ENTER key. -TIME: This shows the time that has
elapsed since you started the exercise
ELEMENTS OF THE or, if a time limit has been established,
ELECTRONIC MONITOR (Fig 1).- the amount of time left before the
The electronic monitor is made up of exercise finishes. The time is
two distinct areas: displayed in minutes and seconds
The top area, Fig. 2 (A – B – C) for (mm:ss).
the DISPLAY -DISTANCE: This shows the distance
The bottom area, Fig. 3 (E – F – G) that you have travelled since beginning
for the KEYPAD the exercise. The distance is calculated
by using the estimated linear velocity
DISPLAY. (SPEED) and the units displayed are
This area comprises of two screens. kilometres and hectometres.
15-CALORIES: This shows the (E) - Fan keys – Off / On;
estimated number of calories that
have been burnt off up until now. This (F) - Function keys– cool down;
calculation is based on the energy pause; reset; down▼; enter; up▲;
being produced and the weight and incline Λ; incline V; stop; quick /
age values provided by the user. start; speed ; speed –. Are used to
select a particular exercise, enter
-INCLINATION: This displays the requested data, control exercise
machine’s current level of inclination. exertion levels and to finish the
The machine has 15 levels of exercise.
inclination (0 to 15). The degree of
inclination can be changed by using (G) - Numeric keys.- (1- 0) are
the incline Λ and incline V keys. At used to enter the data requested by
the end of the exercise the machine the monitor.
returns to a 0 inclination level.
-cool down.- Gradual decrease key
-PULSE: This shows the user’s heart When the speed exceeds 10 km/h,
rate, assuming that this information can pressing the key will slow the speed
be accessed through the hand-grip down by 40% over 40 seconds. When
sensors or the telemetric chest band. this time has elapsed, the speed will
When both of these are used together, drop by 40% over 40 seconds. When
priority is given to the telemetric chest this time has elapsed, the speed will
band. For more information about heart drop by 50% over 30 seconds. Once
rate refer to the section entitled: Pulse this time is up, the machine will stop.
measurement; chest band and hand- When the speed is less than10 km/h,
grip. pressing the key will slow the speed
down by 50% over 30 seconds. When
KEYPAD (Fig.3). this time has elapsed, the speed will
The function of each key is listed drop by 50% over 30 seconds. Once
below. this time is up, the machine will stop.
-reset.- Reset key. This is used to
This electronic monitor features a
erase the data that have been entered
simple easy-to-use keypad. The
into the monitor when selecting a
keypad consists of: (D) program keys;
program.
MP3 connection socket; (E) Fan; (F)
-speed –.- Key for decreasing speed.
Function keys; (G) Number keys.
When pressed during exercise this key
(D). – Program keys.- Manual; will decrease the speed of the machine
Program 2; Program 3; Program 4; by one tenth of a kilometre per hour.
Program 5; Program 6; Program 7; The speed will continue to decrease as
Program 8; User program (User); Test long as this button is being pressed.
Man program; Test Woman program; During the selection of pre-
H.R.C (Heart Rate Constant) program. programmed profiles, it is used to move
back to the previous profile screen.
Audio socket, MP3 socket.
16-speed .- Key for increasing speed. this key is pressed, provided that the
When pressed during exercise this LED on the key is flashing, exercise
key will increase the speed of the will begin in manual mode after a 3
machine by one tenth of a kilometre second countdown.
per hour. The speed will continue to
increase as long as this button is STARTING.-
being pressed. During the selection of Switching the monitor on: Plug the
pre-programmed profiles, it is used to mains cable, supplied with the
move on to the next profile screen. machine, into an electric mains
-enter.- Selection and validation key. socket, making sure that the voltage is
This is used during pre-programmed that stated for the machine and that
profile selection to select a profile, the socket is equipped with an earth
confirm data that have been entered connection Fig.B. Next, set the switch
and to start the exercise. It is also (b) to position [1]. Fig.A.
used during user profile programming Fig.A
to confirm the exertion level settings
for each minute.
-pause.- Pause key. If this is pressed
during a session, the exercise is
interrupted and the exercise
chronometer is halted. To restart the
exercise chronometer press the
pause key again or continue Fig.B
exercising. If, in pause mode, you
press the STOP key then the exercise
will be finished.
-stop.- Stop key. If this is pressed
during the session, the exercise will
finish and the belt will stop. A
summary of all the exercise data will
be displayed and it will then return to Once the monitor is on it will display
the start screen. the profile and the letter “M” for
-Incline V.- Decrease inclination key. manual on the LED array (A) Fig.2,
When pressed during exercise this and the welcome message on the
key will decrease the level of bottom alphanumeric screen (B).
inclination by one degree. Inclination By pressing the QUICK/START key
will continue to decrease as long as the machine will start in manual mode
this button is being pressed. after a 3 second countdown at a
-Incline Λ.- Increase inclination key speed of 2 km/h, by pressing the
When pressed during exercise this speed or speed – keys you can
key will increase the level of inclination increase or decrease the speed
by one degree. Inclination will settings. You can also increase or
continue to increase as long as this decrease the speed settings by using
button is being pressed. the numeric keys (G).
-quick / start.- Quick start key. When
17OPERATING The bottom alphanumeric display (B),
Fig.2, will give alternating 10 second
INSTRUCTIONS.- read-outs of the following values:
SPEED (Metric system km/h or
STARTING THE FAN. - imperial system mph); TIME;
The monitor on this machine is fitted CALORIES; PULSE RATE and the
with an air vent (D), Fig.2, through second sequence will show TIME,
which a FAN provides two air speeds, DISTANCE and INCLINE.
LOW and HIGH. To switch the fan on The program can be interrupted by
while exercising press the ON / OFF pressing the STOP key or the
key on the keypad, Fig.3, and the fan EMERGENCY button at the bottom of
will start. Whenever the monitor is the screen. When the program is
switched to PAUSE the fan will switch stopped the bottom alphanumeric
off. screen (B), Figure 2, will display the
average values for EXERCISE TIME
PROGRAM MODE.- (HH:MM:SS); DISTANCE
This program has: 1 MANUAL profile TRAVELLED (km); AVERAGE
program; 8 pre-programmed SPEED (Km/h); CALORIES
PROGRAM profiles; a user CONSUMED (kcal) during the
programmable profile (USER) as well exercise. These values will be
as a male TEST, female TEST, and a displayed twice every five seconds.
steady pulse rate (H.R.C) program.
If, during the time it takes to display
P0 MANUAL MODE.- these average values, no keys are
Once the monitor is on it will display touched and no further exercise is
the profile and the letter “M” for done and the STOP key is pressed,
manual on the LED array (A) Fig.2, the machine will go back to the
and the welcome message on the manual program.
bottom alphanumeric screen (B) Fig.2.
P2 - P8 PRESET
By pressing the QUICK / START key PROGRAMS.-
the machine will start in manual mode See pre-set program graphs at the
after a 3 second countdown. end of this manual.
With the monitor switched on, the top
The flashing top LED array (A), Fig.2, LED array (A), Fig.2, will display the
will indicate the current speed setting profile and the letter “M” for manual.
for the exercise. By pressing the The speed and speed – keys are
speed or speed – keys you can used to display the various pre-
vary the speed between twenty programmed profiles. Once a specific
different speed settings. You can also profile has been selected press the
increase or decrease the speed ENTER key.
settings by using the numeric keys (G) The top LED array (A) will ask for an
Fig.3. age value (between 10 and 99), select
your age by using the number keys
(G), Fig.3, press ENTER.
18It will now ask for your weight profiles. Once program 9 (USER) has
(between 30 and 199kg), select your been selected, press the ENTER key.
weight by using the number keys (G), The top LED array (A), Fig.2, will ask
Fig.3, press ENTER. for an age value (between 10 and 99),
It will now ask for an exercise time select your age by using the number
limit (between 10 and 60 minutes), keys (G), Fig.3, If the value entered
select the time by using the number exceeds these limits it will display the
keys (G), Fig.3, press ENTER ,will be closest acceptable value. Press
shown on the alphanumeric screen (B) ENTER.
and exercise will begin after a 3 It will now ask for your weight
second countdown at a speed of 2 (between 30 and 199 kg), select your
km/h. weight by using the number keys (G),
There are different difficulty levels Fig.3, press ENTER.
within each pre-programmed profile, to It will now ask for an exercise time
select any of these just press the limit (between 10 and 60 minutes),
speed and speed – keys during select the time by using the number
the exercise. keys (G) Fig.3, and press ENTER.
Once you have finished the exercise Now press the RESET key and you
program, the monitor will calculate the can begin to design a personalised
average values at which you did the exercise profile on the LED array (A).
exercise and display these on the The profile being designed is divided
bottom alphanumeric screen (B), into 21 steps. To select the first step
Fig.2. press RESET, the up▲ or down▼
Keys, then press ENTER and so on
The program can be interrupted by until you have completed the program
pressing the STOP key and the graph to your liking.
bottom alphanumeric screen (B), If you make a mistake when recording
Fig.2, will display the average values any step, press the RESET key and
for EXERCISE TIME; DISTANCE repeat the previous step.
TRAVELLED; AVERAGE SPEED; Next press ENTER. START
CALORIES CONSUMED during the EXERCISE will be shown on the
exercise. These values will be alphanumeric screen (B) and exercise
displayed twice every five seconds. will begin after a 3 second countdown.
If, during the time it takes to display Once you have finished the exercise
these average values, no keys are program, the monitor will calculate the
touched and the STOP key is pressed, average values at which you did the
the machine will go back to the exercise and display these on the
manual program. bottom alphanumeric screen (B), Fig.2.
The program can be interrupted by
P9 USER PROGRAM. pressing the STOP key and the
With the monitor switched on, the top bottom alphanumeric screen (B),
LED array (A), Fig.2, will display the Fig.2, will display the average values
profile and the letter “M” for manual. for EXERCISE TIME; DISTANCE
Use the speed and speed – keys to TRAVELLED; CALORIES
display the various pre-programmed CONSUMED during the exercise.
19These values will be displayed twice NOTE: In order to do the test it is
every five seconds. essential to use heart rate
If, during the time it takes to display measurement, using either the hand-
these average values, no keys are grip sensors or the chest band. It is
touched and no further exercise is advisable to do a brief warm-up
done and the STOP key is pressed, session before doing this test. This will
the machine will go back to the prevent possible injuries.
manual program. The maximum number of heartbeats
that a person should not exceed is
P10 – P11 MALE - FEMALE referred to as the maximum Herat rate
TEST PROGRAMS.- and this value drops with age. A
The aim of this test is to assess the simple formula to calculate this is to
user’s level of fitness The difference subtract your age, in years, from the
between the Male and Female number 220. The maximum Herat rate
programs is in the Watts. The value for should be kept between 65% and 85%
the Male test is set at 150 W whereas for correct exercise, it is not advisable
the Female test is set at 100 W. to go above 85%.
With the monitor switched on, the top Whenever your pulse rate exceeds
LED array (A), Fig.2, will display the 85% of the maximum heart rate value
profile and the letter “M” for manual. a flashing heart symbol will appear
The speed or speed – keys are and a 2 second beep will sound until
used to display the various pre- your pulse rate drops below 85% of
programmed profiles. Once the Male your maximum heart rate.
TEST or Female TEST has been For safety reasons it is advisable to
selected, press the ENTER key. Next, exercise at below 85% of the
the bottom alphanumeric screen (B), maximum heart rate.
Fig.2, will ask for an age value
(between 10 and 99). Select your age
using the numeric keys (G) Fig.3, and
P12 CONSTANT HEART
press ENTER. START EXERCISE will RATE PROGRAM (H R C).
be shown on the alphanumeric screen It is advisable to do a brief warm-up
(B) and exercise will begin after a 3 session before using this program.
second countdown. This will prevent possible injuries.
The top LED array (A), Fig.2, will display
a flashing heart symbol. Place your This program allows you to select a
hands on the pulse sensors (handgrip) heart rate (between 65% and 85% of
located on the handlebar or place the the maximum heart rate) and the
telemetric chest band on your chest, if machine will automatically adjust
you have one. Begin the TEST. exertion levels to ensure that the user
At the end of the 12 minute test you will maintains the selected heart rate value.
be awarded a score between 1 (very Use of heart rate measurement using
poor) and 5 (excellent). A 0 score may the telemetric chest band is obligatory
also appear, which means that either and you must not exceed 85% of your
the test or heart rate measurement maximum heart rate value.
sensor were not used correctly.
20With the monitor switched on, the top Flashing heart symbol :
LED array (A), Fig.2, will display the This symbol only appears in the test
profile and the letter “M” for manual. programs.
Use the speed or speed – keys to The maximum number of heartbeats
display the various pre-programmed that a person should not exceed is
profiles. Once the HRC program has referred to as the maximum heart rate
been selected, press the ENTER key. and this value drops with age. A
The bottom alphanumeric screen (B) simple formula to calculate this value
will ask you for the heart rate value at is to deduct your age, in years, from
which you wish to do the exercise, use the number 220. The maximum heart
the number keys (G), Fig.3, to select a rate should be kept between 65% and
value (between 25 and 250 B.P.M 85% for correct exercise, it is not
beats per minute), then press ENTER advisable to go above 85% Whenever
will be shown on the alphanumeric your pulse rate exceeds 85% of the
screen (B) and exercise will begin maximum heart rate value a flashing
after a 3 second countdown. heart symbol will appear and a 2
This program uses a preset exertion second beep will sound until your
level during the first three minutes in pulse rate drops below 85% of your
order to prevent any type of injury. maximum heart rate. For safety
The first minute starts off at a speed of reasons it is advisable to exercise at
4km/h. The second minute speeds up below 85% of the maximum heart rate.
to 4.5km/h. The third minute speeds
up to 5Km/h. From the fourth minute *0* :
onward the computer automatically This symbol appears in the male and
adjusts the exertion level to keep your female tests, it means that you have
heart rate at the specified value. not worn the chest band during the
NOTE: If the monitor fails to receive a test.
pulse rate signal during the third
minute the program will stop Spanner symbol:
automatically. Mechanical fault. Switch the machine
off for 2 minutes and then switch it
WHAT THE SYMBOLS MEAN back on again. The machine has an
automatic fault correction system,
A series of symbols or words may nevertheless if the problem persists
appear on the screen, meaning the get in touch with your technical service
following: centre.
Heart symbol and a question mark:
The chest band has not been fitted or BH RESERVES THE RIGHT TO
is fitted incorrectly. MODIFY THE SPECIFICATIONS OF
ITS PRODUCTS WITHOUT PRIOR
NOTICE.
21FAULT FINDING CHART
PROBLEM CHECKS SOLUTIONS
1. The monitor does 1)Make sure that the machine is plugged 1) Plug the machine into the
not switch on. in, the ON/OFF switch in position I mains supply.
and that the safety key is inserted. Set the switch to position I
and insert the safety key.
2. The monitor 2) Check that the current limiter is 2)Switch the machine off and
switches on but pressed in. press the circuit breaker
the motor fails to in. Lubricate the treadmill
start. band.
3. Walking motion is 3.a) Check that the belt is lubricated. 3.a) Lubricate the sliding belt.
jerky on the 3.b) Check the tension on the sliding 3.b) Adjust the belt tension.
treadmill belt. 3.c) Adjust the drive belt
3.c) Check the tension on the drive belt. tension.
4. The machine 4) Check that the band is lubricated 4)Reset the overload button
stops (the breaker with the On/Off switch at
trips) “0” and lubricate the
treadmill band.
5. Electrical shocks 5) Check that the machine is plugged 5) Plug the machine into an
through the into an earthed mains socket. earthed mains socket.
handrail.
6. The treadmill belt 6.a) Check that the machine is level on 6) Use the adjustable feet to
skews off centre the floor level the machine.
6.b) Check that the machine does not
wobble.
ERROR CODES
Monitor screen displays E1 - Speed sensor fault.
Monitor screen displays E6-E7 - Elevation fault
Do not hesitate to get touch with the Technical Assistance Service if you have any
queries by phoning customer services (see last page in manual)
22Français
REMARQUES GÉNÉRALES.- 1) MODIFICATION DE LA LANGUE.-
Ce moniteur électronique a été conçu Quand le moniteur sera allumé, le mot
pour être utilisé d’une façon simple et «LANGUAGE» s’affichera à l’écran
intuitive. Les textes qui s’afficheront alphanumérique (B) Fig.2. Quand le mot
sur l’écran inférieur (B) guideront «LANGUAGE» clignotera, appuyez sur
l’utilisateur pendant la réalisation de la touche ENTER et la langue
l’exercice. clignotera, sélectionnez la langue de
Cependant, nous recommandons au travail avec les touches UP▲ et
préparateur physique de lire très DOWN▼, appuyez sur ENTER et le
attentivement ce chapitre afin de mot “LANGUAGE” clignotera à
disposer de toutes les informations nouveau, avec la touche DOWN▼,
relatives au moniteur électronique et passez au point (2 SOUNDS).
de montrer ensuite à l’utilisateur la
bonne façon de l’utiliser. 2) CHANGEMENT DU SON.-
Avec le mot SOUNDS en train de
NOTE: Le moniteur passe au mode clignoter, appuyez sur la touche
repos si pendant 4 minutes aucune ENTER et le mot ON ou OFF
touche n’est enfoncée. En appuyant clignotera, avec les touches UP▲ et
sur la touche STOP, le moniteur DOWN▼ vous pourrez modifier
passe au mode préparé (READY). l’option qui est en train de clignoter,
ensuite appuyez sur la touche ENTER
PERSONNALISATION DU pour confirmer et le mot SOUNDS
clignotera. Avec la touche DOWN▼
MONITEUR ÉLECTRONIQUE.- passez au point (3 TEXT).
Pour entrer dans le mode de
personnalisation du moniteur, faire 3) MODIFICATION FORMULE DE
comme indiqué ci-après: BIENVENUE.-
Avec la machine et le moniteur Avec le mot TEXT qui clignote, appuyez
éteints, appuyez sur la touche RESET sur ENTER et le mot ON ou OFF
sur le moniteur, Fig. 3, et sans lâchez clignotera, avec les touches UP▲ et
la touche, placez le bouton (b) DOWN▼ sélectionnez l’option qui
d’alimentation du courant sur la clignote à l’écran Si vous sélectionnez le
position 1 Fig.A. placé en-bas de la mot ON vous pourrez modifier le
partie avant de la machine. message de bienvenue du moniteur.
Après avoir choisi l’option ON,
Fig.A appuyez sur ENTER et un curseur
clignotera sur l’écran alphanumérique
(B). Avec les touches UP▲ et
DOWN▼, sélectionnez lettre par
lettre, le message de bienvenue.
Ensuite, appuyez quelques secondes
sur la touche ENTER et le mot Text
clignotera.
23Avec la touche DOWN▼ passer au ÉLÉMENTS DU MONITEUR
point (4 MANUAL T). Pour quitter le ÉLECTRONIQUE (Fig.1).-
mode personnalisation, appuyez sur la Le moniteur électronique comprend
touche STOP. deux zones bien différenciées:
La zone supérieure Fig.2 (A – B –
4) TEMPS MAXIMUM de C) ou se trouve l’AFFICHAGE.
l’EXERCICE.- La zone inférieure Fig.3
Avec le mot MANUAL T. en train de (E – F – G) où se trouve le CLAVIER.
clignoter, appuyez sur ENTER et un AFFICHAGE.-
chiffre de 0 à 60 minutes clignotera. Cette partie comprend deux écrans:
Avec les touches UP▲ et DOWN▼ (A) Display Général des LED
sélectionnez l’option qui clignote. supérieur sur lequel est affiché le
Après avoir sélectionné l’option, niveau d’effort réalisé du programme
appuyez sur ENTER pour confirmer. sélectionné à chaque moment.
Le mot MANUEL T. clignotera. Avec la (B) Display d’écran alphanumérique
touche DOWN▼ passez au point inférieur qui guide l’utilisateur durant la
(SPR TIME). sélection de l’exercice.
5) TEMPS DE RÉSISTANCE DANS L’écran supérieur (A) affichera les
LE PROGRAMME H.R.C. différents profils pré-programmés
Avec le mot SPR TIME en train de d’effort (programmes) qu’il est
clignoter, appuyez sur ENTER et un possible de sélectionner et durant
chiffre de 20 à 60 secondes l’exercice, il affichera l’effort fourni à
clignotera. Avec les touches UP▲ et chaque instant.
DOWN▼ sélectionnez l’option qui L’écran alphanumérique inférieur (B)
clignote. Après avoir sélectionné est chargé de guider l’utilisateur
l’option, appuyez sur ENTER pour pendant la sélection de l’exercice à
confirmer. réaliser et d’afficher les informations
Pour quitter le mode personnalisation, relatives à l’exercice avant et après la
appuyez sur la touche STOP. réalisation de celui-ci.Les LED
indicatrices (C) placées sous l’écran
PASSER des km aux milles. alphanumérique montrent
Pour passer des km aux milles, simultanément la VITESSE, le TEMPS/
appuyer sur la touche ENTER la DISTANCE; les CALORIES/
pendant 10 secondes et vous INCLINE; le POULS et indiquent
accéderez ainsi à la modification, qu’elle est l’information qui est affichée
l’écran (B) affichera “KM”, au moment de l’exercice.
sélectionnez la moyenne de la vitesse Les informations montrées par les
avec les touches incline Λ et incline V LED (C) durant la réalisation de
(METRIC / km. - ENGLISH / Millas) l’exercice sont:
appuyer sur la touche ENTER. - SPEED - VITESSE: Affichage d’une
valeur estimative de la vitesse linéaire
de déplacement du tapis de la
machine. La valeur est affichée en
kilomètres/heure (km/h).
24- TIME – TEMPS: Pendant l’exercice, CLAVIER (Fig.3).
le programme montre le temps qui La fonction assignée à chaque touche
s’est écoulé depuis le début de est indiquée ci-après.
l’exercice ou si l’utilisateur a Ce moniteur électronique dispose d’un
sélectionné un temps d’exercice pré- clavier facile et simple à utiliser. Ce
défini, le temps qu’il reste pour le clavier comprend: (D) Touches des
terminer. Le temps est affiché en programmes, Connexion pour le MP3,
minutes et en secondes (mm:ss). (E) Ventilateur (F), touches de
-DISTANCE – DISTANCE: Affichage fonction (G), Touches numériques.
de la distance parcourue depuis le (D).- Touches des programmes-
démarrage de l’exercice. La distance Manuel, Programme 2, Programme 3,
est calculée en tenant compte de Programme 4, Programme 5,
l’estimation de la vitesse linéaire Programme 6, Programme 7,
(SPEED) et les unités sont les Programme 8, Programme Utilisateur
kilomètres et les hectomètres. (User), Programme Test Man
-CALORIES – CALORIES: Le (Homme), Programme Test woman
programme affiche une estimation des (Femme), Programme H.R.C
calories brûlées jusqu’à présent. (Fréquence cardiaque constante).
L’estimation s’effectue en tenant
compte de l’énergie produite à chaque Fiche d’audio, connexion MP3.
instant et des paramètres poids et âge
introduits par l’utilisateur. (E) - Touches Fan / Ventilateur.
INCLINATION – INCLINAISON: Off / On (marche et arrêt).
Affichage du niveau d’inclinaison de la (F) - Les touches de fonction.-
machine à tout instant. La machine cool down; reset; down ▼; up ▲;
dispose de 15 niveaux d’inclinaison (0 enter; pause; stop; incline Λ;
à 15). Le degré d’inclinaison peut être incline V; quick / start; speed ;
modifié par l’intermédiaire des touches speed –. Ces touches s’utilisent pour
incline V et incline Λ. À la fin de sélectionner l’exercice à réaliser, pour
l’exercice, la machine revient sur le introduire les données demandées,
niveau d’inclinaison 0. pour contrôler le niveau de résistance
-PULSE - POULS: Affichage de la de l’exercice et pour le terminer.
fréquence cardiaque de l’utilisateur à (G) - Les touches numériques.-
condition que cette information soit (1- 0) s’utilisent pour introduire les
accessible à travers les senseurs de données demandées par le moniteur.
main (Hand– Grip ) ou de la sangle -cool down.- Touche progressive de
télémétrique de poitrine. Quand les
ralentissement. Quand la vitesse
deux éléments sont utilisés ensemble
dépassera 10km/h, en appuyant sur
il est donné priorité à la sangle
cette touche, celle-ci diminuera de
télémétrique de poitrine. Pour toute
40% avec un temps en diminution de
information concernant la fréquence
40 secondes. À écoulement du temps,
cardiaque, voir le chapitre: Mesure du
la vitesse diminuera de 40 % pendant
pouls, sangle de poitrine et hand-grip.
40 secondes en diminution.
25También puede leer